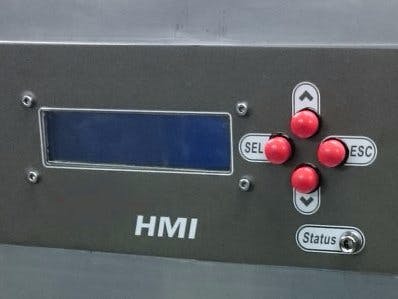
It is a very common application to feature 4 or 5 user buttons and a screen to fully configure a machine or device through a user interface, with a series of different screens.
For instance here is the user interface for the Replicator 2 3D printer.
In this Example I will show a very practical way to make this work. My example will use 4 buttons and a 2 color LED (red, green).
Escape, Enter, Up and Down.- *This project features an I2C LCD explained here
- and the emEEMPROM explained here
If you haven't seen them please check them out to understand how they work.
LEDs colorsFor the dual color LED I will use the Precise illumination Signal Modulation block, this block provides modulation technology that significantly reduces low-frequency flicker and radiated electromagnetic interference (EMI), which are common problems with high brightness LED designs. The PrISM is also useful in other applications that need this benefit, such as motor controls and power supplies.*Taken from component datasheet.
#define Green() {PrISM_WritePulse0(0x0u);  PrISM_WritePulse1(0x00u);}
#define Red()   {PrISM_WritePulse0(0xFFu); PrISM_WritePulse1(0xFFu);}
#define Yellow(){PrISM_WritePulse0(0xFFu); PrISM_WritePulse1(0x00u);}
#define NOC()   {PrISM_WritePulse0(0x0u);  PrISM_WritePulse1(0xFFu); }
For an easier and cleaner usage of the I2C LCD I defined the clear function.
Each button is wired to a toggle flip-flop, this is enables the program to read multiple button pushes when the button is pressed continuously or for a long period. (This makes the user interface more friendly) the XOR gate outputs only when the buttons are pressed and the flipflop outputs a low, the buttons are wired to.
Then each button signal is debounced to remove any false or repeated signals because of the switching transition.
Each signal is ran to an interrupt, on the program we define each interrupt sequence with a number.
//BUTTONS
CY_ISR(ENTER){whichkey=1;}//ok
CY_ISR(ESC)  {whichkey=2;}//ok
CY_ISR(UP)   {whichkey=3;}//ok
CY_ISR(DWN)  {whichkey=4;}//ok
Inside the Init routine the interrupts are started.
upISR_StartEx(UP);
dwnISR_StartEx(DWN);
escISR_StartEx(ESC);
entrISR_StartEx(ENTER);
Now we must define the Menu() function this function contains each screen that the will be used. each screen will be addressed with the variable menuoffset, number 9 is a confirmation screen after pressing ESC this screen is shown and waits for the user to press enter to proceed.
These are just LCD commands print numbers and strings...
void Menu(void){
  switch(menuoffset){
     case 1:{
         LCD_Position(0u,4u); LCD_PrintString("Welcome");
         LCD_Position(1u,0u); LCD_PrintString("press enter . . .");
         break;}//MainScreen
     case 2:{
         LCD_Position(0u,0u); LCD_PrintString("RUN:");
         LCD_Position(0u,14u);LCD_PrintString("m/s");
         LCD_Position(1u,14u);LCD_PrintString("m/s");
         break;}//RunScreen
     case 3:{
         LCD_Position(0u,0u); LCD_PrintString("Config. Speed A:");
         LCD_Position(1u,14u);LCD_PrintString("m/s");
         LCD_Position(1u,9u); LCD_PrintNumber(SPspeedA);
         break;}//Set SPEEDA
     case 4:{
         LCD_Position(0,0); LCD_PrintString("Config. Speed A:");
         LCD_Position(1,14);LCD_PrintString("m/s");
     	LCD_Position(1,9); LCD_PrintNumber(SPspeedB);
         break;}//Set SPEEDB
     case 5:{
         LCD_Position(0,0); LCD_PrintString("time:");
     	LCD_Position(1,14);LCD_PrintString("s");
         LCD_Position(1,10);LCD_PrintNumber(time);
     break;}//Set TIME
     case 6:{
         LCD_Position(0,15);LCD_PrintString("TESTING...");
         LCD_Position(1,9); LCD_PrintNumber(angleA);
         LCD_Position(1,9); LCD_PrintNumber(angleB);
     break;}//Testing
     case 9:{
         LCD_Position(0,0);LCD_PrintString("Sure want to Exit?:");
         LCD_Position(1,0);LCD_PrintString("Press Enter");
         break;}//Confirmar
 }
}
Now the actual screen and button operation is placed on the main function, inside the infinite loop for(;;){}. So working with the whichkey variable (each button interrupt assigns a value to it) a switch loop is run:
switch(whichkey) {
  case 0:{//no pressed key
In case no key is pressed whichkey should remain with a value of 0.
Now I have two cases the machine is running and I must update the sensor values (SPspeed A & B), and I am configuring the parameters and I want the data to blink to help the user know it is being changed.
      if((run==1)&&(menuoffset==2)){ //RUN
          CyDelay(175);
          LCD_Position(0u,10u);LCD_PrintString("    "); //clear the previous data
          LCD_Position(0u,10u);LCD_PrintNumber(SPspeedA);//update
          LCD_Position(1u,10u);LCD_PrintString("    ");//clear the previous data
          LCD_Position(1u,10u);LCD_PrintNumber(SPspeedB);
      }
      if((set>0)&&(set<4)){//Parameter Change
      LCD_Position(1,9);LCD_PrintString("    ");Menu();CyDelay(50);Yellow();
      //blink the data that is being set
      }
  break; }//No key
In case the ENTER key was pressed, depending on the current screen menuoffset will have a different value, for instance in case 9 (confirmation screen) after the confirmation prompt was answered with an enter the corresponding commands will be run for example a stop routine to halt a process or so.
case 1:{ //Enter
   switch(menuoffset){
       case 2:{
           mode=1;run=1;Yellow();
           upISR_Disable();dwnISR_Disable();
           clr();Menu();CyDelay(600);break;}
       case 3:{set=1;Yellow();CyDelay(300);break;}//set SpeedA
       case 4:{set=2;Yellow();CyDelay(300);break;}//set SpeedB
       case 5:{set=3;Yellow();CyDelay(300);break;}//set Time
       case 6:{upISR_Disable();dwnISR_Disable();break;}//test
       case 9: {//confirm menu
           if(conf==1){
               mode=0;run=0;menuoffset=2;rundisable();
               conf=0;upISR_Enable();dwnISR_Enable();
               NOC();clr();Menu();CyDelay(400);}break;}
   clr();Menu();
   whichkey=0;
   break;}//Enter
In case the ESC key was pressed the commands will be the same in the case we are at screens 3 to 5 so I grouped them on a single case.
case 2:{
   switch(menuoffset){
       case 2:{if(run==1){CyDelay(400);menuoffset=9;conf=1;clr();}}break;
       case 3 ... 5:{
           if((set>0)&&(set<4)){set=0;Storeparam();NOC();}
           if(menuoffset==5){set=0;Storeparam();NOC();}break; }
       case 6:{test=0;CyDelay(50);}break;
       case 9:{if(conf==1){CyDelay(300);menuoffset=2;clr();conf=0;}}break;
   }
   Menu();
   whichkey=0;
   break;}//ESC
In case the Up and Down keys are pressed the commands would be very similar so I will explain them both at once depending on the current screen the screen can be switched to the next or previous consider that the first screen is 1, the only way to get past that screen is by pressing the up key, and then you can't get back to it.
case 3:{ //up/
   if((run==0)&&(test==0)){
       if((set>0)&&(set<4)){
           switch(set){
               case 1:{SPspeedA++; break;}//SpeedA+
               case 2:{SPspeedB++; break;}//SpeedB+
               case 3:{time++;     break;}//Time+
           }
       }
       Green();CyDelay(75);NOC();CyDelay(25);clr();
   }else if(menuoffset<7){
       menuoffset++;CyDelay(300);clr();}
       Menu();
       whichkey=0;
       break;}//UP
case 4:{//down
   if((run==0)&&(test==0)){
       if((set>0)&&(set<4)){
           switch(set){
               case 1:SPspeedA--;  break;//SpeedA-
               case 2:SPspeedB--;  break;//SpeedB-
               case 3:{time--;     break;}//Time-
           }
           Green();CyDelay(75);NOC();CyDelay(25);clr();
    }
    else if ((menuoffset>2)&&(menuoffset<7)){
       menuoffset--;CyDelay(500);clr();}
       Menu();
   }
   CyDelay(50);
   whichkey=0;
   break;}//Down
}
Below I am showing an example menu I used on a project it shows how to move past screens, and what can be done on each screen, and what each led color means on each case.


Comments
Please log in or sign up to comment.