


Starting from Scratch…Again
For some time now I’ve struggled with the notion of document vs. create. It’s easy for me to start a project and get lost in the process of “doing” that by the time I think of documenting an idea it’s too late. Each project carries a sense of excitement, an adrenaline rush if you will and it expires upon being completed. I get so fixated on seeing the end result that stopping to document or for any reason at that seems illogical. The thought of going back to an old project, simply so I can document it seems dreadful, especially when there’s an overabundance of shiny new projects awaiting on YouTube, GitHub, and Instructables. There’s also the constant overthinking on how to approach this task adequately, whether or not the project is worthy of publication, the list goes on. I am genuinely passionate about what I do(anything D.I.Y.) and want to transcribe that when showcasing a project. I’m starting to get sidetracked here but i’ll end this extensive intro with an equally extensive quote. 😅
Ok so this is a bad transition but bare with me. I plan to be more organized with my posts (separating personal thoughts form the actual projects). Sometimes you just have to START!
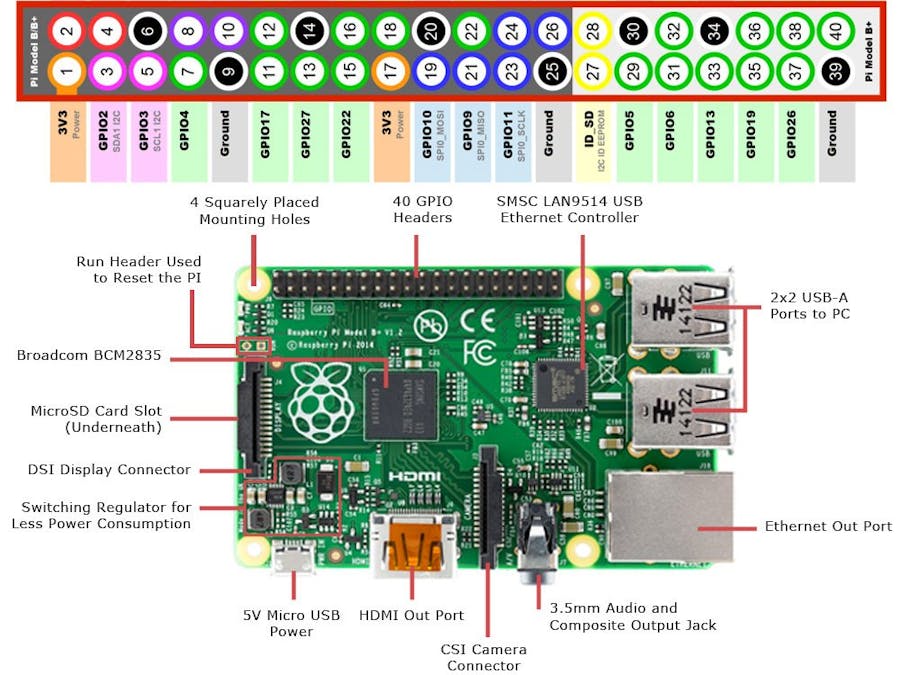
Raspberry Pi 3, not your average pie 🥧Home to endless possibilities, this $35 single board computer can handle everyday tasks a desktop/laptop can but what sets it apart is its GPIO pins, 40! to be exact. This along with its small form factor(~2x3.5x0.5in) allow it to break the digital barrier and interact with the real world(more on this later). So what exactly are GPIO(general purpose input/output) pins?, these pins can be programmed to connect/control anything from a servo motor to elaborate sensors. Okay so you might be thinking so what?, but in todays world these features are the foundation to creating innovative technology. Examples range from fitness/health wearables, smart home automation such as Amazon’s Alexa or Philips overpriced color changing lightbulbs to complex 3D printers and laser cutters. This concoction of technologies has a term, Internet of Things, better known as IoT but that deserves an entire post of its own! so ill leave it at that.
The Raspberry Pi supports various OS’s(operating system), from Linux based versions, dedicated digital media centers, it even supports its own version of Windows 10. I will be installing the official supported OS, Raspbian Stretch, since this is intended to be a general purpose setup.
Step 2: Going headless!?Most installation guides call for a monitor+hdmi cable, usb keyboard and mouse in order to access the Pi’s GUI(graphical user interface). In the spirit of D.I.Y. were going to do the installation without it! this is known as a headless setup. Here is what you’ll need
- Raspberry Pi 3 ~$35
- MicroSD card 16GB with SD Card adapter ~$9 (8GB is plentiful but this 16GB+Adapter was cheaper!)
- Micro-USB cable a.k.a. android charger (to power the Pi)
- A computer with an SD card reader/internet access(obviously)
- A fresh download of Raspbian Strech OS
- D.I.Y. Spirit ~$0 Priceless
1. We will begin by loading the downloaded Raspbian Stretch OS image onto the micro SD card. This can be easily accomplished using Etcher, a free tool for writing “images to SD cards & USB drives, safely and easily”.
2. After downloading and installing Etcher, open the application and insert the microSD card with adapter to your computer. Drag and drop the image on to the Select Image button, select your microSD card, and hit Flash. Perfect timing to grab a snack!
3. After the application is done flashing and validating the image, you’ll have a bootable Raspbian Stretch OS microSD card. If necessary take out and re-insert the microSD card, it should now be labeled boot.
Step 3: The Secret Sauce 🤫In order to make this a headless setup, we’ll need to add two files to the boot microSD card. The first one will enable SSH(Secure Shell), this is turned off by default in Raspbian Stretch OS. SSH is a network protocol used to establish a secure encrypted connection between a client(your computer) and a server(Pi) over a public network. The second file will allow your Pi to connect to your home network on bootup.
1. Create an empty text file, name it ssh and save it to your boot microSD card. Download hereCreate a file named wpa_supplicant.conf and paste the lines of code below. Download here
2. Replace “Your Wifi Name”/”Your Wifi Password” with your own WiFi credentials, keep the quotation marks.
3. After editing the code to your WiFi credentials, save the file to the boot microSD card as well.
4. Now the boot microSD card is ready for a headless setup, no extra components required! Simply insert the microSD card in the Raspberry Pi and power it up using the micro USB cable. The Pi will now load the OS and connect to your WiFi network automatically.
Step 4: Accessing the Raspberry Pi Raspbian Stretch OS via command lineRemember that boring line about SSH I mentioned earlier, well now that your Pi is connected to your WiFi( a public network) and SSH is enabled we can access it! Your computer(the client) can access the Pi(the server) using the command prompt/terminal. Heres how
1. The same way a GPS requires a physical address to give you a route, we need the Pi’s IP address in order to access it. Any IP scanner tool will get the job done, ill be using Angry IP Scanner.
2. After installing the application open it and simply click the Start button.
3. After finding your Pi’s IP address open the terminal and copy/paste the following line ssh@<your_Pi's_IP_address> Then hit enter, you'll be prompted to enter a password, which by default is set to raspberry.
4. We are now within the Raspberry Pi Raspbian OS command line, Houston we have a connection!!! But we aren’t done just yet
5 Copy/paste the following line sudo raspi-config, this will allow us to access the software configuration tool and enable the VNC(virtual network computing) server. “VNC is a graphical desktop sharing system that allows you to remotely control the desktop interface” Basically you get to see an actual GUI instead of the boring command line via remote access.
6. Using your arrow keys scroll down and select option 5 Interface Options. In the following window select P3 VNC. You will be prompted to enable VNC, select Yes and hit enter. After a confirmation window you’ll be redirected to the initial window, select Finish to return to the terminal.
So right about now(or throughout out the whole process 😅) your probably thinking, so what the hell did I just do? and why? Aside from following the instructions we haven’t seen any real visual representation of what we’ve accomplished…yet.
1. In order to view/access the GUI we will need to download VNC viewer the counter part to VNC server(what we just enabled on the Pi). Once installed open the application and enter your Raspberry Pi’s IP address, which we acquired in the last step, into the address bar.
2. You’ll be prompted to enter a username/password, these are by default setup to pi/raspberry respectively. Click Ok to continue
3. WE ARE NOW VIEWING THE RASPBERRY PI RASPBIAN STRETCH OS GUI
While it may seem that a lot was done, we are barely scratching the surface. Now that we have a Raspberry Pi up and running with an OS and internet connection the possibilities, as stated before, are ENDLESS. In the posts to come I will guide through installing Amazon’s very own Alexa’s Voice Service, get a basic home automation service running and attempt to replicate Philips hue lightbulbs at a fraction of the cost!!!
Don’t Let The Fear of Failure Trump The Excitement of Victory
This post was fueled by Tea/Coffee & Russ/Drake(a lil bit of miggos was in the mix) on repeat and most importantly ambition. Thank You for reading, Sincerely Julio C Gonzalez. 02/05/18 12:59AM
If you have any questions/suggestions/find a typo(most likely will) please drop a comment below!

Comments
Please log in or sign up to comment.