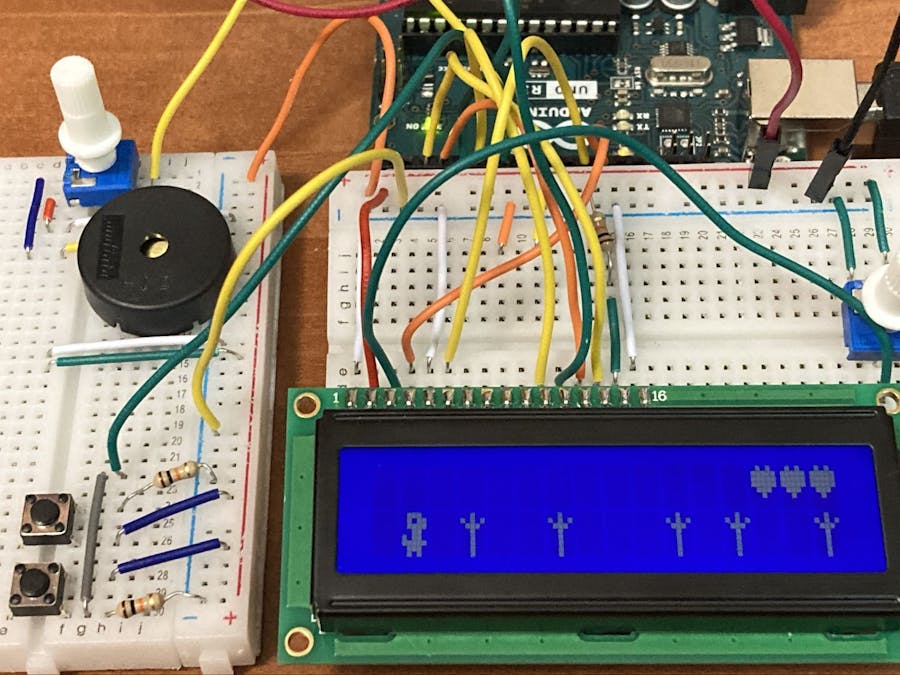
When we received the Arduino Starter Kit at home, my 12 years old son saw the LCDS screen. He asked: “Can we do video game on this screen ? “. I said: just very basic one. He wanted to do a game where a dinosaur jumping over obstacles. I said “Cool, let’s go for the Hard Dino Game. As he was motivated, we make the encoding together and these were his first encoding lessons.
Just push a button to make the dinosaur jump over the obstacles. There is a buzzer to make funny sound like in the old video game, a potentiometer to setthe sound level and one to set the screen light. There are 3 live for each game.
There is not much to connect, except the screen, the coding is little bit longer.
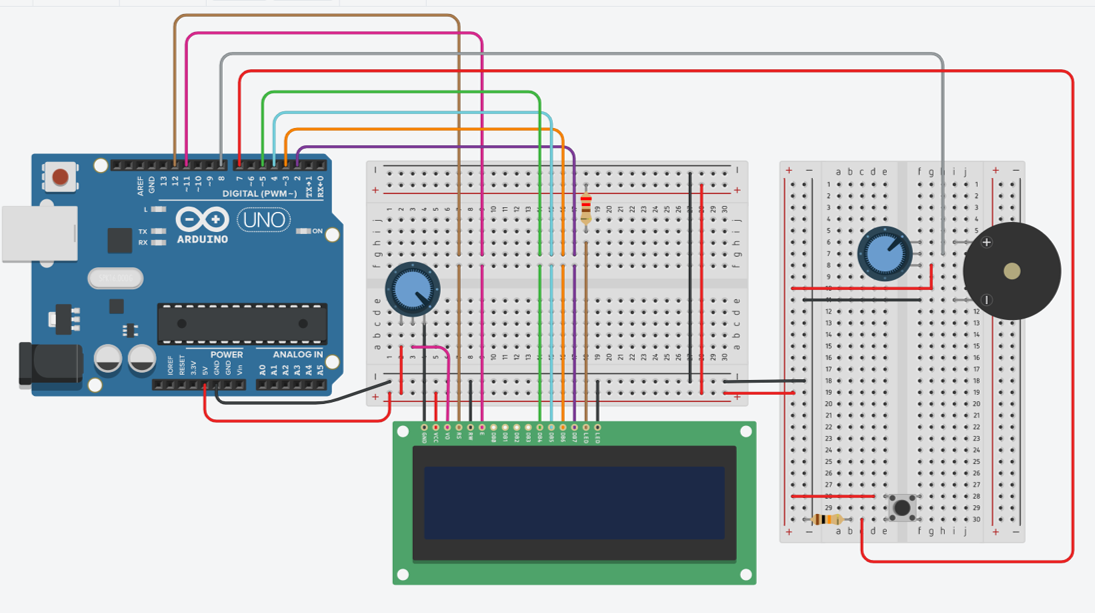
There is a sketch for the cabling. But the Arduino project book can also help. The push button is connected as lesson 2 of the Arduino project book. The screen is connected as in lesson 11. The buzzer is connected as Lesson 6, but with an additional potentiometer to set the sound level.
Characteristic of thegame
Just push a button to make the dinosaur jump over the obstacles. There are 3 lives for each game. There is a buzzer to make funny sound like in the old video game, a potentiometer to set the sound level and one to set the screen light.
During the game, the speed of the obstacles increases every 20 seconds and the distance between each obstacle reduces. This makes the game more and more difficult.
The score and the best score are displayed at the end of the game
At each collision the number of live is displayed and the buzzer make a disappointment sound.
CablingThere is a sketch for the cabling. But the Arduino project book can also help. The push button is connected as lesson 2 of the Arduino project book. The screen is connected as in lesson 11. Buzzer is connected as lesson 6, but withan additional potentiometer10k Ohms to set the sound level.
All the parts are the standard one from the Arduino Starter Kit.
Explanation on the codeThe standard Arduino loop void loop() make the game restart after each“game over”. There is another loop inside with a while to keep planning as long as the game is not over. When a life is lost, it’s just a break in the game to reduce the number of life (it’s not a loop).
Inside this while loop, each parameter of the game is checked one by one in the following order.
1- Manage and display obstacles
2- Check if button is push down, start a jump if it is the case and start the jump timer
3- Check if the jump timer is over to end the jump
4- Write the dino character on the line defined above
5- Check if player release the button.This is to avoid the player to cheat by keeping the button push down for a longtime to jump over several obstacle.
6- Check if there is one collision on top or lower line
7- Check if is it time to increase the speed of the game
The speed of the game is controlled by the variable “Fix“. Fix is the duration in millisecond when obstacles are frozen, they do not move during this time. 0.5 second at the beginning of game.
The distance between 2obstacles is set with the function: random(3, 8). So the next distance between 2obstacles will be between 3 and 8 characters at the beginning of the game. It’s store in EspaceAl. Each time the obstacles move to the left, Espace increase by one. When Espace = EspaceAl a new obstacle is added on the right, column 15.Then a second random function decide if the obstacle is put on the top or lowerline. I wanted mor obstacle on the lower line, so the instruction is ‘if(random(1, 10) >2)’
The obstacles are stored in a 2 x 16 table. This is because there is no LCD screen function to check what there is on the screen.
When all the obstacles are defined, they are print on the screen using the 2 “For” loop with the variable II and LL. II for the 15 columns, LL for the 2 lines.
There is a check “if (II!= ColBonh )” to avoid erasing the dino when we want to erase an obstacle.
When the button is pushed and when the dino is on the bottom line, then the dino jump and the jump timer start. And the dino line become 1. We erase the dino on the lowerline by writing a space.
We do the opposite at the end of the jump when the timer is over 3 time the fix time. This number 3 is the number of characters the dino jump, the length of one jump. It must be synchronized with the speed of the game.
To check if there is a collision, 2 things are checked:
- Is there an obstacle on column 1, lower line and is the dino on line 0
- Is there an obstacle on column 1, upper line and is the dino on line 1
If one of the 2 is true, then we reduce the number of life, display the heart and play the sound.
How to control the game? To increase the difficulties of the game you can do several thing :
- Increase the speed at the start of the game by reducing the variable fix (500 in this code).
- Increase more the speed each time. In the code the time is reduce by 30 milliseconds, this 30 can be increase.
- Increase the speed more often, this is done by reducing variable ‘InterAugVitess’ (20 000 in the code)
- Reduce the distance between 2obstacles by reducing the 8 in the instruction random(3, 8).
The score is just the duration of the game with the millis function, but it could also be the number of obstacles crossed.


_ztBMuBhMHo.jpg?auto=compress%2Cformat&w=48&h=48&fit=fill&bg=ffffff)


Comments
Please log in or sign up to comment.