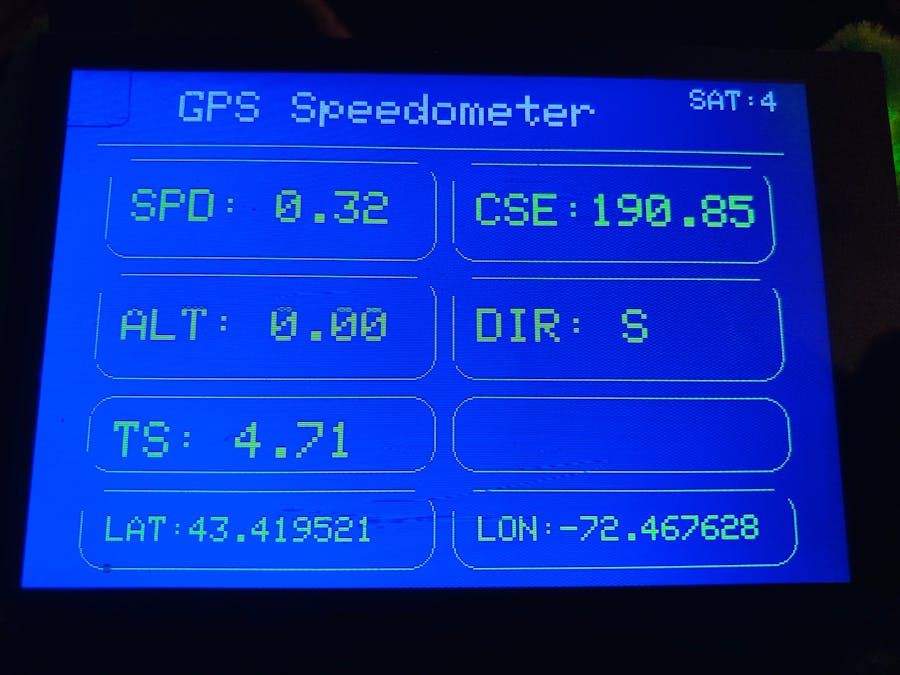
Hello! I have been wanting to build a GPS speedometer for as long as I can remember, and I have finally done it! I have made a project that displays speed, course, altitude, direction, top speed, average speed, latitude, and longitude.
DFRobotDFRobot has sponsored most of the parts for this project! They have an almost unlimited amount of electronic components, and parts, for every project you can imagine!
Parts- DFRobot Bluno
- DFRobot GPS with Case
- DFRobot 3.5” TFT Screen
- DFRobot Solar Charge Controller
- 2x 6V 250mA Solar Panels (or any other solar panels)
- 3.7V 3,000mA Lithium Ion Battery (or any size)
- Waterproof Case
I have had many issues with this project because I did not realize the Arduino Uno memory limitations. I have a successful working version though with everything I intended! In the future I plan on reusing this project to turn into a ship's speedometer for my small sailing dinghy.
Step 1; Setup the SolarFind a suitable solar panel, battery and a case to put the solar controller inside. Attach the battery to the solar controller. Wire the solar panel as shown below:
You will need to make two holes in the enclosure; 1 for the solar panel, and 1 for the USB output port.
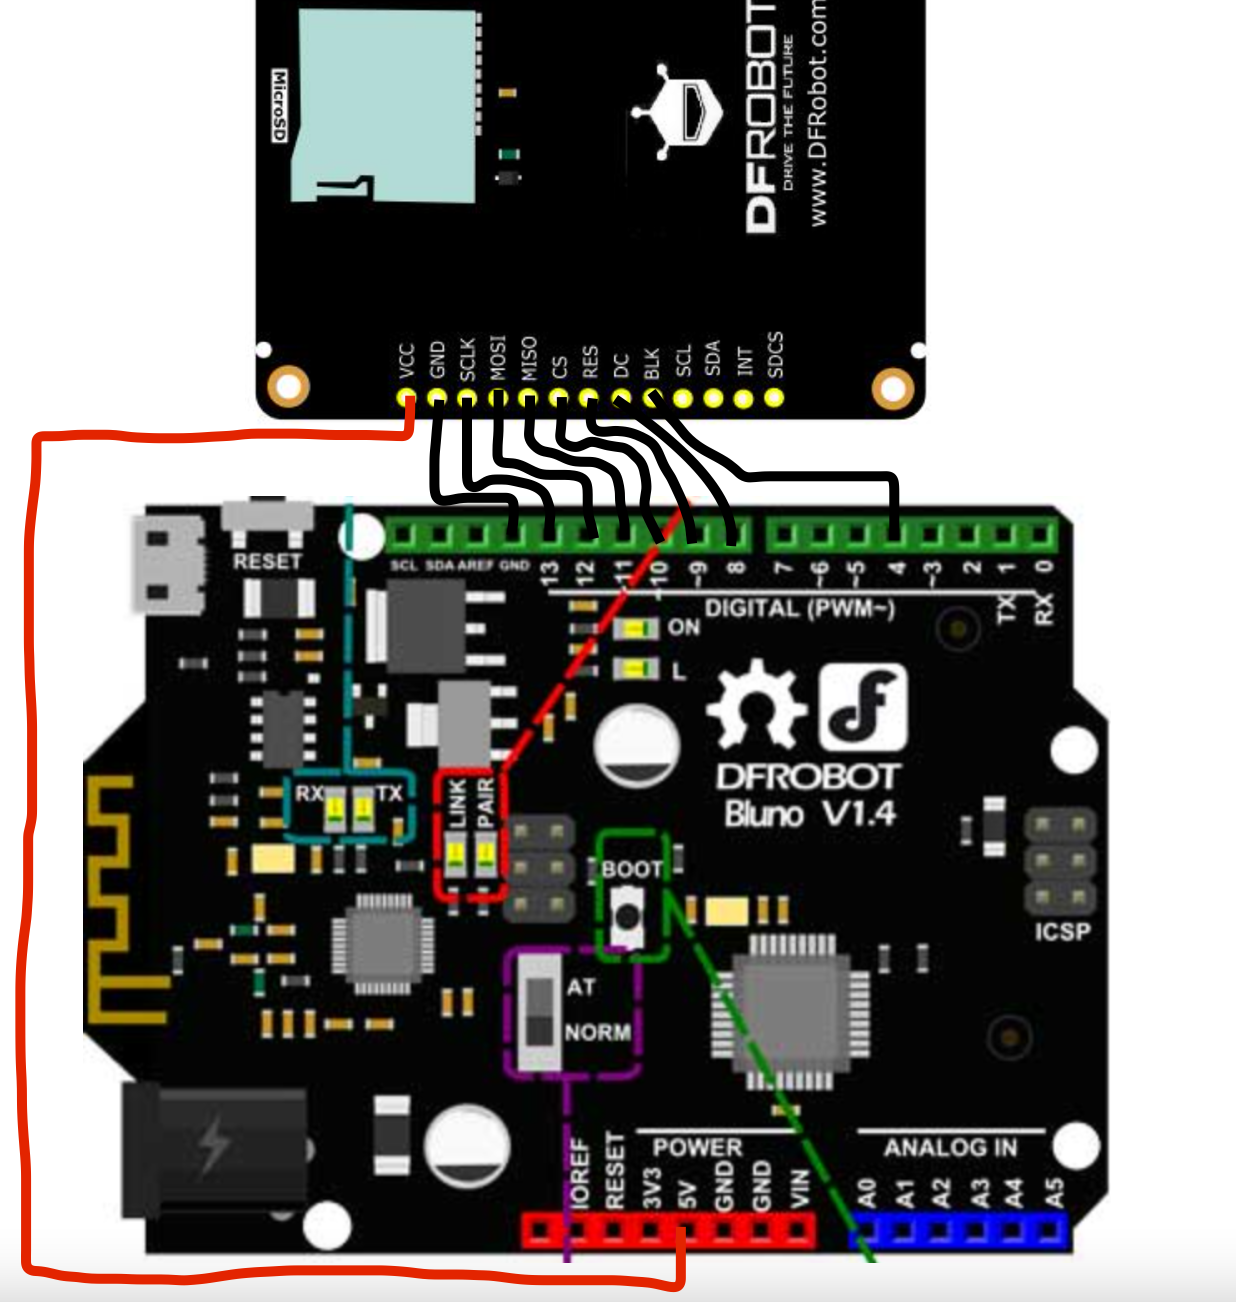
Step 2; Wiring the display and the BlunoThe wiring from the 3.5" display to the Bluno is shown below:
Connections:
Display Bluno
VCC +5V
GND GND
SCK D13
MOSI D11
MISO D12
CS D10
RES D9
DC D8
BLK D4
I redid all of my wiring by soldering them all afterwards, because I found the connections unreliable from shaking (shown below).
When I redid the wiring, I accidentally switched the MISO and MOSI lines so spent the next week trying to find the cause of my not working speedometer! So, just in case your project isn't working, recheck and well... recheck again to make sure its not bad wiring 😉.
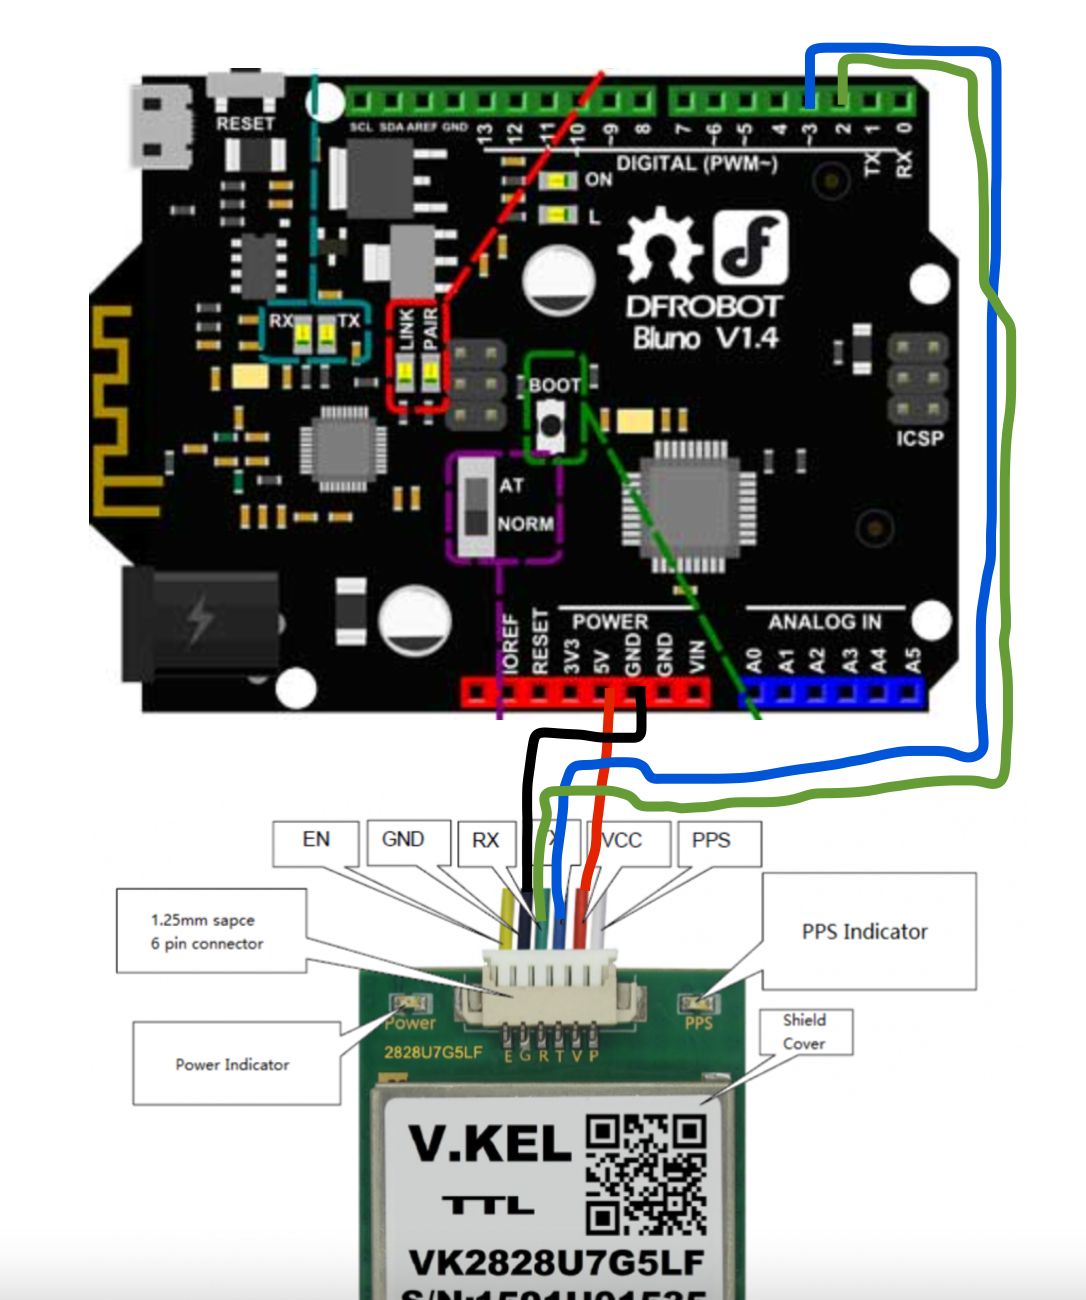
Step 3; Wiring the GPS to the BlunoThe DFRobot GPS module has 6 wires of which we will be using 4. The wiring is show below:
Connections:
GPS Bluno
VCC +5V
GND GND
TX D3
RX D2
The GPS wires are unleaded, so they will either need to be soldered to pin headers, or soldered directly to the Bluno.
Step 4; Packing Everything TogetherI based my setup on the solar panel. I attached my enclosure for the Bluno and display to the back of the solar panel. The solar charger and battery are in a separate small enclosure also attached to the back of the solar panel. My entire design is shown in the video.
Step 5; The CodeI have spent a lot of time on the code to make sure it works properly and doesn't cause the Arduino to crash due to too much memory being taken up.
#include <DFRobot_GDL.h>
#include <TinyGPS++.h>
#include <SoftwareSerial.h>
First, include the display library, and gps libraries.
//display
#define TFT_DC  8
#define TFT_CS  10
#define TFT_RST 9
Here, we define the display pins (SPI pins are automatically taken care of).
#define arrSize(X) sizeof(X) / sizeof(X[0])

int last = 0;

float LAT;
float LON;

float topSpeed;
float Speed;
float Course;
float Alt;
float aveSpeed;
float aveSpeeds;
int Sat;
All of the data storage integer and floats are initialized.
//GPS
static const int RXPin = 3, TXPin = 2;
static const uint32_t GPSBaud = 9600;

int bearings[] =               { 0,    22.5,  45,   67.5,  90, 112.5,  135,  157.5, 180,  202.5, 225,  247.5, 270, 292.5,  315, 337.5, 360 };
const char* bearingStrings[] = { "N", "NNE", "NE", "ENE", "E", "ESE", "SE",  "SSE", "S",  "SSW", "SW", "WSW", "W", "WNW", "NW", "NNW", "N" };
The GPS pins and baud rate are defined here. Also, we initialize the our own cardinal positions.
DFRobot_ILI9488_320x480_HW_SPI screen(TFT_DC,TFT_CS,TFT_RST);
TinyGPSPlus gps;
SoftwareSerial ss(RXPin, TXPin);
The display and GPS are initialized from the libraries.
#define screenColor COLOR_RGB565_NAVY
#define backColor COLOR_RGB565_DGRAY
Setting two of the generic display colors. These can be changed according to preference.
Serial.begin(115200);

  ss.begin(GPSBaud);

  screen.begin();
  screen.setRotation(1);
  screen.fillScreen(COLOR_RGB565_WHITE);
  screen.setTextColor(COLOR_RGB565_RED);
In void setup();, the serial monitor and gps serial is started. Also, the display is setup and initiated.
retry:
  while (ss.available() > 0){
    gps.encode(ss.read());
  }

  while (!gps.location.isUpdated()){
    screen.setCursor(190,150);
    screen.print("No GPS Data");
    goto retry;
  }

  HOME_LAT = gps.location.lat();
  HOME_LON = gps.location.lng();
Here, we wait till there is a GPS signal, and while we wait, we print "No GPS Data". Then, when we have a signal, we save our current location for future reference as the "home" location.
screen.fillRoundRect(0, 0, 480, 320, 15, backColor);
  screen.fillRoundRect(7, 7, 466, 306, 15, screenColor);

  //title
  screen.setTextColor(COLOR_RGB565_CYAN);
  screen.setTextSize(3);
  screen.setCursor(70, 13);
  screen.print("GPS Speedometer");

  screen.setTextSize(1);

  //title underline
  screen.drawLine(20, 50, 460, 50, 0x0700);

  //speed
  screen.drawRoundRect(30, 60, 205, 65, 15, 0x0700);
  screen.setCursor(200,64);
  screen.print("MPH");

  //course
  screen.drawRoundRect(245, 60, 205, 65, 15, 0x0700);
  screen.setCursor(415,64);
  screen.print("DEG");

  //altitude
  screen.drawRoundRect(30, 135, 205, 65, 15, 0x0700);
  screen.setCursor(200,140);
  screen.print("FT");

  //direction
  screen.drawRoundRect(245, 135, 205, 65, 15, 0x0700);
  screen.setCursor(415,140);
  screen.print("ROS");

  //top speed
  screen.drawRoundRect(30, 210, 205, 45, 15, 0x0700);

  //direction (left or right)
  screen.drawRoundRect(245, 210, 205, 45, 15, 0x0700);

  //course to home
  screen.drawRoundRect(30, 265, 205, 45, 15, 0x0700);

  //dist to home
  screen.drawRoundRect(245, 265, 205, 45, 15, 0x0700);

  last = millis();
In the rest of void setup();, we draw all of the rectangles for displaying the data.
void loop(){
  screen.setTextColor(COLOR_RGB565_GREEN);
  screen.setTextSize(3);

  while (ss.available() > 0){
    gps.encode(ss.read());
  }

  if (gps.location.isUpdated()){
    LAT = gps.location.lat();
    LON = gps.location.lng();
  }

  if (gps.speed.isUpdated()){
    Speed = gps.speed.mph();
    if (gps.speed.mph() < 1){
      Speed = 0;
    }
  }

  if (gps.course.isUpdated()){
    Course = gps.course.deg();
  }

  if (gps.altitude.isUpdated()){
    Alt = gps.altitude.feet();
  }

  if (gps.satellites.isUpdated()){
    Sat = gps.satellites.value();
  }

  if (millis() - last > 1000){
    displayData();
    last = millis();
  }
}
In void setup();, we first make sure that if there is any gps data, we read all of it. Next, if everything is updated, we assign all of the data to variables. Then, at the very bottom, we check our timer to see if it is time to display the data again.
int nearestBearing(int x, bool sorted = true) {
  int idx = 0; // by default near first element
  int distance = abs(bearings[idx] - x);
  for (int i = 1; i < arrSize(bearings); i++) {
    int d = abs(bearings[i] - x);
    if (d < distance) {
      idx = i;
      distance = d;
    }
    else if (sorted) return idx;
  }
  return idx;
}
Big thanks to st3v3n92 on Arduino Forum for this piece of code. It is the function that calculates cardinal direction.
void displayData(){
  screen.setTextColor(COLOR_RGB565_GREEN);
  screen.setTextSize(3);

  //speed
  screen.fillRect(110,78,120,25,screenColor);
  screen.setCursor(45, 80);
  screen.print("SPD: ");
  screen.println(Speed);

  //course
  screen.fillRect(325,78,120,25,screenColor);
  screen.setCursor(260, 80);
  if (Course >= 100){
    screen.print("CSE:");
  }
  else {
    screen.print("CSE: ");
  }
  screen.println(Course);

  //altitude
  screen.setCursor(45, 155);
  if (Alt >= 100 && Alt < 1000){
    screen.fillRect(110,153,120,25,screenColor);
    screen.print("ALT:");
  }
  else if (Alt >= 1000){
    screen.fillRect(70,153,160,25,screenColor);
    screen.print("A: ");
  }
  else {
    screen.fillRect(110,153,120,25,screenColor);
    screen.print("ALT: ");
  }
  screen.println(Alt);

  //direction
  screen.fillRect(330,153,80,25,screenColor);
  screen.setCursor(260, 155);
  screen.print("DIR: ");
  screen.println(bearingStrings[nearestBearing(Course)]);

  //top speed
  if (Speed > topSpeed){
    topSpeed = Speed;
    screen.fillRect(92,223,135,25,screenColor);
    screen.setCursor(45, 225);
    screen.print("TS: ");
    screen.print(topSpeed);
  }

  double distanceToHome =
        TinyGPSPlus::distanceBetween(
          gps.location.lat(),
          gps.location.lng(),
          HOME_LAT,
          HOME_LON) / 1000;
  double courseToHome =
        TinyGPSPlus::courseTo(
          gps.location.lat(),
          gps.location.lng(),
          HOME_LAT,
          HOME_LON);
  double distanceToHomeFT = distanceToHome*3281;

  Serial.println(distanceToHomeFT, 6);
  Serial.println(courseToHome, 6);

  screen.fillRect(307,223,135,25,screenColor);
  screen.setCursor(260, 225);
  screen.print("D: ");
  if (turnRight(Course,courseToHome) == true){
    Serial.println("Right");
    screen.print("Right");
  }
  else if (turnRight(Course,courseToHome) == false){
    Serial.println("Left");
    screen.print("Left");
  }

  screen.setTextSize(2);

  screen.fillRect(90,278,140,18,screenColor);//screenColor
  screen.setCursor(45, 280);
  screen.print("Dist:");
  screen.println(distanceToHomeFT, 2);//in feet

  screen.fillRect(305,278,140,18,screenColor);
  screen.setCursor(260, 280);
  screen.print("CSE:");
  screen.println(courseToHome, 1);

  screen.setTextSize(3);

  //satellites
  screen.setTextColor(COLOR_RGB565_WHITE);
  screen.setTextSize(2);
  screen.fillRect(435,10,28,18,screenColor);
  screen.setCursor(390, 12);
  screen.print("SAT:");
  screen.println(Sat);
}
In the displayData(); function, everything on the display is cleared and printed again to update it.
bool turnRight(long CourseNow,long CourseNew){
  bool retval = true;
  if(CourseNew > CourseNow){
    if((CourseNew-CourseNow) > 180)
      retval = false;
    }
  else {
    if((CourseNow-CourseNew) < 180){
      retval = false;
    }
  }
  return retval;
}
This is the directional (turn right or left) function.
If you have any suggestions for things I should change or add, please post them in the comments or in the GitHub discussions!
The VideoSo, I made a ~8 minute long movie for you to enjoy of me putting this project together.
Wrapping upSo that was it for this project! Please feel free to post in the comments for any questions, ideas, advice, suggestions, and so on!
Final display:
More awesome projects here:


Comments
Please log in or sign up to comment.