


Temperature sensing! Something so basic, yet so useful!
The regular way of measuring temperature is contact temperature sensing. This can be a mercury thermometer, a thermistor probe, etc.
The way this device is based off of though, is non-contact temperature sensing! This method works by optically analyzing the infrared radiation emitted by the measurement object.
DFRobotDFRobot is an awesome electronic parts company! They regularly come out with new, amazing parts, my latest favorite of which is their brand new Romeo ESP32-S3 Robotics FPV Development board! Any part you can possibly imagine for building projects, including in robotics, can be found on their website. Check them out here!
The PartsAll the parts used for this project are built by DFRobot! There is only three things needed:
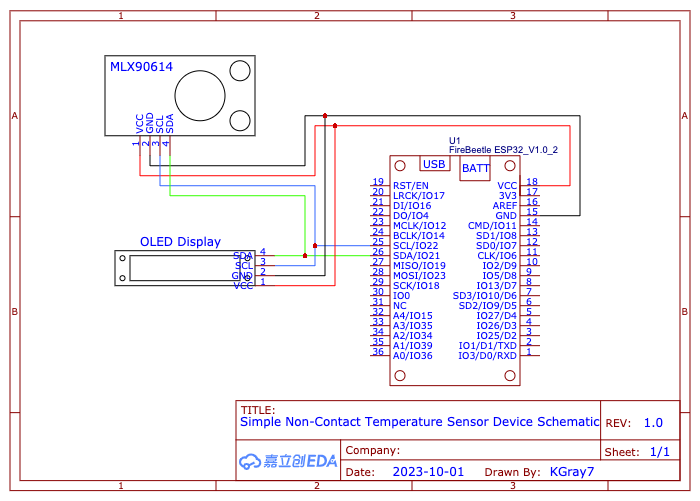
The HookupAs this project utilizes only three parts, and everything can be connected using only I2C, the wiring is very simple!
Here is a description, but if it doesn't make much sense, just scroll further down to the schematic:
OLED - FireBeetle:
VCC - 5V
GND - GND
SCL - SCL
SDA - SDA
MLX90614 - FireBeetle:
VCC - 5V
GND - GND
SCL - SCL
SDA - SDA
Here is the schematic!
The code is fairly short for this project! I added many annotations to the file, to help explain what everything does, and here is a more in depth explanation.
#include <Wire.h>
#include <Adafruit_GFX.h>
#include <Adafruit_SSD1306.h>
#include <DFRobot_MLX90614.h>
First, the libraries we need. This is two libraries for the display, one from DFRobot for the temperature sensor, and the Wire.h library for the I2C communication with both devices.
#define SCREEN_WIDTH 128 // OLED display width, in pixels
#define SCREEN_HEIGHT 32 // OLED display height, in pixels
#define OLED_RESET     -1 // Reset pin # (or -1 if sharing Arduino reset pin)
#define SCREEN_ADDRESS 0x3C ///< See datasheet for Address; 0x3D for 128x64, 0x3C for 128x32
Next, the information for the screen is defined, such as the width and height, if the reset pin is wired, and the screen's address.
Adafruit_SSD1306 display(SCREEN_WIDTH, SCREEN_HEIGHT, &Wire, OLED_RESET);
DFRobot_MLX90614_I2C sensor;
Here, instances of both libraries are created, so that we are able to use them.
void setup() {
    Serial.begin(9600);
    // SSD1306_SWITCHCAPVCC = generate display voltage from 3.3V internally
    if(!display.begin(SSD1306_SWITCHCAPVCC, SCREEN_ADDRESS)) {
        Serial.println(F("SSD1306 allocation failed"));
    }
    else {
        Serial.println("SSD1306 started...");
    }
    while( NO_ERR != sensor.begin() ){
        Serial.println("Communication with device failed, please check connection");
        delay(3000);
    }
    Serial.println("Begin ok!");
    // Show initial display buffer contents on the screen --
    // the library initializes this with an Adafruit splash screen.
    display.display();
    delay(1000); // Pause for a second
    // Clear the buffer
    display.clearDisplay();
    delay(100);
}
In voidsetup(), first the serial monitor is started at 9600baud. Then, the screen is started, with some loops to take care of errors.
void loop() {
    displayTemp();
    delay(400);
}
voidloop() only has two lines! The first one is the function that displays the temperature (which also includes reading the temperature, as will be explained next), and then a delay to slow down the loop a little. You can change the delay time, but I found 400ms (0.4s) to be adequate.
void displayTemp(){
    display.clearDisplay();
    display.setTextSize(3);             // Large pixel scale
    display.setTextColor(SSD1306_WHITE);        // Draw white text
    display.setCursor(10,10);
    display.print(String(readTemp(true)));
    display.setTextSize(1);             // Small pixel scale
    display.print(F("F"));
    display.display();
}
Here is the magical displayTemp() function! First, the display is cleared. Then the text information is set; the size, color, location (setCursor). Finally, the value is printed! You will notice that the float function readTemp(boolf) is directly placed inside String() to convert it to a String, which is directly inside the print function of the display. It is all done in one line. After, the text size is set to 1 (instead of 3), and the unit of measurement is displayed. The last line in the function is very important. Without it, the screen will not do anything. It is what updates the display after you have told the display what to do.
float readTemp(bool f){
    float temp=0;
    if (f){
        temp = (sensor.getObjectTempCelsius()*1.8)+32;//convert celcius to fahrenheit
    }
    else {
        temp = sensor.getObjectTempCelsius();
    }
    Serial.print("Temperature:");
    Serial.print(temp);
    Serial.println(" F");
    return (temp);
}
The last function; readTemp(). This function is what gets the data! If readTemp(true) is used, it will return the Fahrenheit value gotten from the sensor. Then the temperature is printed to serial monitor, and the last line (return(temp); ) is what returns the temperature value when the whole function is called.
That was all for this tutorial! If you liked it, feel free to follow me for more tutorials and give this one a thumbs up!
If you have any questions or comments at all, please post in the comments section! I would appreciate feedback.
Check out my other tutorials here!


Comments
Please log in or sign up to comment.