If you are a beginner, you can learn about Arduino - Wifi here.
DemoWiring- Stack PHPoC WiFi shield on Arduino.
- Connect pin GND, 3.3V, pin SCL and SDA of color sensor to GND, 3.3V, A4 and A5 of Arduino, respectively. (see schematics section)
Data FlowArduino ---> PHPoC WiFi Shield ---> Web browser
Arduino reads RGB color values from sensor and send the values to PHPoC WiFi Shield. When receiving the color values, PHPoC WiFi Shield send it to Web browser via websocket. Web browser changes background color to the received color.
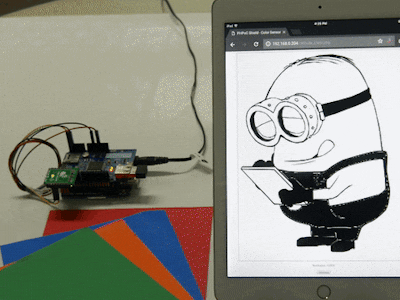
Since background image is png image, some parts of image is transparent. Therefore, we will see the background color in transparent part of background image. In the demonstration, body of Minion is transparent. When background color is changed, we will see the color of Minion is changed.
Note that: PHPoC shield has a built-in program to pass data from Arduino to web browser. Therefore, we don't need to care about it.
What We Need to Do- Set WiFi information for PHPoC shield (SSID and password)
- Upload new UI to PHPoC shield
- Write Arduino code
Setting WiFi Information for PHPoC Shield
See this instruction.
Upload new Web UI to PHPoC Shield
- Download PHPoC source code remote_color.php (on code section) and background.png file.
- Upload them to PHPoC shield using PHPoC debugger according to this instruction.
Write Arduino Code
- Install three following libraries: PHPoC Library for Arduino, SparkFun ISL29125 (see instruction).
- Upload Arduino code (on code section) to Arduino.
Testing- Click serial button on Arduino IDE to see the IP address.
- Open web browser, type
http:// replace_ip_address/remote_color.php - Click connect button and test it.
The Best Arduino Starter Kit for BeginnerSee The Best Arduino Kit for Beginners
Function References

_ztBMuBhMHo.jpg?auto=compress%2Cformat&w=48&h=48&fit=fill&bg=ffffff)


Comments
Please log in or sign up to comment.