The purpose of this project is to control and monitor a swimming pool using temperature sensors, relays and Microsoft Azure.
The inspiration for this project is the need to remotely operate and monitor our kids swimming pool, which is an Intex 15' x 48" round pool. The pool holds approx. 5000 gallons of water. It is connected to a Sand Filter/Pump, an 11KW Heater, and a Salt Water System. The goal was to monitor pool water temperature, air temperature and control the pump, heater and salt water system to ensure the pool was warm enough for the kids, while not over-running it.
This 5 minute video shows how the pool, sensors, circuit boards and relays are connected.
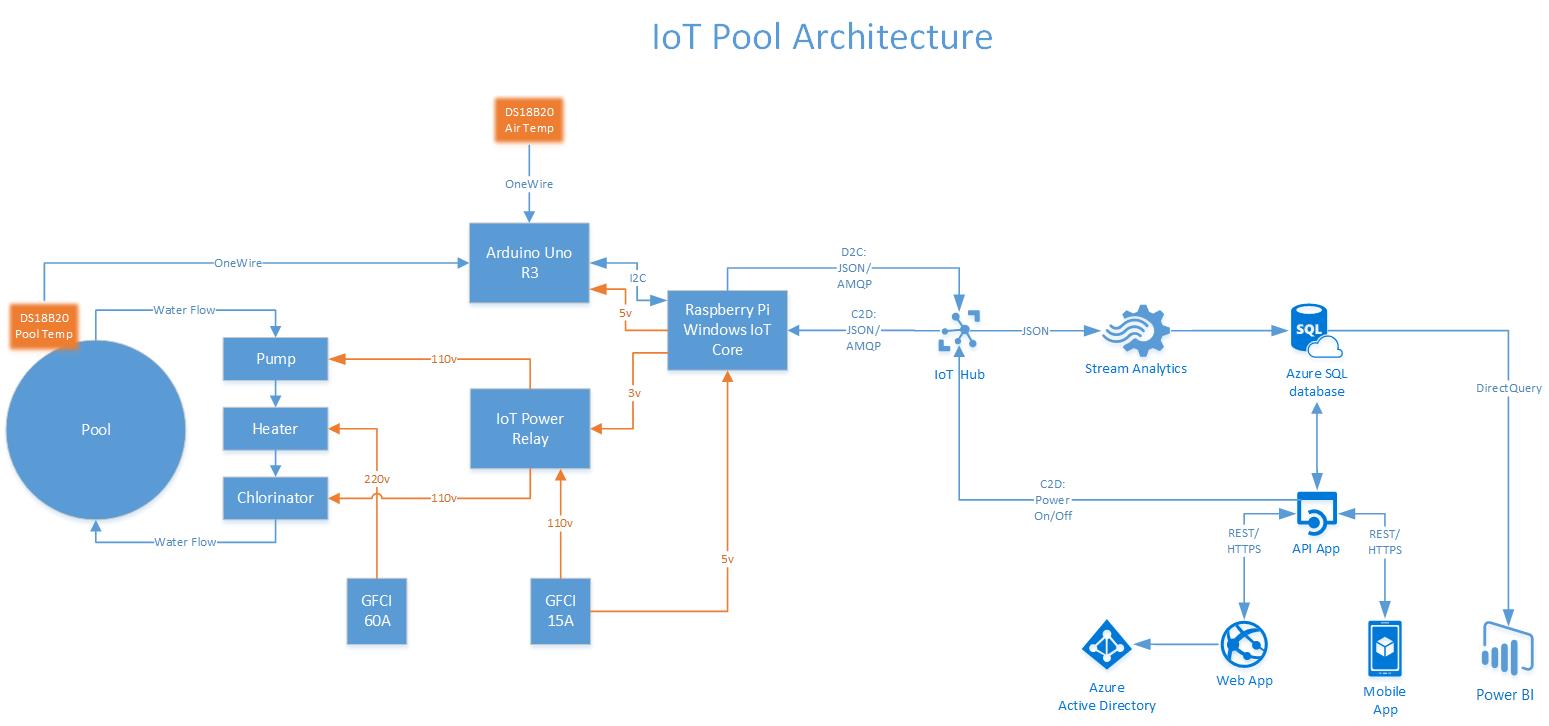
The following architectural diagram shows all the major components in the solution.
The Raspberry Pi, Arduino, IoT Power Relay and breadboard are zip-tied into a plastic storage container to keep water/moisture away. Holes were drilled for the cables and ventilation.
Note: In the above picture, the pool temperature DS18B20 is not yet connected to the breadboard. The air temperature DS18B20 is connected and taped to the outside of the plastic container (see bottom of picture).Sensors
Monitoring of the pool water temperature and air temperature is accomplished using a pair of DS18B20 waterproof temperature sensors, connected to an Arduino Uno R3 using the Dallas Controls Library and OneWire Library. The temperature data (in Celsius) is sent to a Raspberry Pi every 1 second over I2C. The two temperature values are delimited with a "|".
temperatureData = padRight(String(poolSensor.getTempCByIndex(0)) + "|" +
                     String(outsideSensor.getTempCByIndex(0)), I2C_BUFFER_LEN);
The DS18B20 waterproof temperature sensors come pre-wired as follows:
- Red connects to 3v/5v
- Blue/Black connects to ground
- Yellow/White is data
I used some cheap 20 gauge bell wire (door bell wire) to extend the reach of the DS18B20 that is reading water temperature. This DS18B20 is submerged in the pool.
The second DS18B20 sensor reading air temperature is taped to the outside of the plastic storage container.
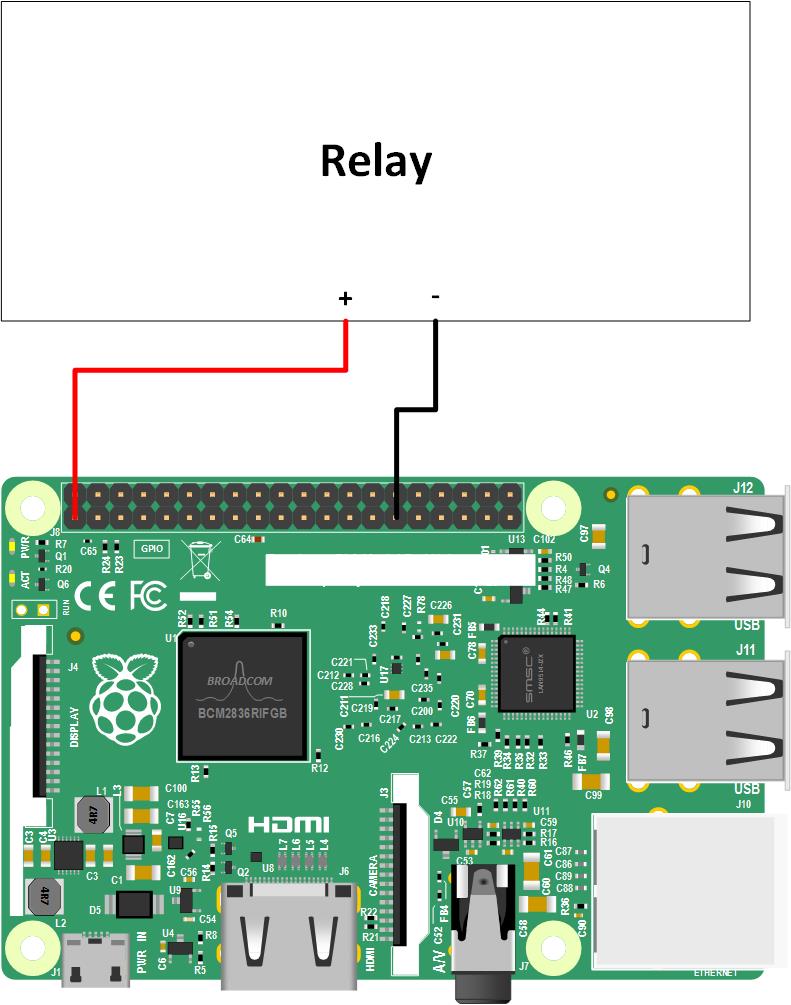
RelayThe Raspberry Pi controls an IoT Power Relay power bar to which the Pump and Salt Water System are connected using 110v. This is done using the 3v pin on the Pi. Toggling the 3v pin enables/disables a pair of 110v outlets on the IoT Power Relay (the pair of outlets are off by default). Refer to the diagram later for a schematic.
There was no need to connect a relay to the Heater since it has a built-in flow sensor, and will stop/start heating based on the absence or presence of water flow. Plus I couldn't readily find a relay to control a 220v/60amp circuit needed by the Heater using 3v or 5v.
In the future I will be attaching sensors to measure the electrical use of the 110v and 220v circuits. If anyone can recommend some, I would be grateful.
Raspberry PiThe Raspberry Pi runs Windows IoT Core Build 10.0.10586.0 and performs the following:
- Runs the IoTPoolRaspiBackgroundApp background application;
- Acts as a IoT field gateway (opaque);
- Provides power to the Arduino Uno over USB (5v);
- Receives pool and air temperature (in C) from the Arduino Uno over I2C;
- Controls the IoT Power Relay using a 3v pin; and
- Sends the pool name, pool temperature, air temperature, IoT Power Relay on/off status and a time stamp (in UTC) every 1 minute to the Azure IoT Hub.
The IoTPoolRaspiBackgroundApp is a headless C# application, built using the Background Application (IoT) project template in Visual Studio 2015, Update 3.
The IoTPoolRaspiBackgroundApp sends the following JSON payload to the Azure IoT Hub every 1 minute using AMQP (this can be changed in the source code to HTTPS or MQTT).
{
"PoolName" : "iotpool",
"PoolWaterTempC" : 30,
"OutsideAirTempC" : 27,
"IsPoolPowerOn" : false,
"SampleDateTime" : "2016-07-05T23:35:58.0882185Z"
}
The Raspberry Pi is registered as a device in the Azure IoT Hub. The easiest way to register a device in Azure IoT Hub is using Device Explorer. This tool is also a great way to obtain the device's connection string, monitor D2C (Device to Cloud) messages and to test sending C2D (Cloud to Device) messages.
Tip: Ensure the device name (case sensitive) you register in IoT Hub is used consistently throughout the project. In my case I used "iotpool".
Edit the following in StartupTask.cs to connect IoTPoolRaspiBackgroundApp to your IoT Hub:
static string iotPoolConnString = "HostName=<iothubname>.azure-devices.net;DeviceId=iotpool;SharedAccessKey=<key>";
static string deviceName = "iotpool";
The Arduino Uno R3 is connected to two DS18B20 temperature sensors using the Dallas Controls Library and OneWire Library. It is powered by the Raspberry Pi over USB (5v) and sends the pair of temperature readings to the Raspberry Pi over I2C using the SDA and SLC pins. Refer to the Fritzing diagram for a schematic.
Note: In the above picture, the pool temperature DS18B20 is not yet connected to the breadboard. The air temperature DS18B20 is connected.
Use the Two-DS18B20-I2C.ino code to run the Arduino.
AzureAll Azure components were created in the same Azure region (West US) to minimize costs associated with egress traffic.
Azure IoT HubThe free edition of the Azure IoT Hub was used in this project. It's limited to 8,000 messages/day at 500 bytes each. The IoTPoolRaspiBackgroundApp sends D2C messages at 1 per minute, or 1,440/day, at 158 bytes each. This leaves ample headroom for any C2D messages.
You must first register a device with Azure IoT Hub. The easiest method is using Device Explorer. Once registered, you can obtain the device connection string using Device Explorer.
The Azure Streaming Analytics (ASA) job connects the IoT Hub input to the Azure SQL Database output using the following simple ASA query.
SELECT
 PoolName,
 PoolWaterTempC,
 OutsideAirTempC,
 IsPoolPowerOn,
 SampleDateTime
INTO
 sql
FROM
 iothub
This query writes each Device to Cloud (D2C) JSON message (1 per minute) to a table named Pools in an Azure SQL Database.
Future improvements to this query may include some aggregation functions to for alerting purposes (e.g. Average PoolWaterTempC > 35 indicates pool is getting too warm).
Azure SQL DatabaseTo minimize cost, and because the performance requirements of the database were minimal, the database is an S0 Standard (10 DTUs).
A single database with a single table was created to store all the D2C messages.
Schema:
CREATE TABLE [dbo].[Pools] (
[Id] INT IDENTITY (1, 1) NOT NULL,
[PoolName] NVARCHAR (MAX) NULL,
[PoolWaterTempC] FLOAT (53) NOT NULL,
[OutsideAirTempC] FLOAT (53) NOT NULL,
[IsPoolPowerOn] INT NOT NULL,
[SampleDateTime] DATETIME NOT NULL,
CONSTRAINT [PK_dbo.Pools] PRIMARY KEY CLUSTERED ([Id] ASC)
);
The API is a RESTful API built using ASP.NET Web API.
API clients must authenticate using an API key specified in the HTTP header.
api-key : {your API key}
The API key is defined in the IoTPoolAPI\Controllers\PoolControllers.cs. The Mobile App and the Web App must use this API key to communicate with the API.
The REST API supports the following methods:
Future improvements to the API may include placing it behind Azure API Management and adding other authentication options into the API such as Azure Active Directory.
Tip: Postman is a great tool for testing REST APIs.Azure Web App
The IoTPoolWebApp contains a ASP.NET web forms application to interact with the API.
There is also a mobile friendly version of the web app.
Edit the default.aspx.cs and change the following:
private static string apiKey = "";
...
HttpRequestMessage requestMessage = ...."http://<yourwebsite>.azurewebsites.net/api/pool/poweroff");
...
HttpRequestMessage requestMessage = ...."http://<yourwebsite>.azurewebsites.net/api/pool/poweron");
...
HttpRequestMessage requestMessage = ...."http://<yourwebsite>.azurewebsites.net/api/pool/getlatest");
The web app is integrated with Azure Active Directory (AAD) for authentication. The web app requires that all users must authenticate using AAD.
You must first register your web app with your AAD tenant (e.g. tenant_name.onmicrosoft.com). You can do this through the Azure Portal or through Visual Studio. Once registered, copy the client ID from the Azure Portal.
Next, change the AAD domain in the web app by modifying the <AAD client ID> in the web.config.
<appSettings>
<add key="ida:ClientId" value="<AAD client ID>" />
<add key="ida:AADInstance" value="https://login.microsoftonline.com/" />
</appSettings>
The Mobile App is written using Xamarin Forms. I've only compiled it to run on Windows Phone and Windows 10 but should cross compile on iOS and Android.
Warning: The mobile app doesn't enforce user authentication and is not yet integrated with AAD. So be careful where you deploy the mobile app!
Edit Core.cs and change the following:
string queryString = "http://<yourwebsite>azurewebsites.net/api/pool/getlatest
Edit DataService.cs and change the following:
private static string apiKey = "";
Edit PoolPage.xaml.cs and change the following:
private static string apiKey = "";
...
HttpRequestMessage requestMessage = ...."http://<yourwebsite>.azurewebsites.net/api/pool/poweroff");
...
HttpRequestMessage requestMessage = ...."http://<yourwebsite>.azurewebsites.net/api/pool/poweron");
Power BI (free edition) was used to create and publish a real time dashboard showing IoT Pool data.
The process involved downloading Power BI Desktop, connecting to the Azure SQL DB (using DirectQuery), creating some reports with visuals, and publishing the .pbix to PowerBI.com. I then pinned the report to a dashboard.
In the future I may use Power BI embedded to directly embed the dashboard into the web app.
For now I can view the dashboard through Powerbi.com or through the free Power BI mobile app.
ReferencesHere's a list of resources I used in building this solution:
Special thanks to Miles Burton for the Dallas Controls Library and Mike Mackes for the Arduino / I2C / DS18B20 sample code and overall inspiration for this project.


_ztBMuBhMHo.jpg?auto=compress%2Cformat&w=48&h=48&fit=fill&bg=ffffff)


Comments