Has the weather station ever told you that there was plenty of rain and you thought oh sweet I don't have to water all of my plants or my grass! SWEET! And then,
Don't you hate that feeling!
Or, you invite a bunch of friends over to play outside.
When your friends get to your house and you go to your yard to play, you realize that it rained more than your weather app said it had overnight.
With Rainometer, the rain gauge that talks with Alexa, you won't have to feel that feeling ever again! And you won't even have to go outside to check it, you simply say "Alexa, ask Rainometer how many centimeters has it rained in the past 6 hours?" or "Alexa, ask Rainometer how many centimeters did it rain on Friday" Alexa will tell you exactly how much it rained down to the quarter of a centimeter!
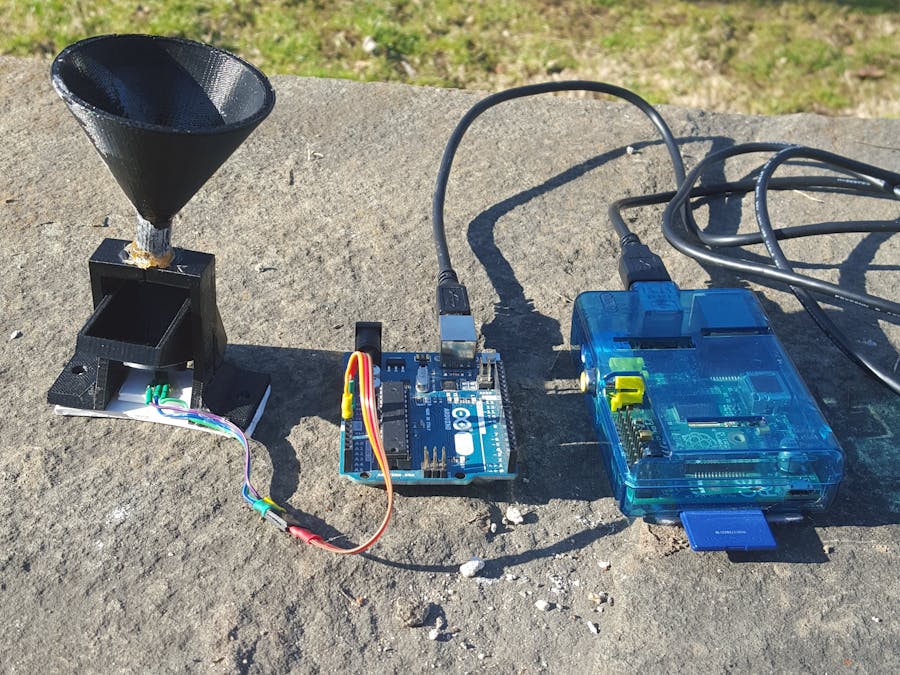
Finished Product ExampleHardware- Arduino uno
The Arduino will read data from the hall effect sensor and talk to a python program over a serial port.
- Amazon Alexa Echo Dot
The Amazon Alexa Echo Dot can recognize speech, and skills for the echo dot are easy to make. In our project, the echo dot will take user voice input, then respond with the response generated by a python program.
- Raspberry Pi
Any Raspberry pi will work. The Raspberry pi talks to both the Arduino over serial and Alexa over the internet. You will need to make sure that your Raspberry Pi is connected to the internet either over Ethernet or WiFi.
- Hall effect Sensor
A Hall effect sensor is a transducer that varies its output voltage in response to a magnetic field. Hall effect sensors can sense how close they are to magnets. In this project, when the rain gauge is tipped one way, the hall effect sensor sends a positive signal because the magnet is closer to it.
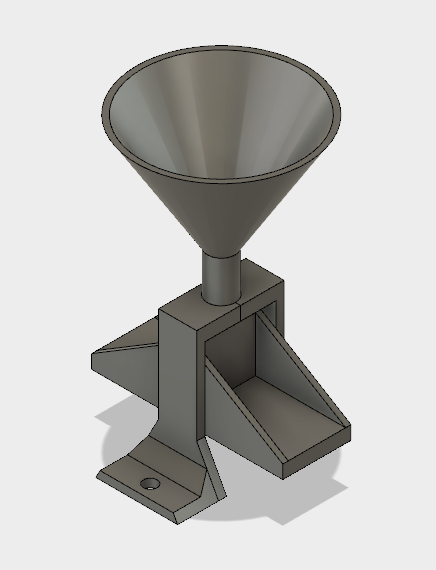
How it was BuiltBuilding Rainometer was a fun process. First, the CAD was designed in Autodesk Fusion 360. Here's a video showing it being designed.
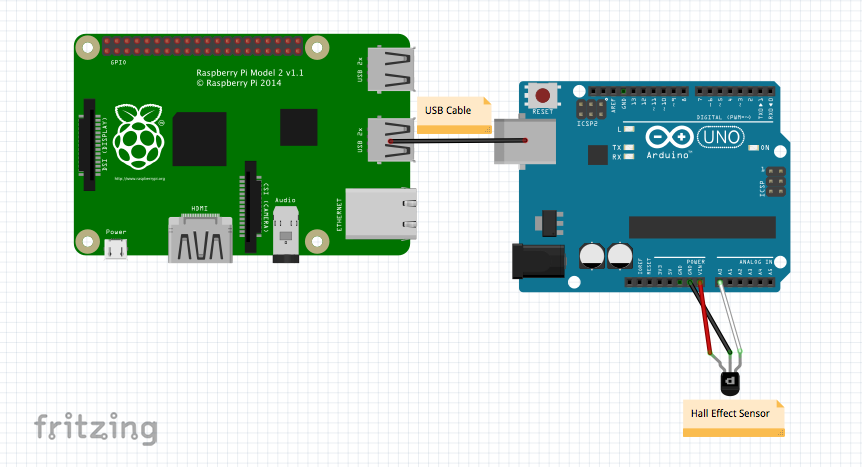
Next, the hall effect sensor was wired up and plugged into the Arduino. Schematics can be found in the Schematic section.
Finally, all of the code was written and uploaded to the Raspberry Pi and Arduino. The code for this project can be found below.
Building Rainometer was a great way to learn new skills for working with Arduino, Raspberry Pi, and Alexa. The end result is also useful and fun.
VUI DiagramHere's how Rainometer works:
To build your own Rainometer, first gather the materials. You will need a Raspberry Pi, an Arduino, and a hall effect sensor. You will also need to 3d print the plastic parts that can be found in the CAD section. Wire up the hall effect sensor as shown below.
Glue a magnet into the hole in the 3d printed rocker piece. Glue your hall effect sensor underneath the magnet.
Code SetupNext, you will need to set up the code. On your Raspberry Pi, make sure you have python installed, then run the following commands.
sudo apt-get install python-pip
sudo apt-get install python-serial
sudo pip install Flask flask-ask
The next step is to download ngrok. Ngrok allows you to connect strait to your Alexa skill over the internet.
Go to the following page and download the latest version of ngrok:
Find the directory when ngrok is installed and run it using the following command:
./ngrok http 5000
After running the command, look for where it says "Forwarding:" and copy the HTTPS address. (i.e. https://ese18274.ngrok.io)
Set up the Alexa SkillNow, go to the Alexa developer website and create a new skill
https://developer.amazon.com/edw/home.html#/
For help creating a developer account, go to the following link:
Once you are on this page, click "Alexa Skills Kit", then "Add a New Skill"
Enter "Rainometer" for both the skill name and the invocation name and click save.
First, click "Interaction Model". Next, launch Skill Builder Beta, click code editor, and paste the code below into the code box.
{
 "languageModel": {
   "intents": [
     {
       "name": "AMAZON.CancelIntent",
       "samples": []
     },
     {
       "name": "AMAZON.HelpIntent",
       "samples": []
     },
     {
       "name": "AMAZON.StopIntent",
       "samples": []
     },
     {
       "name": "AtHourRainIntent",
       "samples": [
         "How much did it rain at {Number} o'clock",
         "How much did it rain at {Number}",
         "How much rain was there at {Number} o'clock",
         "How much rain was there at {Number}"
       ],
       "slots": [
         {
           "name": "Number",
           "type": "AMAZON.NUMBER"
         }
       ]
     },
     {
       "name": "DateRainIntent",
       "samples": [
         "How much did it rain on {DATE}",
         "How much did it rain {DATE}",
         "How much rain was there on {DATE}",
         "How much rain fell on {DATE}"
       ],
       "slots": [
         {
           "name": "DATE",
           "type": "AMAZON.DATE"
         }
       ]
     },
     {
       "name": "LastHoursRainIntent",
       "samples": [
         "How much did it rain in the past {Number} hours",
         "How much rainfall was their in the past {Number} hours",
         "how many centimeters of rainfall was there in the past {Number} hours",
         "How many centimeters of rain was there in the past {Number} hours"
       ],
       "slots": [
         {
           "name": "Number",
           "type": "AMAZON.NUMBER"
         }
       ]
     }
   ],
   "invocationName": "rainometer"
 }
}
Apply Changes and click "build model." Once that is done, move on to configuration.
Select HTTPS as your endpoint. Where it says "default," paste in the HTTPS address that ngrok gave you on the Raspberry Pi (i.e. https://ese18274.ngrok.io)
Click save and go on to SSL Certificate. In SSL Certificate, select "My development endpoint is a sub-domain of a domain that has a wildcard certificate from a certificate authority"
Once you save that, your skill should be done.
Arduino and Raspberry Pi CodeDownload the Arduino code and both python codes. To upload the code to your Arduino. Open the code in the Arduino IDE found here:
https://www.arduino.cc/en/Main/Software
Under tools->ports, select your arduino port and click upload.
To setup your Raspberry Pi, run both ArduinoRainGauge.py and AlexaRainGauge.py by double clicking on them. If the Arduino python program gives an error because it can't connect to your Arduino, make sure that your Arduino is plugged into the Raspberry Pi and that the port in the program is the port that the Arduino is plugged into. Once both programs are running, also make sure that your ngrok server is running as explained above.
To test everything, ask Alexa to open rainometer. Your Rainometer is finished! Feel free to ask questions if you cannot get everything setup.


_ztBMuBhMHo.jpg?auto=compress%2Cformat&w=48&h=48&fit=fill&bg=ffffff)


Comments
Please log in or sign up to comment.