

Hardware components | ||||||
 |
| × | 1 | |||
 |
| × | 1 | |||
 |
| × | 1 | |||
 |
| × | 1 | |||
| × | 1 | ||||
| × | 1 | ||||
Software apps and online services | ||||||
 |
| |||||
Someone asked me for a GPS tracker. To make it a nice gift, I created an embroidered rocket accessory. Hey, I don't just make dresses ;)
For this design, you need three layers of felt fabric: one for the front embroidered graphics, one for sewing the modules and another one to protect the back.
Electrical hookupWhat's so nice about Adafruit tutorials is that everything is already very comprehensive. The electrical hookup is clearly explained here. Or just look at the photo below. Rx to Tx, Tx to Rx, makes sense. (Learn how to program Flora here.)
After running a test to make sure that your modules are working, simply sew them onto the middle piece of felt with conductive threads (see picture below). In addition to the Adafruit Flora and the GPS module, I also added four individual addressable NeoPixel RGB LEDs in a strip onto pin 9. If you haven't played with NeoPixels before, learn how-to here.
Outline the geometry of your design with a single thread-line (or use a pen to draw the outline) on the top-layer felt. Then embroidered colored threads until all areas are covered.
This step took the longest. Do it when you can multi-task.
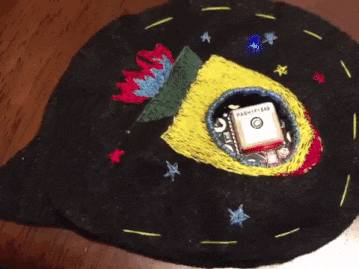
It's a flying spacecraft among the stars. I cut a hole as the window on the spaceship to display the GPS module.
Embroider a nice rim around the window.
To reduce wear and tear on the electronics and the conductive threads, sandwich them between the top and bottom felt layers.
Attach clip
Sew or glue a clip onto the back. Type of clip depends on where you or your pet wants to wear it.
Now wear it anyway you like~
Yes, I am wearing the glow-in-the-dark Starry Night shirt I made a while back. I've been wearing it to meet astronomers and astronauts.


Comments
Please log in or sign up to comment.