


Hardware components | ||||||
_baVEVgguW1.jpg?auto=compress%2Cformat&w=48&h=48&fit=fill&bg=ffffff) |
| × | 1 | |||
 |
| × | 1 | |||
 |
| × | 1 | |||
 |
| × | 2 | |||
 |
| × | 1 | |||
 |
| × | 3 | |||
 |
| × | 2 | |||
 |
| × | 1 | |||
Software apps and online services | ||||||
 |
| |||||
 |
| |||||
| ||||||
| ||||||
| ||||||
| ||||||
For our March Hackster Live workshop we will be using Greg V.’s "Lend me your ears" project as our inspiration. After creating this project you should be able to turn on and off an led, or other ***low voltage (<12 volts) device*** of your choosing through low energy bluetooth using voice commands. A big thank you goes out to our sponsors, Intel and Mikroelektronika, for providing the hardware that we will be using for this project.
***WARNING - Do NOT attempt to control any high voltage AC or DC devices or expose the wires of high voltage AC or DC device. Do NOT use any device over 12 volts as this could lead to strong electric shock if used improperly!***
Hackster has modified the original version of this project to be achievable for beginners with an option to extend the project using the original project outlined here. If you choose to do the extended edition of this project you need to be aware the of the warning above. Please do not attempt the extended edition if you are unfamiliar with the basics of electrical engineering. **Hackster is not responsible for any damages or injuries sustained while completing this project.**
What you will need for this project:Mac with Yosemite or newer operating system, chromebook, or linux. For chromebook instructions see Greg’s project here.
See steps below to find out which operating system you have on your Mac
1. Click the apple icon and go to “about this mac”
2. The version will pop up on your screen, make sure the version is Yosemite (vs. 10.10), El Captain (vs. 10.11) or Sierra (vs. 10.12). If you have a version older than 10.10 you will need to download the newest version to complete this project.
3. For a good overview of how to backup your mac and install the newest operating system check out this article here.
Computer that supports bluetooth.
See steps below to check if your mac supports bluetooth
1. Go to the apple icon and click about this mac.
2. Click the system report button.
3. Click Bluetooth in the left column and look at the 4th row and make sure it says “Bluetooth Low Energy Supported” - “Yes” . If Bluetooth Low Energy is not supported you will not be able to complete this project using this device.
Updated Chrome Web Browser - You should have version 53 or higher
If you don’t have the chrome web browser download it here.
If you have chrome, see the steps below to find out which version you have on your Mac:
1. Go to the dock at the bottom of your desktop and click on the chrome icon to open chrome.
2. Now go to the menu bar on your desktop and go to “chrome” and click “About google chrome”
3. You will see the version you are using and whether your version is up to date. If you have a version of Chrome less than version 53, follow the prompts to install the latest version.
Arduino IDE with Arduino/Genuino 101 installed
Download Arduino IDE here.
Once you have downloaded the Arduino IDE, make sure it has the drivers for the Arduino/Genuino 101 by following these steps
1. Click Tools → Board → Boards manager.
2. Scroll down the list and find the “Intel Curie Boards” by Intel. If it is not installed, click “install” and follow the prompts making sure to allow the app to make changes on your device.
3. Once installed, go to the Arduino IDE, click Tools → Board → Arduino/Genuino 101 at the bottom of the dropdown menu.
We recommend starting with this basic sketch first to make sure that your Arduino code and the voice control through the website is working properly. Once you have completed this basic LED tutorial, we encourage you to follow Greg’s instructions here to create your own project using the click shields provided and a low voltage (<12 volts) device of your choice.
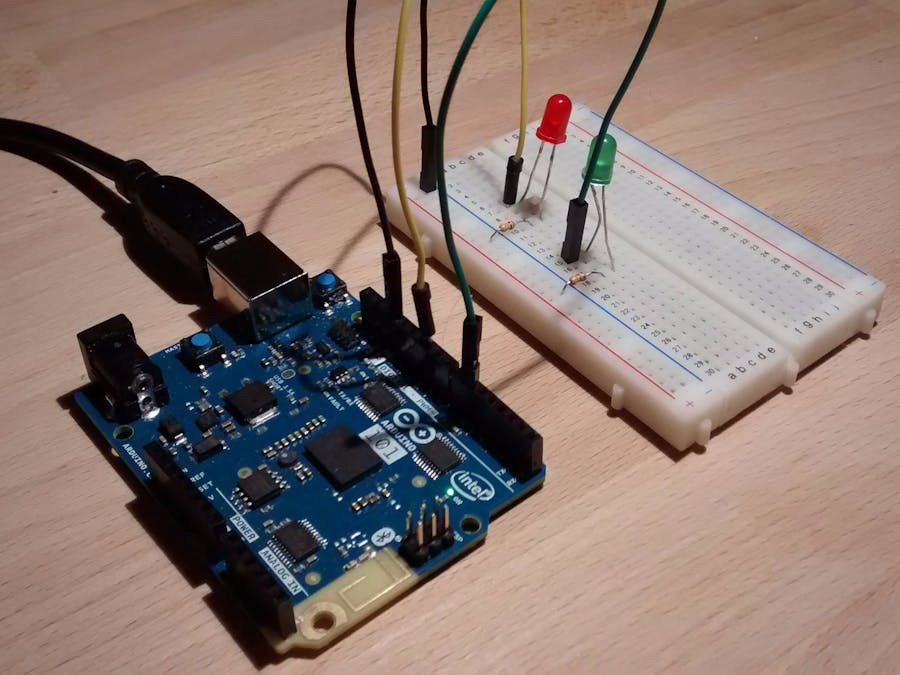
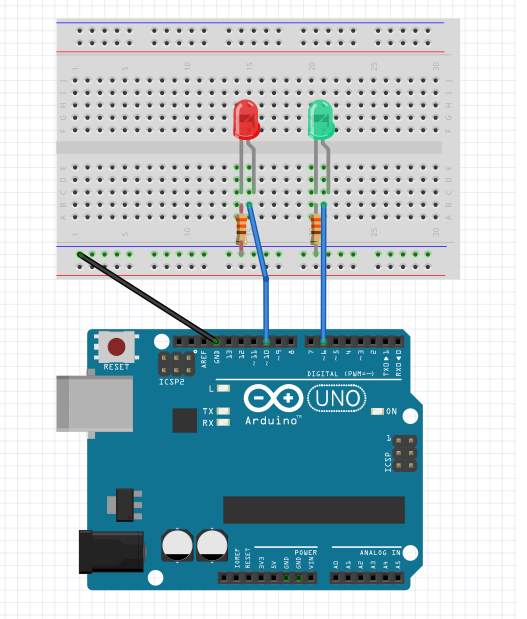
Hardware Setup
- Connect LED 1 (this matches relay one when using the relay) to pin 6 and LED 2 (this matches relay two when using the relay) to pin 10. Follow the Fritzing diagram and picture below:
*Note, the Fritzing diagram above shows an arduino UNO. This is NOT the board we are using. You should be using an Arduino/Genuino 101. The UNO does not have BLE capabilities and will not work for this project.
Arduino Code
- Open your Arduino IDE and connect your Arduino/Genuino 101 to your computer
- Make sure you’re board is set to Arduino/Genuino 101 and you have selected the correct USB port
- Go to Greg’s github page here and click on the folder arduino sketch
- Click relayClick5.ino link
- You should now see the arduino code for this project. Copy and paste this code into your Arduino IDE window.
- Scroll down to line 126 of your code, where it says “blePeripheral.setLocalName("relays");”. The line numbers are displayed on the bottom left hand corner of your Arduino IDE screen.
- Change “relays” to a unique name of your choice containing 8 characters or less. Since there will be multiple bluetooth connections in one room, this will allow you to identify and pair with the your device and not your neighbor’s. I changed my local name to “katie”.
- Now upload your code to your arduino.
Using BLE with voice control
- If you would like to find out more about how to make your own website visit Greg’s project here. Greg used github to host his website. I chose to host my modified version of his website using Amazon’s AWS S3 services.
- Click the bluetooth icon and choose the device that matches the local name that you changed in your arduino code. In my case this was “katie” so I click “katie” and click pair.
- Once your device has paired you will see a green “paired” under your device name.
- Now you have a choice, you can use the pre-coded commands below:
relayOne: relay one, one, lamp, desklamp
relayTwo: relay two, two
Or you can create your own trigger words. I decided to create my own trigger words and made relay one “green” for my green LED, and relay two “red” for my red LED. Now when I say “green” my green light will turn on and if I say “green” again it will turn off. And “red” will turn on and off my red LED.
- If you want to make sure that the web bluetooth is hearing you and capturing your words correctly, turn on the development tools on the right hand side of the screen by going to chrome’s menu→ more tools → developer tools.
Now you can see read what the web bluetooth hears. It will also allow you to troubleshoot any problems you run into.


Comments
Please log in or sign up to comment.