


Hardware components | ||||||
| × | 1 | ||||
| × | 1 | ||||
| × | 1 | ||||
| × | 1 | ||||
| × | 1 | ||||
| × | 1 | ||||
Software apps and online services | ||||||
 |
| |||||
Here is a quick tutorial on how to interface your arduino uno r3 with an LCD Display.By following the tutorial you can easily interface Arduino UNO R3 with an LCD Display.
In this tutorial, we’ll discuss how to interface LCD Display with an Arduino UNO R3. LCD Displays can be used to display some information, for example, To display Voltage, Temperature, Status of Operation or simply a text depending the objective of the project.
In this tutorial we’ll simply print “Hello Knackminds” on the Display. You can get all the components required for this project or tutorial on the Knackminds App.
What are the steps you should follow to interface Arduino UNO R3 with LCD Display?- Step 1: Get the Components Required
- Step 2: Understanding the usage of LCD Display
- Step 3: Circuit Connections
- Step 4: Arduino IDE Programming
You can get all the components required for this tutorial in the Knackminds App.
- 16 X 2 LCD
- Arduino Uno
- Jump wires
- 10k potentiometer
- 1k resistor
- Breadboard
- USB cable
- Laptop or PC with Arduino IDE Software
Done getting the required components?
Let’s understand and connect them together.
Step 2: Understanding the usage of LCD displayLcd display consists of 16 pins lets know the working of each pin
Pin16: Backlight Ground (0V)
- Pin1: Ground(0v)
- Pin2: Supply voltage(5v) vcc
- Pin3: Vo/VEE is used to adjust the contrast of lcd display with pot resistance by connecting to the display you can easily vary the contrast level by rotating the knob of pot in forward & backward directions.
- Pin4: Register pin it consists of two registers named as data register&command register, when logic is high then register pin takes the data register & logic is low atomatically it takes the value of command register.
- Pin5: Read & Writes the data, Low to write to the register; High to read from the register
- Pin6: Enable is used to send the data to data pins en=0 no execution of instruction, en=1 execution of instruction happens due to logic is high.
- Pin7 to Pin14: Data pins (D0 to D8)
- Pin15: Backlight VCC (5V)
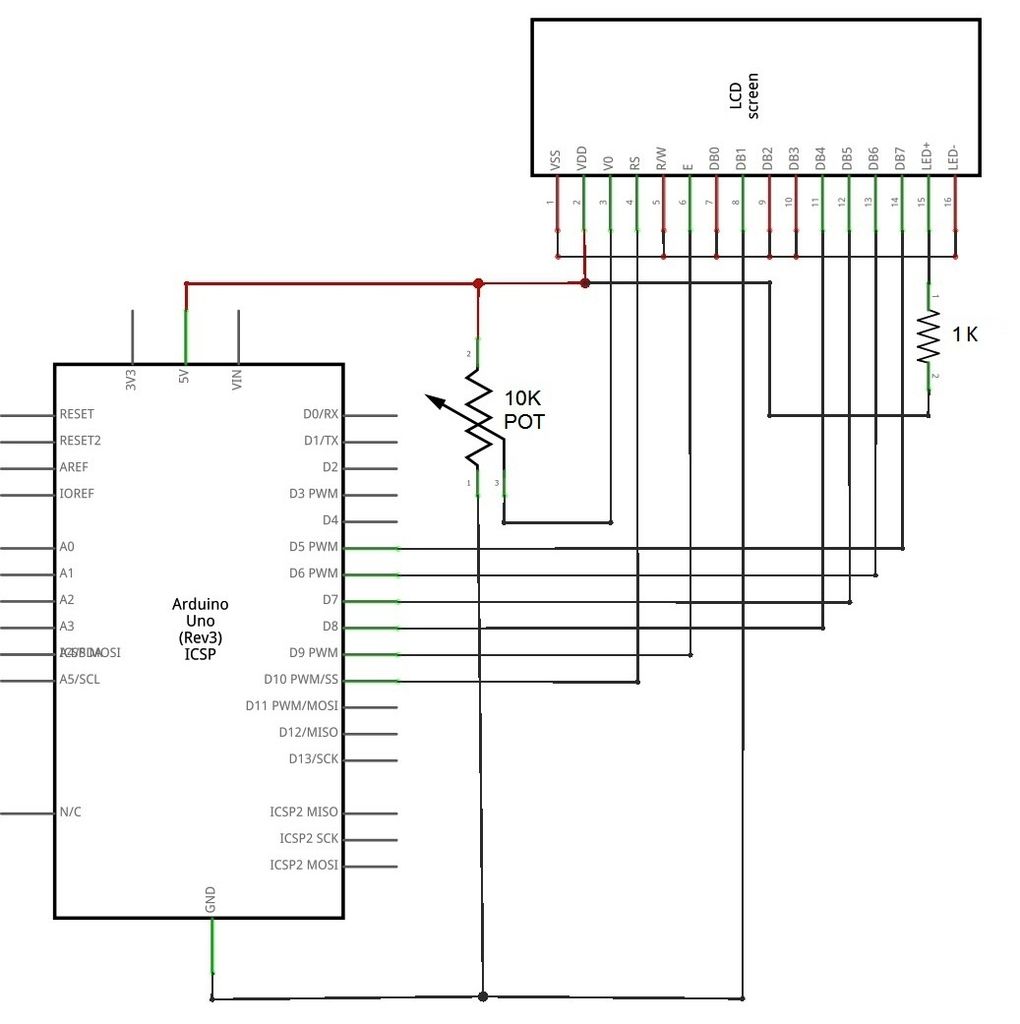
The circuit:
* LCD RS pin to digital pin 12
* LCD Enable pin to digital pin 11
* LCD D4 pin to digital pin 5
* LCD D5 pin to digital pin 4
* LCD D6 pin to digital pin 3
* LCD D7 pin to digital pin 2
* LCD R/W pin to ground
* LCD GND pin to ground
* LCD Vcc pin to 5V
* 10K resistor:
* ends to +5V and ground
* wiper to LCD VO pin (pin 3)
Open the editor of Arduino. Write the following code
CODE:
#include <LiquidCrystal..h>
// LiquidCrystal lcd( RS, EN, D4,D5, D6, D7)
LiquidCrystal lcd (12, 11, 5, 4, 3, 2);
void setup() {
// set up the LCD's number of columns and rows:
lcd.begin(16, 2);
}
void loop() {
// set the cursor to column 0, line 0
lcd.setCursor(0, 0);
//print Hello
lcd.print(" Hello!");
// set the cursor to column 0, line 1
lcd.setCursor(0, 1);
//print Knackminds
lcd.print(" Knackminds");
}
Connect the USB cable to Arduino and upload the code
OUTPUT: Hello! KnackmindsUnderstanding the code#include<LiquidCrystal.h>
The above imports the LiquidCrystal Header file which contains all the methods required to control the LCD Display.
LiquidCrystal lcd (12, 11, 5, 4, 3, 2);
This line helps to initialize the LCD Display. It tells the Arduino Micro controller about the connection of LCD.
void setup() {
lcd.begin(16, 2);
}
Setup is used to initialize variables, pin modes..etc. The setup function is called on start of our sketch (program ). By writing lcd.begin(x, y) you are setting the no of rows and columns to display on the LCD.
void loop() {
// set the cursor to column 0, line 0
lcd.setCursor(0, 0);
lcd.print(" Hello!");
// set the cursor to column 0, line 1
lcd.setCursor(0, 1);
lcd.print(" Knackminds");
}
We are setting the cursor by writting lcd.setCursor() and printing the text by calling lcd.print();
knackminds
 john saho
_3u05Tpwasz.png?auto=compress%2Cformat&w=40&h=40&fit=fillmax&bg=fff&dpr=2)
Comments
Please log in or sign up to comment.