

Hardware components | ||||||
 |
| × | 1 | |||
Software apps and online services | ||||||
| ||||||
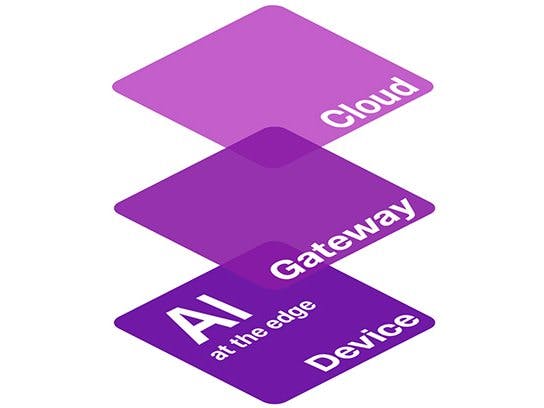
Brainium is a hardware and software stack combo with 3 layers. The Brainium stack features mature AI, highly secure, cloud agnostic, highly scalable and also ready for mass production usage.
It has 3 layers:
- SmartEdge Agile
- Gateway
- Cloud
SmartEdge Agile is a ready to use BLE sensor and edge computing device with various sensors attached. It comes with built-in security with TLS connection for cloud connectivity. SmartEdge Agile is production ready with CE and FCC certification. It has a water and dust proof enclosure also.
The device has following sensor:
- Accelerometer + Gyroscope
- Magnetometer
- Pressure Sensor
- Temperature & Humidity
- Proximity/Ambient Light Sensor
- Microphone
It has BLE 5.0 and USB Type-C connectivity. It has rechargeable LiPo battery which can charged connecting to USB. The device is connected to the Brainium portal through a Gateway.
Gateway is a software used to connect to the Brainium portal. The SmartEdge Agile device is connected to the Gateway and can be communicated to the cloud through Gateway. As of now there are three gateway software available for Android, iOS and Raspberry Pi.
Cloud software is backend and frontend solution to manage sensor devices, sensor data and gateways.
The Brainium has Artificial Intelligence stack called Brainium AI Studio. Using the AI Studio solution is capable of Supervised and Unsupervised Machine Learning. It can be used for production level Anomaly Detection, Predictive Maintenance, Gesture Detection, etc... without even writing a single line of code. Everything from Collecting Data, Training with collected data, creating Models and applying the model to the SmartEdge Agile device can be done using the AI Studio. As mentioned before, it is very easy to perform these tasks without writing any code.
The Pattern Recognition model created using the AI Studio is transferred to the SmartEdge Agile device and the recognition happens at the edge device. The recognized pattern is transferred to the Brainuim portal and can be applied to projects created using the portal. We can view the pattern recognition in real-time.
The portal is capable for creating various visual widgets. We can view the sensor values from the Agile device using the UI Widgets. Using the portal we can collect and save sensor data for future use. The saved data can be downloaded later in different formats. The data saved can be used for AI projects from the AI Studio.
The Brainium Software stack has security built-in. The stack has following security features built-in:
Firmware reverse engineering protection
- Secure firmware update: OTA Firmware code is signed and validation using the signature at the edge
- TLS: Device-to-cloud gateway is using TLS v.1.2 for high security. Device is validated using x509 ECC certificates
- Tamper resistant storage: The cloud certificated is stored in a tamper resistant storge on the device
These security measures ensure the device to cloud communication is highly secure and cannot be compromised. These security measure also makes the Software Stack production ready.
Buying a SmartEdge AgileYou can buy SmartEdge Agile device from Element14 Site. It costs $110 aprox. as of now.
Start Using Brainium PortalTo start using Brainium portal, create and account using this link. Once the account is created, download the Gateway application from this link. You can download Android, iOS and Raspberry Pi Gateway application from the above link. This article concentrate the mobile Gateway Application. For Raspberry Pi Gateway please refer to this link to install and configure it.
Once the Gateway is installed log on to the cloud using your credentials. After login make sure that the Gateway is connected to the cloud.
Mobile Gateway
After the Gateway setup is completed, log on to Brainium portal. Create a Project using the + button at the bottom of the projects page.
Create Project Page
Once the project is created, you have to associate the SmartEdge Agile device to your account. In order do do that, select on the Equipment tab and click on the + button. This will open the site page and it will start for searching for Agile device. It may take some time to get the device listed on the page. Once it is listed click to add to your account.
Associate Agile Device
Once the device is associated, update the device firmware if necessary. After that select the project and associate the device to that project. Once associated you can see the device listed on the project page under the "Devices" tab.
Project Page
You can list of sensors available on the device on the right side of the page. You can click on any sensor and configure how the sensor reports to the cloud. It is called Data Sources
Configure Data Sources
You can configure the frequency of the device reports to the cloud for different sensors. You can choose from following options
- Off
- Low
- Medium
- High
- Extreme
Off mean the sensor will not report its values to the cloud, any other values determine the frequency. Note that the battery usage depends on the frequency you choose.
Once the data source is configured, you can go to "Data Tracking/Recording Tab" to start viewing/recording the sensor values.
In order to record/view sensor values, create widget by click the "Create Widget" button.
Create Widget
Enter a name for the widget and select select Widget Type and Graph Type from the drop down menu.
New Widget Page
Once the widget is created, you can see that on the project page.
Widgets
Now the widget is create and you can start collecting the sensor data. To do that click on the "Start Tracking" button. This will popup a page to assign an already associated device. Select the device which you want to collect data from.
Assign device page
Once the recording is started, you can see the sensor values on the widget. Here I have selected Acceleration and selected Line Chart. You can see the line graph of the sensor data.
Acceleration Graph
To start recording and save it for future use, click "Record Session" button. To stop recording click on the "Recording..." button. This will popup dialog to prompt you the name of the recording session. Click on the "Save & Open Report List" or "Save & Open Widget Page" to save the recording.
Save Recording Dialog
The saved recordings are listed on the "Recording Sessions" page.
Saved Recording Page
You can record various sensor data and as many recordings as you want. You can download the recording files in CSV format by clicking on the "Generate" button. It may take some time to prepare the file and start downloading depending on the recording time and the size of the data recorded. Once File is prepared click on the download button to start downloading it.
Download Recording File
Using AI Studio requires its on article and will be published in future, stay tuned.
Hope this gives a gentle introduction to the Brainium Platform and help you to get started with it.
Happy Brainium and SmartEdge Agile tinkering. :)


Comments