


Hardware components | ||||||
 |
| × | 1 | |||
Getting Started Guide
For More Info Visit: http://ultra96.org/product/medical-cybersecurity-platform
Hardware Requirements:- Ultra96v2
- PMOD Adapter
- Heart Rate Sensor
- Ultra96 Power Supply
- TPM PMOD 2.0
- 16 GB SD Card
- USB to Micro USB Cable
- Chrome Browser
- TeraTerm
- Image File (Download Link)
- Win32DiskImager
- Download the image file from the download link provided (http://ultra96.org/product/medical-cybersecurity-platform)
- Unzip the downloaded file to get the image file (Disk Image File /.img extension)
- Write the image file to a 16GB SD card using Win32DiskImager
- Once the write is successful, the SD card is ready
- Insert the prepared SD card into the SD card slot of the Ultra96v2
- Connect the micro USB to the Ultra96v2, the other end of the USB cable will be connected to the laptop
- Connect the PMOD adapter to the Ultra96
- Connect the heart rate sensor to the PMOD adapter using the grove cable
- Connect the TPM PMOD 2.0 to the vertically mounted PMOD adapter
- Connect the power adapter to the Ultra96v2 board
Once completed, your set up should look like the below images:
If you are unsure of the connection, please refer the following link for a video of the setup: https://www.youtube.com/watch?v=LtXzalxy2zc&t=6s
Step 3:- Press the power button on the Ultra96v2 to turn on the board
- Give the board a few seconds to boot up, you will see blue lights flashing on the board to indicate that the boot is complete
- Now open the browser and enter the following IP Address: http://192.168.3.1:9090/
- You will be prompted by the browser to enter a password as shown below:
Password: xilinx
Once the password is entered, you will be able to access the home directory of Ultra96v2 via jupyter
Step 4:- The home directory will look as follows:
- Click on “dashboards” from the list of folders
- Click on “secure-dashboard.ipynb” from the list of folders
- To start, click on Cell -> Restart & Run All
- Click on “Restart and Run All Cells”
- The Medical Cybersecurity Demonstration will be ready and will look like the picture shown below:
- Insert your finger into the finger the heart rate sensor
- You will see the heart rate values show up on the live graph
- Note: the respiration rate is artificially generated once the heart values are detected
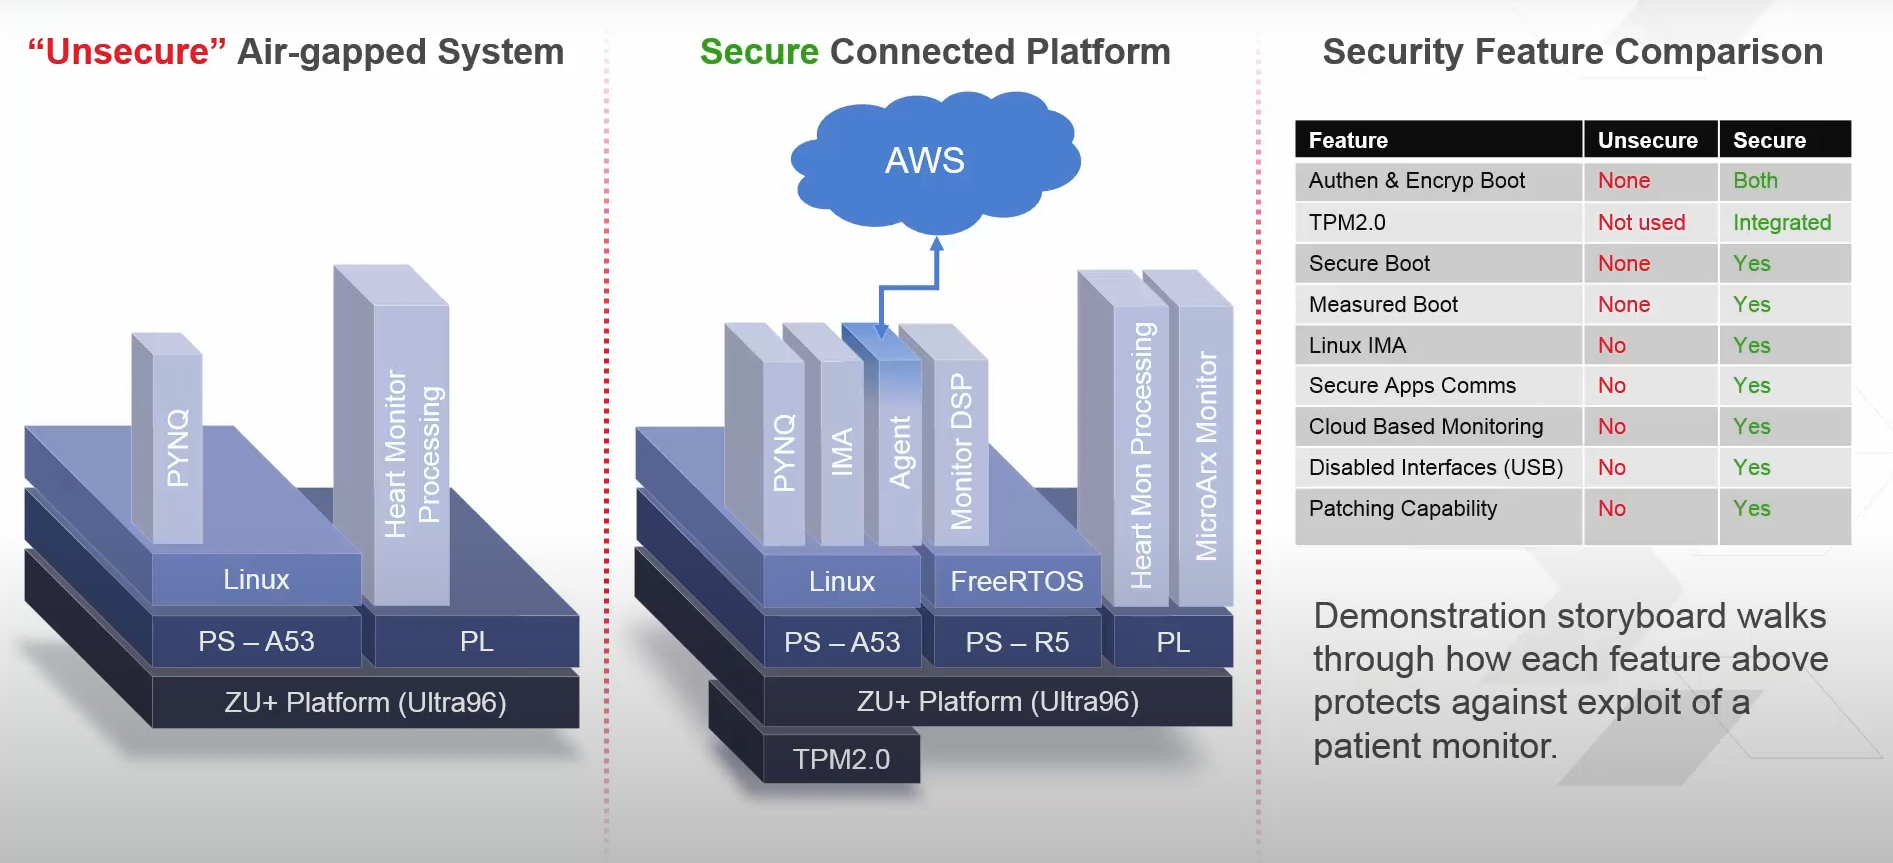
All the buttons on the left are action Buttons:
- Attack FPGA (user) – Attempts to load an unauthenticated bitstream as non-root user. Blocked by ZU+ authorization checks.
- Attack FPGA (root) – Attempts to load an unauthenticated bitstream as root-user. Blocked by ZU+ authorization checks even when called by root.
- Attack RTOS App – Inserts attack in FreeRTOS application memory. Flagged by MicroArx monitor.
- Attack RTOS Kernel – Inserts attack in FreeRTOS kernel memory. Flagged by MicroArx monitor.
- Attack Linux Kernel – Attack to load unsigned file, against security policy of Linux. Flagged as issue requiring patch.
- Patch Linux – Mock patch to address “Attack Linux Kernel” attack. Makes point that even a secure system will need patches over time.
- Reset System – Resets the demo back to the starting point
- Restart System in Unsecure Mode - Restarts the demo in unsecure mode
- Properly shutting down the demo
- Select the click button next to “secure-dashboard.ipynb”
- Click on shutdown and the demo will be shutdown
- Click on New -> Terminal
- In the terminal, enter “shutdown now”
- The board will shutdown following the proper shutdown routine
- Note: This step will help in starting the demo back up again in the future
- Disconnect power to the Ultra96v2
For more information and resources please visit: http://ultra96.org/product/medical-cybersecurity-platform
White Paper:Risk Management for Medical Device Embedded Systems
Xilinx Medical Webpage:https://www.xilinx.com/applications/medical.html
Xilinx Security Webpage:https://www.xilinx.com/products/technology/design-security.html
Thank you!


Comments