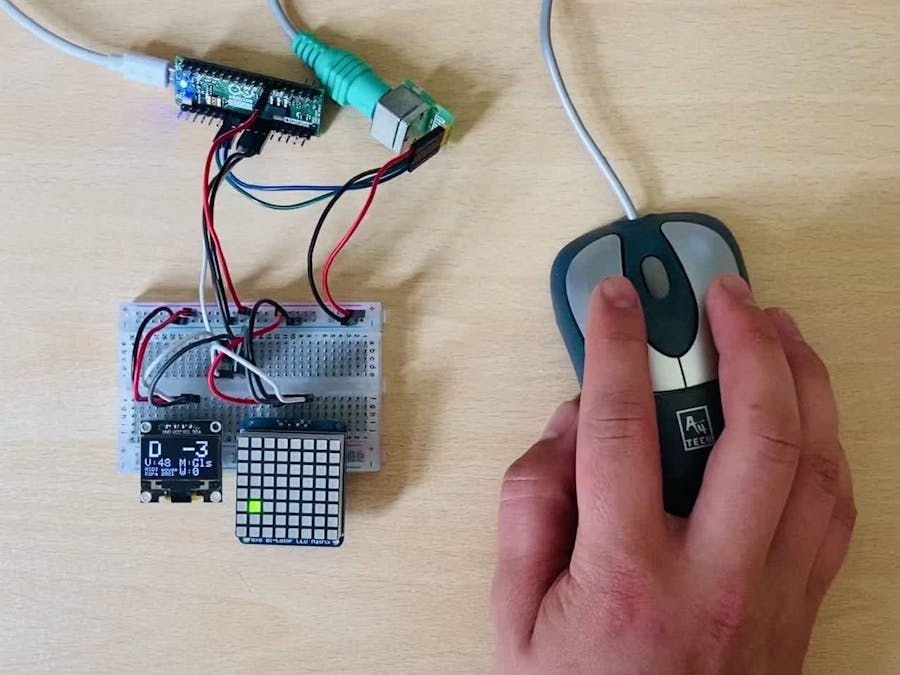
I hate throwing away old electronics that still work but are no longer supported by modern appliances. My idea for this project came after finding an old PS/2 port roller ball computer mouse that I no longer had a use for. I'm a musician in my spare time and currently recording an EP with my metal band HELL SHEEP. I'm using MIDI controllers to create synth parts for our tracks on pro tools. Many people use a MIDI keyboard to write MIDI parts on the computer. I'm no pianist so I have been experimenting with different methods of writing MIDI, including using chess games and cellular automata. Trying to think of a way to re-use the old computer mouse, it occurred to me that it could be repurposed with Arduino as a nifty MIDI controller.
(For those of you who don't know what MIDI is, check out this great video by Collin's Lab.)
The Arduino MIDI computer mouse controllerI decided that the controller would make use of every feature on the old computer mouse I had. That meant mapping separate MIDI commands to left click, right click, mouse wheel click, mouse wheel scroll, and mouse movements on the X and Y axis.
I decided to map the midi pitch to the X axis position, and the midi volume (known as 'velocity') to the Y axis position. The position of the mouse wheel, would determine the value of a continuous controller. In the default settings this is CC1 - the mod wheel value.
The operation of the device is based around two modes which can be switched between by clicking the mouse wheel. In Glissando mode, the device can only play one MIDI note at a time. Left or right mouse clicks map to the same note. Moving the mouse while clicking down leads to a seamless movement between notes. In Interval mode, left and right mouse clicks map to different notes so it is possible to play intervals by first clicking one mouse button, then moving the X axis position of the mouse, and clicking the other mouse button.
The user interfaceI wanted to give the controller an intuitive and fully established user interface so users wouldn't have to rely on a computer display to be able to use the device. This means the controller can be used with any device capable of reading MIDI through USB. In order to do this I used an LED bicolour 8 * 8 matrix and a 128 * 64 monochrome I2C display.
The LED matrix provides a representation of the X and Y axis position of the mouse. The pattern of lights across the X axis is based on 1 octave of a C major scale. The pattern is shown in the images below. It will repeat from -5 to +4 octaves above middle C.
Unlike the X axis, the Y axis does not 'loop' and so the 127 possible volume values map to 8 positions on the matrix. This is demonstrated in the images below:
In Glissando mode the matrix lights up green to show the position of the mouse before a note is pressed, and red while a note is being pressed. In interval mode, the matrix lights up red at the point at which the left mouse button was pressed, orange at the point at which the right mouse button was pressed, and green at the current position of the mouse.
Alongside the LED matrix, there is a 128 * 64 OLED monochrome display that displays the current note and volume, as well as the position of the mouse wheel and the mode of operation. An annotated image of this display is shown below.
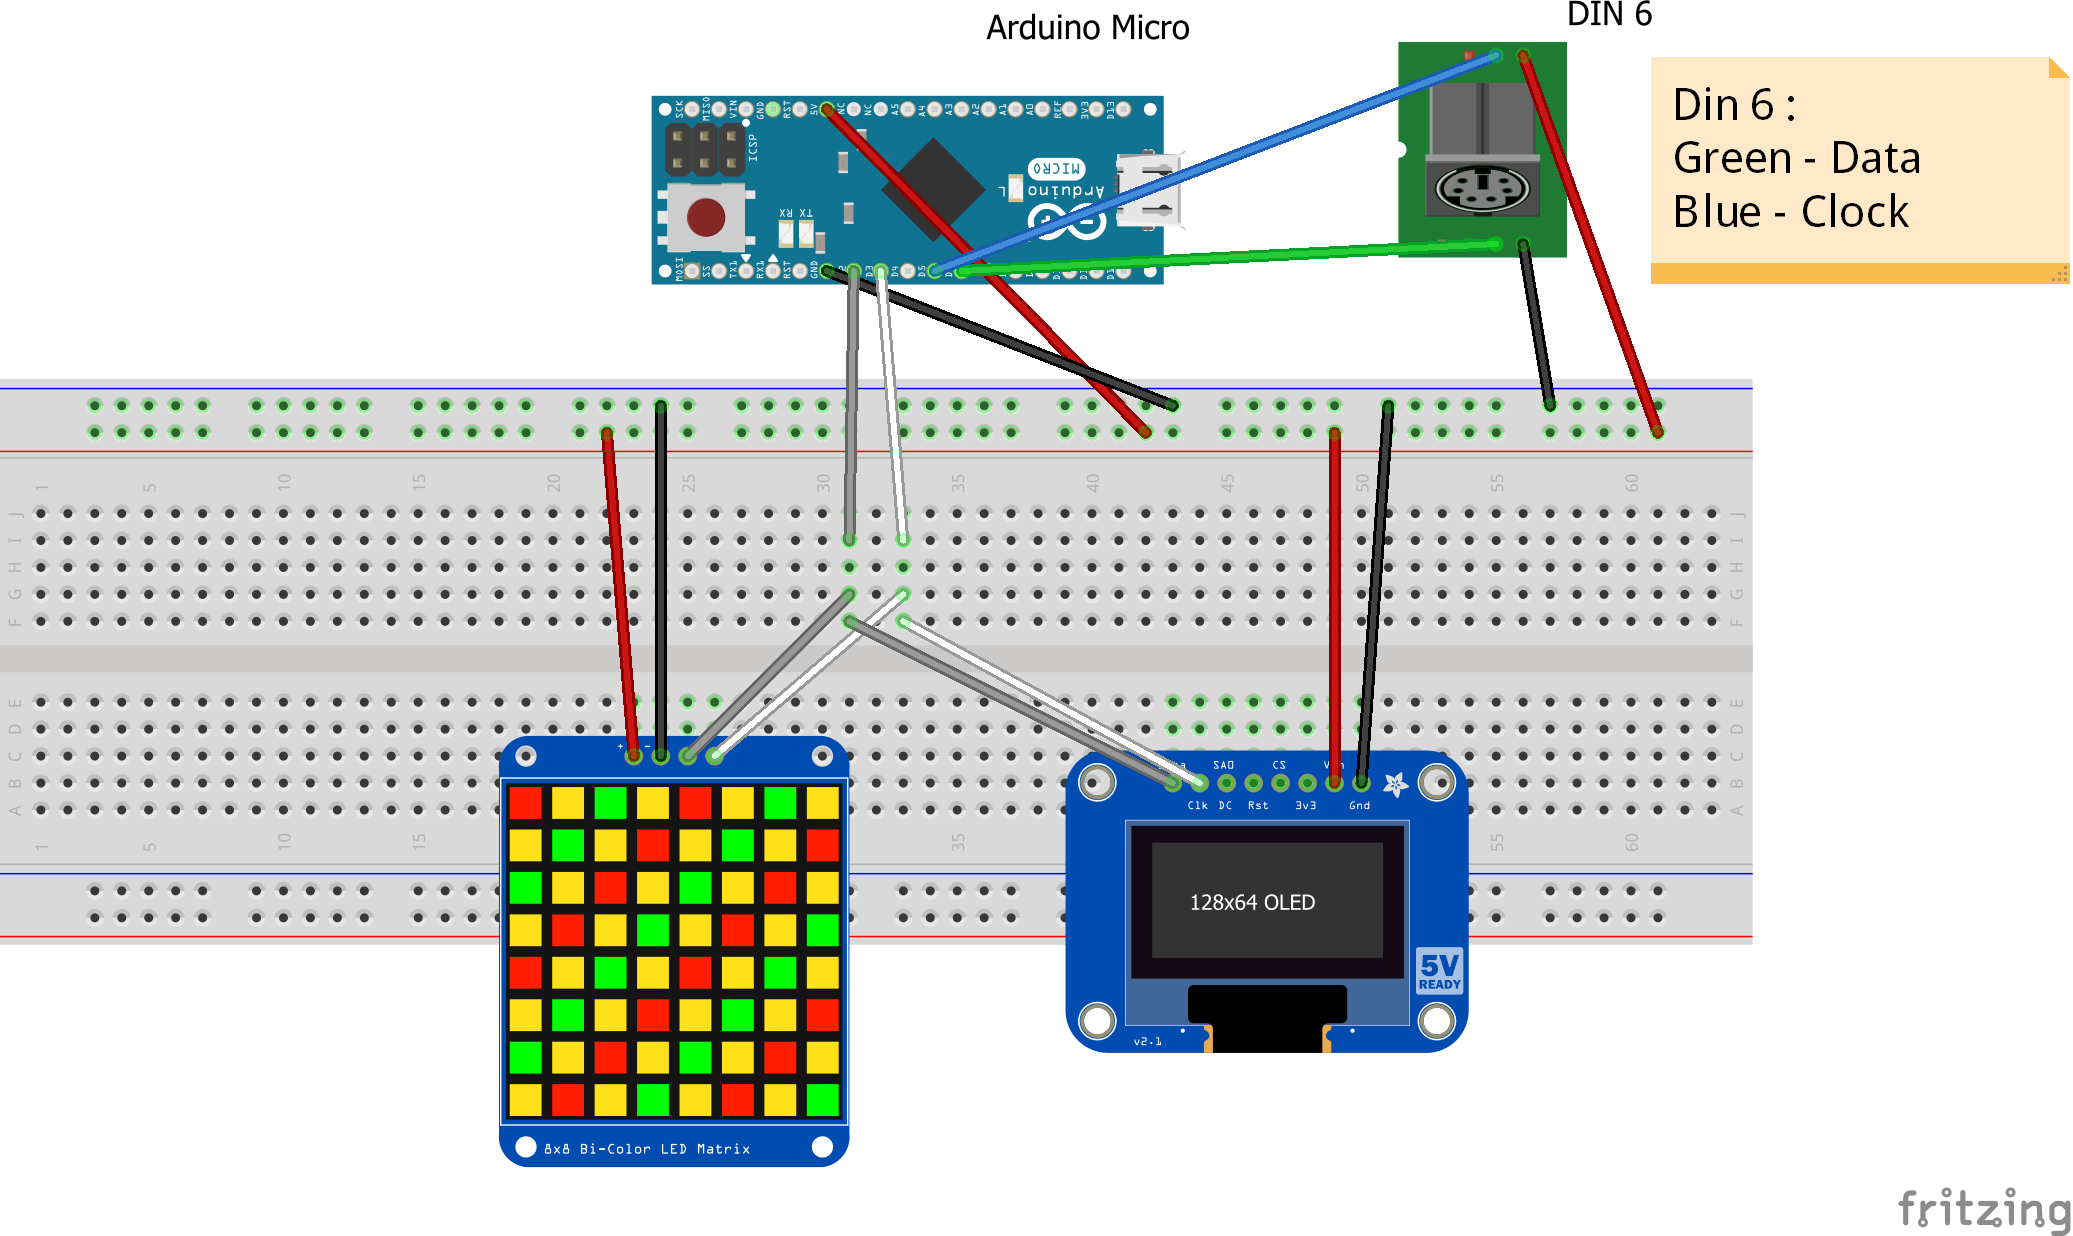
Wire up your components on a breadboard as shown in the breadboard layout image below. Install the following libraries using the library manager on the Arduino IDE:
- MIDIUSB (used to send MIDI through USB)
- Adafruit_LEDBackpack (used to communicate with LED matrix)
- Adafruit_GFX (used by the OLED display)
- Adafruit_SSD1306 (to communicate with the OLED display)
Install the following library from GitHub to communicate with the PS/2 mouse adapter. ps2 mouse.
Download the code from the GitHub repository and upload it onto your Arduino micro.
Making music with your mouseOnce you've wired the circuit and uploaded the code, attach a ps/2 roller ball mouse and check that the UI is working. If it is, the device is now ready to be used as a MIDI controller. If you've never used a MIDI controller to make music on your PC before I recommend following the Midi Sound Generation on Windows instructions in the MIDI device documentation.
If you've used MIDI before, the device is ready to be used just like any other MIDI controller. In the images below I show how I use the device with Pro Tools 12.
Some things to note: the MIDI channel is fixed at channel 1. If you want to change this you will have to change the midiChannel constant in the code. Likewise the mouse wheel is mapped to CC 1, this can be changed in the code too.
Finally, if you do some light tinkering with the code, you can experiment with changing the sensitivity of the mouse, or what MIDI parameters the X an Y positions or mouse wheel correspond to. If you do some tinkering and come up with something cool, please share it in the comments!
AcknowledgementsThis project was greatly aided by the PS/2 mouse library and the USBMIDI library. In the YouTube video I am using the chipsounds software synth to create music with the controller.


_PnKPri8a6q.jpg?auto=compress%2Cformat&w=48&h=48&fit=fill&bg=ffffff)


Comments
Please log in or sign up to comment.