


Hardware components | ||||||
 |
| × | 1 | |||
 |
| × | 1 | |||
 |
| × | 1 | |||
Software apps and online services | ||||||
 |
| |||||
ESP8266 - WIFI - DS18B - Scaleway - Node Red
1 - Get started with Scaleway IoT HubCreate an IoT Hub
Go to the IoT Hub tab:
Create your first Hub and choose the Free SHARED Plan:
Click on create, your hub will be ready in few seconds:
Add a device
Once your hub is created, you should see the following screen:
Navigate to the Device tab:
Click on Add Devices:
Before validating, choose the Allow Insecure option, we won't use devices certificates in the tutorial.
To check your device information, just click on its name, you should see the following screen:
Your MQTT broker is now ready to receive some physical device information!
Now repeat this step to create a two other devices:
Install Developer Environment - Arduino IDE : https://www.arduino.cc/en/main/software
Open Arduino IDE and go to preferences:
Add the following link in the Additional Boards Manager URLs: http://arduino.esp8266.com/stable/package_esp8266com_index.json
Close Preference window and go to Tools -> Board -> Boards Manager...
In the Boards Manager window, type esp in the search box, esp8266 will be listed there below. Select latest version of board and click on install.
Program
https://github.com/citroZ26/connected_fish_tank/blob/main/main.ino
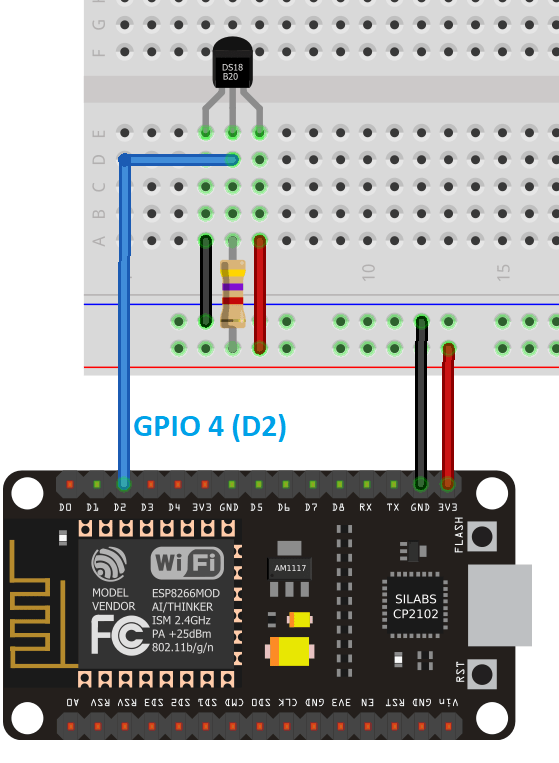
3 - Display TemperatureWiring
Go back to your IoT Hub and go to the Kickstart tab
Click on + Create a Kickstart
Fill the following form:
validate by clicking on Create a Kickstart.
Now wait few seconds until your application is getting ready. When ready, a green indicator will appear.
Now click on Dashboard and log with:
- Username:
admin - Password:
your-password
Find the node-red-dashboard and install it
node-red-dashboard image
5 - 3d PrintingInstall 3D modelisation software - SOLIDWORKS :
https://www.3ds.com/fr/produits-et-services/solidworks/
And model the different parts.
- The box
Click on files -> New -> Piece -> Ok.
Go to Esquisse and select a form that you want (rectangle), select the plan you want (front plane) and click on the board do make a rectangle. And you click on Ok (V green).
Then, click on Smart Quotation -> select borders in blue -> put mesure of what you need (length: 80mm and width: 40mm).
After go to Function -> Extruded Brushing and you see in yellow the extension of your object. Put the direction of you want (automatically) and the mesure of brushing (40mm).
Then, you create another rectangle on the same esquiss.
Select Smart Quotation -> click on borders of the first rectangle and the second rectangle created -> put mesure between their (2.5mm).
After go to Function -> remove material. You see in yellow the remove of the object. Put the direction of you want (automatically) and mesure of brushing (37mm).
- The top
Click on files -> New -> Piece -> Ok.
Esquisse -> front plane -> Ok.
Smart Quotation -> select borders in blue -> put mesure of what you need (length: 80mm and width: 40mm).
Function -> extruded brushing -> direction -> mesure: 3mm
Then, you create another rectangle on the same esquiss.
Smart Quotation -> click on borders of the first rectangle and the second rectangle created -> put mesure between their (2.5mm).
Function -> extruded brushing -> direction -> mesure: 2.5mm
After,
Install 3D printing software - PrusaSlicer:
https://www.prusa3d.fr/prusaslicer/
Go on your desk and click on PrusaSlicer.
Click on the window add
and click on the stl files download.
Ajust the support if you need and the padding.
Modify the support and select "support on the tray only".
click on yes.
Then, click on cutting now at the bottom right.
Then, the printed model appears.
A support appears to print correctly the model on the tray.
Click on export G-code at the bottom-right.
And put the G-code on the SD card and print on the 3D printer selected.
Sources : https://github.com/luisomoreau


Comments
Please log in or sign up to comment.