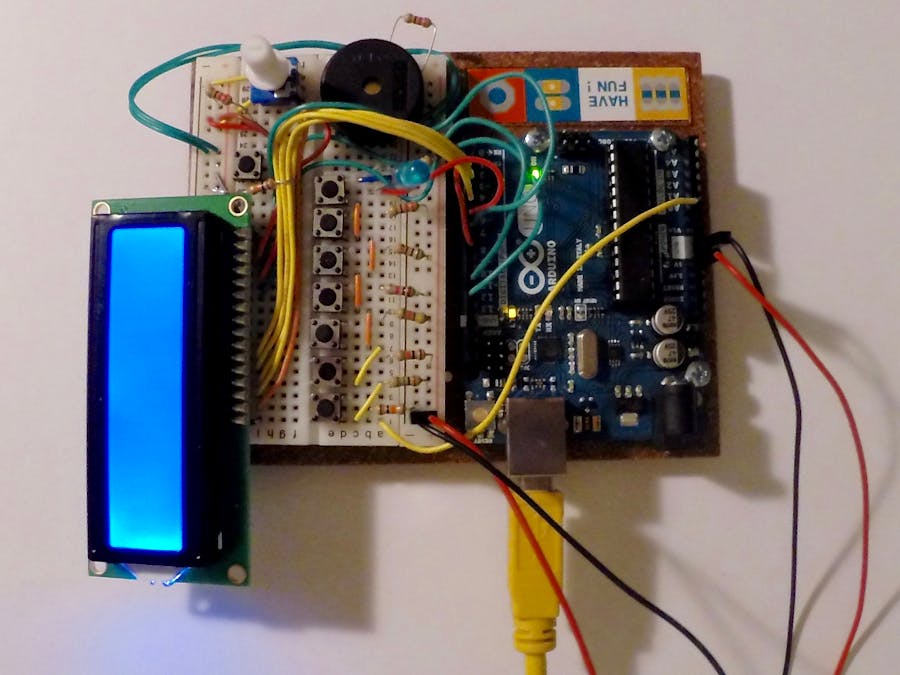
To begin, I should fill you in that I am completely new to the world of electronics. I have a decent background in coding, which helps, but I am always open to new ideas and suggestions for any of the projects I've created.
Recently, I've been learning more about the Piezo Buzzer and the coding involved, and this is my creation based on what I've learned so far. There is plenty of room for expansion with new features or switches, which I plan to do later, but for now it's on to the next challenge!
Below is a video of how the device works, including the menu of preset songs. I will admit, technically song 4 and 5 are the same, but what can I say, I have the urge to create bigger and better things and writing the music code for more songs was not one of them! The basic coding for both the main loops, and the individual song loops are pretty easy to adapt to your own ideas, so feel free to change however you see fit.
See it in action!How to set up the hardwareThe piano keys...
The piano key switches were connected using a resistor ladder. The resistors are placed in sequential order, connecting each switch to power. For my project, I chose to use (in ohms) 1M, 10k, 4.7K, 1K, 560, and 220. The first piano switch (on the left) is connected to power, and also to the next switch in the circuit. The second switch is connected to the smallest resistor, and each switch after that connects to the next largest resistor in the series. The last switch grounds the connection via a 10k ohm resistor and also connects all 7 switches to the "analog in" pin A0 on the Arduino. The main sketch defines which music note frequencies are associated with each piano key. For this project, I used C4, D4, E4, F4, G4, A4, & B4, with C4 being the leftmost switch. Change the frequency values, or add additional switches to fully customize your own project!
The LCD screen...
Connect the LCD pins according to the circuit diagram below. Connect LCD pin 3 to the Potentiometer for contrast control of the screen. The outside pins of the Potentiometer are connected to power and ground to complete this circuit. LCD pin 15 is connected to power via a 220 ohm resistor. If any of these pins change on your own project, update the code accordingly.
The menu switch...
Connect the menu switch to power, and ground it through a 10K ohm resistor. This switch should also be connected to pin 7 on the Arduino so you can control it via coding.
The LED...
The LED is used to indicated when you're in "menu mode", and the piano keys have been disabled. The LED light turns on once the menu switch is pressed. Connect the anode (positive) of the LED to pin 6 of the Arduino, and ground the LED through a 220 ohm resistor.
The Piezo buzzer...
To integrate the Piezo Buzzer, simply connect one end to the Arduino pin 8, and the other side to ground via a 220 ohm resistor. The "tone" function in the code will look for this pin in order to play the note called.
The set up...
- The sketch begins by importing the "LiquidCrystal.h" and "pitches.h" libraries so we can reference various items from them later on in the code
- Next, the code is set up by defining a name for the menu switch, determining which pins are inputs vs. outputs, and setting the frequency values for each of the 7 piano keys
- A new tab was created for each individual song in an effort to keep my code somewhat organized and easier to understand, and to expand on later. If you'd like to delete or add more songs, just make sure to change the code in the main "Electronic Keyboard" sketch as well.
The main loop...
- The keyboard begins with the LED turned off, and all of the piano keys active
- Once the loop detects that the menu button has been pushed, it will disable the piano keys and turn the LED on to indicate you are in "menu mode"
Accessing the menu...
- Push the menu button to cycle through the present songs, and push any of the piano keys to start playing the song displayed on the LCD screen
- The LCD screen will show which song is currently playing, then return to the same point in the menu once the song has finished playing. From there, you can either replay or continue in the list of available songs.
- Double-clicking the menu button will restart the menu from the beginning
- To return to using the piano keys, cycle through the remainder of songs in the menu. Once the LCD screen in blank, and the LED is off, the piano keys will work again.


_ztBMuBhMHo.jpg?auto=compress%2Cformat&w=48&h=48&fit=fill&bg=ffffff)


_3u05Tpwasz.png?auto=compress%2Cformat&w=40&h=40&fit=fillmax&bg=fff&dpr=2)
Comments
Please log in or sign up to comment.