The potentiometers are widely used in various robotics projects, this is associated with the fact that it is a way of interacting with a prototype or even a way of registering a movement. We must remember that the reading of analog values is one of the first examples that are learned in electronics, but... In how many different ways can they be represented? In the previous projects I used a sequence of 8 LEDS, followed by a 8x8 LED matrix, and a 7-segment display, but now I'll use a 4-digit 7-segment display.
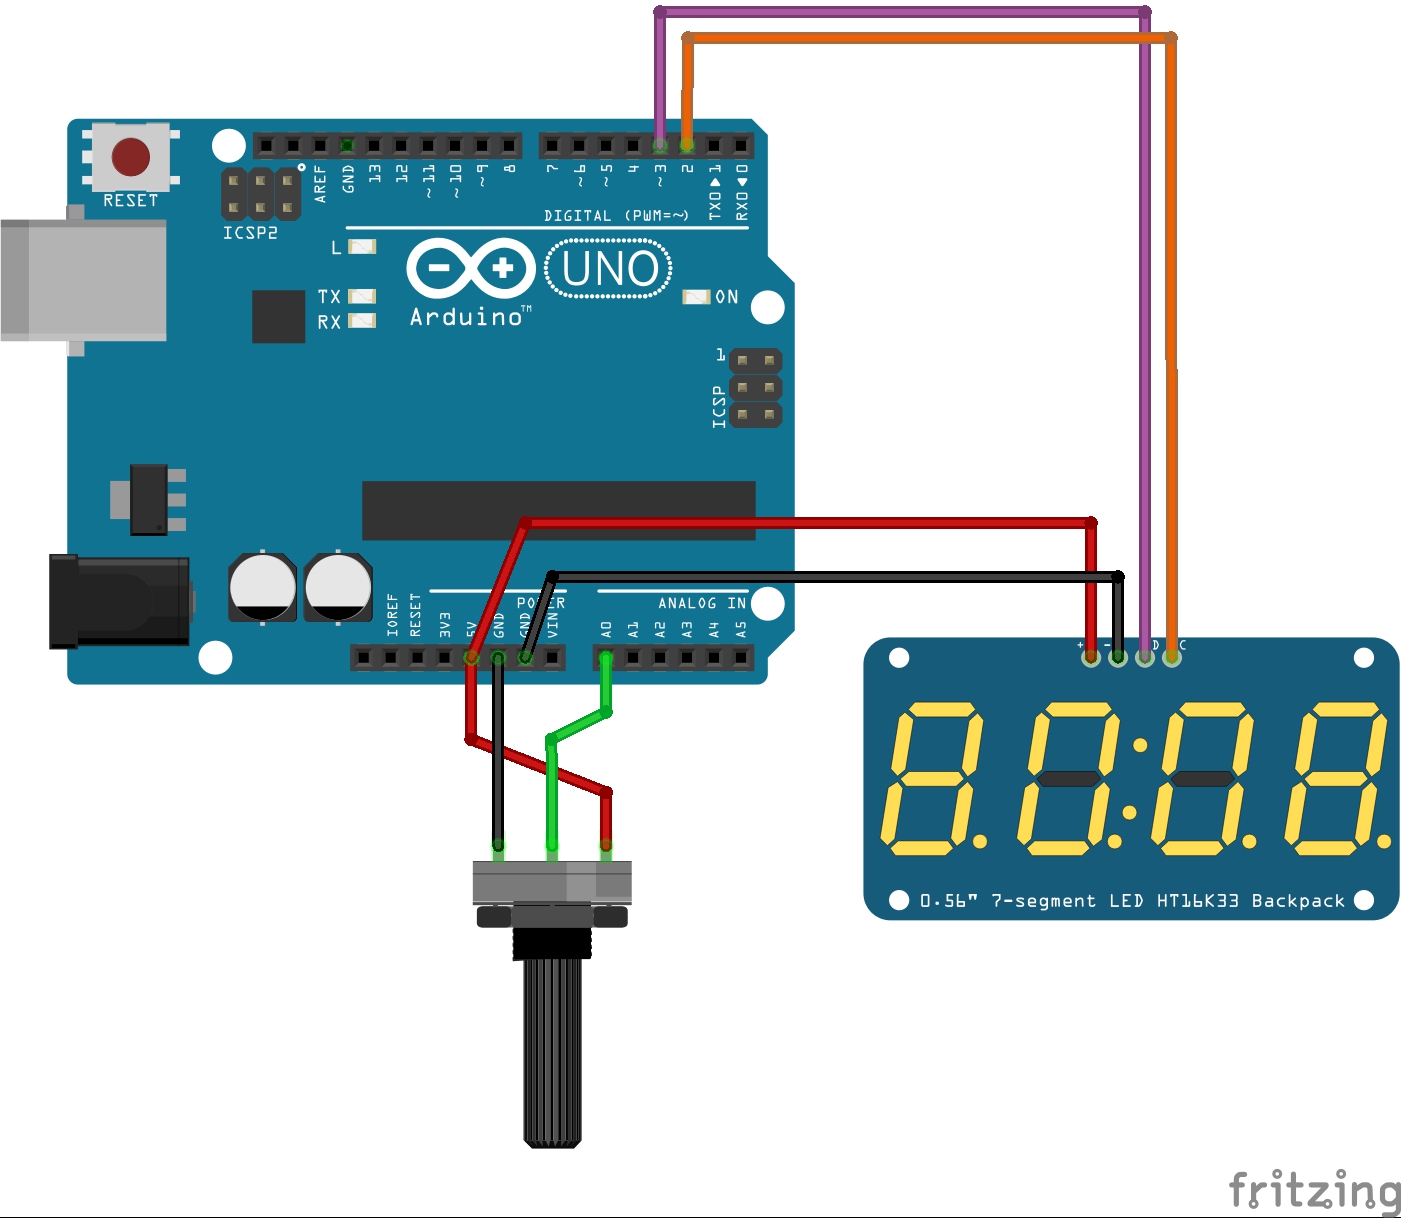
DiagramIt is important to identify the advantages of using the module with the TM1637 instead of the 4-digit 7-segments display component, since it requires twelve cables connected to the digital pins and four resistors to activate the corresponding digit. Njk-jeev
The module simplifies the connections:
Knowing this and checking the Arduino UNO's pinout, we make the following connections:
At this moment we must install the library (TM1637Display.h created by Avishorp)to the Arduino IDE and run TM1637Test.ino.
Living on the edgeWith our connections ready, we start the programming with the library and initial declarations:
#include <Arduino.h>
#include <TM1637Display.h>
#define CLK 2
#define DIO 3
TM1637Display display(CLK, DIO);
The configuration section remains empty.
void setup() {
}
The loop section contains the following lines:
void loop() {
  display.setBrightness(0x0f);
  display.clear();
  uint8_t data[] = { 0x00, 0x00, 0x00, 0x00 };
  int value = analogRead(A0); // read of potentiometer value
  String texto = String(value);
  if (value > 999){
    data[0] = display.encodeDigit(texto[0]);
    data[1] = display.encodeDigit(texto[1]);
    data[2] = display.encodeDigit(texto[2]);
    data[3] = display.encodeDigit(texto[3]);
  } else if (value > 99){
    data[1] = display.encodeDigit(texto[0]);
    data[2] = display.encodeDigit(texto[1]);
    data[3] = display.encodeDigit(texto[2]);
  } else if (value > 9){
    data[2] = display.encodeDigit(texto[0]);
    data[3] = display.encodeDigit(texto[1]);
  } else {
    data[3] = display.encodeDigit(texto[0]);
  }
  display.setSegments(data);
  delay(100);
}
The most important actions that we must see is first to clean the screen and activate the characters depending on the number of the reading, that is correct, unlike previous projects, it is the first time that we can appreciate the value numerical value of the potentiometer reading.
ConclusionThe use of this type of display reminds me of the discman, they are very easy to use even without libraries but let's be realistic, we must make simple projects that can be easily duplicated, of course remember to comment if you have made a project with this display or if it information has been useful to you. Soon I will present another project. See you later!!!


_ztBMuBhMHo.jpg?auto=compress%2Cformat&w=48&h=48&fit=fill&bg=ffffff)


Comments
Please log in or sign up to comment.