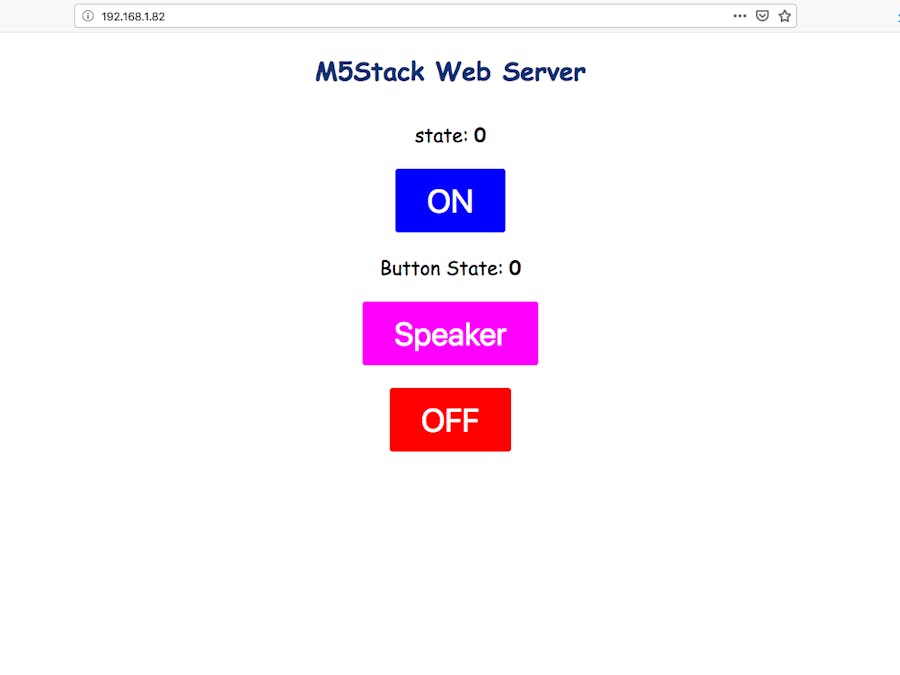
ESP32 has almost become the de facto standard for IoT development and it doesn't look set to change. Therefore whether we are using our ESP32 based M5Stack for automating our home, monitoring our pets or whatever it is you like to do with your M5Stack, we could use some kind of interface that we can access on both a computer or a mobile phone.
The simplest way to do this is by hosting a simple web page on the M5Stack with buttons and text fields that can trigger the hardware of the M5Stack and also display readouts of its behavior. We can also learn some basics about servers, clients and other networking terminology in the process.
To begin with we will need to have a MicroPython firmware flashed to our device. At the time of writing Uiflow version 1.3.2 is recommended. Flash your device with the M5Burner program found in the downloads section of the M5Stack website. If for some reason the burner doesn't work you can always use the esptool from command line to flash it.
Once you've got the firmware flashed you'll want to decide which IDE you are going to use to program the M5Stack in MicroPython. There's Uiflow which is our online platform for programming with blocks and MicroPython (in this tutorial we will only be using the python side) or there's our new plugin for vscode. See how to get setup with it here.
Once your set up in your MicroPython IDE of choice we can start to write the program, but first lets try to understand a little about the server client relationship.
You might think of a server as a big bulky powerful computer kept inside a super cooled data center, but actually a device as tiny as your M5Stack can also be a server to host a website. When we connect your M5Stack to your router shortly it will be assigned an IP address. You will need to know your IP address in order to enter it into the code and also to type into the browser on your computer to access the website hosted on the M5Stack. The M5Stack will act as a web server using HTTP (Hyper Text Transfer Protocol) A protocol for relaying webpages which uses port 80 to show a copy of that webpage to any other device (the client) that sends a request to its IP address. In order to interact with the device we set some buttons on the page in the html. When those buttons are pressed it sends a http request to the device which then turns the RGB bars on or off or makes the speaker beep. Lets take a look at code. Here we import all the necessary libraries.
from m5stack import *
from uiflow import *
from m5ui import *
import network ##only import if you want to connect to M5Stack AP
import wifiCfg
import socket
Here we set a variable for the state of the RGB LED bars.
state = 0
Setup a function to display the webpage.
#function for displaying the html
def web_page():
    if state == 0:
        led_state="Off"
    else:
        led_state="On"

 html = """<html><head> <title>M5Stack Web Server</title> <meta name="viewport" content="width=device-width, initial-scale=1">
 <link rel="icon" href="data:,"> <style>html{font-family: Comic Sans MS; display:inline-block; margin: 0px auto; text-align: center;}
 h1{color: #0F3376; padding: 2vh;}p{font-size: 1.5rem;}.button{display: inline-block; background-color: #0000FF; border: none;
 border-radius: 4px; color: white; padding: 16px 40px; text-decoration: none; font-size: 40px; margin: 2px; cursor: pointer;}
 .button2{background-color: #ff0000;}.button3{background-color: #ff00ff</style></head><body> <h1>M5Stack Web Server</h1>
 <p>state: <strong>""" + str(state) + """</strong></p><p><a href="/?led=on"><button class="button">ON</button></a></p>
 <p><a href="/?btn=on"><button class="button button3">Speaker</button></a></p>
 <p><a href="/?led=off"><button class="button button2">OFF</button></a></p>
 </html>"""
 return html
Assign the ifconfig function to a variable so we can output our M5Stacks IP address to the screen.
ip = wifiCfg.wlan_sta.ifconfig()
Create some labels to show some status messages on the M5Stack screen.
label1 = M5TextBox(0, 0, "Text", lcd.FONT_Default,0xFFFFFF, rotate=0)
label2 = M5TextBox(0, 12, "Text", lcd.FONT_Default,0xFFFFFF, rotate=0)
label3 = M5TextBox(0, 24, "Text", lcd.FONT_Default,0xFFFFFF, rotate=0)
label4 = M5TextBox(0, 50, "Text", lcd.FONT_Default,0xFFFFFF, rotate=0)
label5 = M5TextBox(120, 200, "Text", lcd.FONT_Default,0xFFFFFF, rotate=0)
Enter your WiFi network and password and set up the socket. NOTE: Leave the 'enter your IP here once you know it' string blank, run the program once and then once you see the IP address on the screen of your M5Stack enter it into this field.
response = None
wifiCfg.doConnect('yournetwork', 'yourpassword')
s = socket.socket(socket.AF_INET, socket.SOCK_STREAM)
s.bind(('enter your IP here once you know it', 80))
s.listen(5)
If you don't want to connect your M5Stack to the internet and would rather
connect to the devices AP then remove the wifiCfg line and replace it with.
ap = network.WLAN(network.AP_IF)
ap.active(True)
ap.config(essid='ESP32')
ap.config(authmode=3, password='123456789')
On connection display IP address.
if wifiCfg.wlan_sta.isconnected():
    label1.setText('wifi connected')
    label2.setText('Your IP Address is: ' + str(ip[0]))
else:
    label1.setText('wifi not connected')
    wait_ms(2)
Main Loop, set up the http requests and status messages.
while True:
    conn, addr = s.accept()
    request = conn.recv(1024)
    request = str(request)
    label4.setText('Content = %s' % request)
    label3.setText('Got a connection from %s' % str(addr))
    led_on = request.find('/?led=on')
    led_off = request.find('/?led=off')
    btn_press = request.find('/?btn=on')
Check if the http request was received, if so turn on/off the LED or speaker.
    if led_on == 6:
        state = 1
        label5.setText('LED ON')
        rgb.setColorAll(0xFF0000)
    if led_off == 6:
        state = 0
        label5.setText('LED OFF')
        rgb.setColorAll(0x000000)
    if btn_press == 6:
        speaker.tone(400,200)
    response = web_page()
    conn.send('HTTP/1.1 200 OK\n')
    conn.send('Content-Type: text/html\n')
    conn.send('Connection: close\n\n')
    conn.sendall(response)
    conn.close()
And thats all there is to it. You could also combine this tutorial with the one I wrote previously for MIT APP Inventor to control your M5Stack via a app inventor app which responds to http requests. Hope you enjoyed this tutorial, stay tuned for more.


Comments
Please log in or sign up to comment.