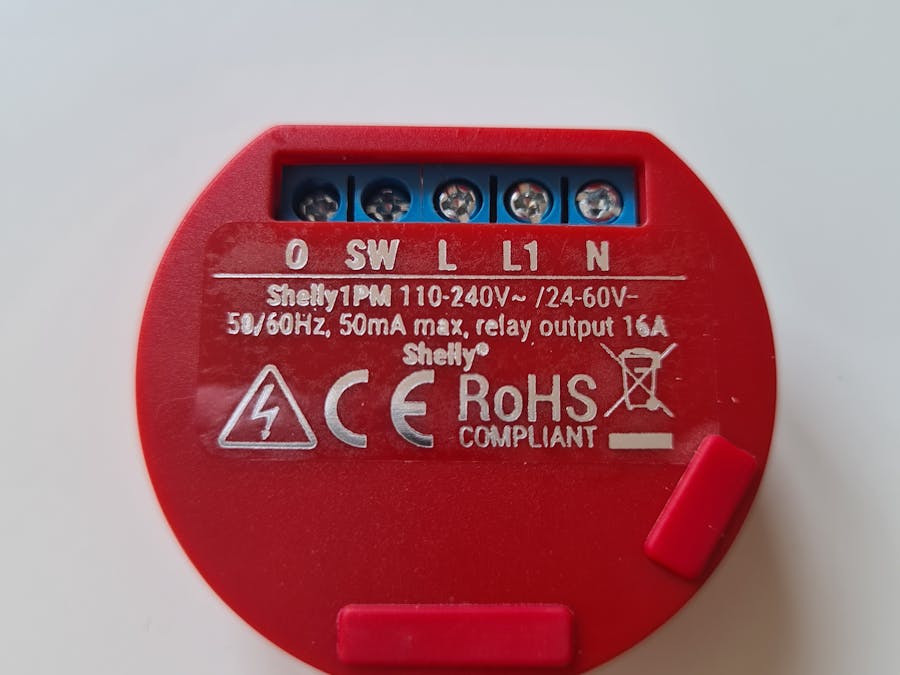
I have a few basic power strips and wanted to make them a bit smarter without a huge cost.
Enter the Shelly 1PM module. This is a very affordable, small and CE certified WIFI based switch. The great thing about is it also has a very precise power metering plus an APP with many automation options. You don't need any other devices or hub to use this. You can use it local it with Shelly.cloud - completely up to you.
To complete the fairly easy conversion you also need a Wago clamp (or similar) and some insulated cable end sleeves.
Please don't do this conversion if you have no electrical knowledge or support.
Supplies:Shelly 1PM - https://shelly.cloud/
Wago clamp - Amazon link
Insulated cable end sleeve - Amazon link of a 2, 5mm2 type, many other possible
Some left of electrical wire (1, 5mm2 or 2, 5mm2 - check depending on your local specifications)
Step 1: Assemble WiringAssembly:Select a power strip that has enough space inside to hide the Shelly. You only need 44mmx18mm. Open it up and disconnect or cut the wires coming from the cord.
- Connect the Live wire (usually brown) from the cord to the 'L' of the Shelly
- Connect the Neutral (in my case blue) from the cord to the Wago clamp
- Connect an additional blue wire from the Wago clamp to the 'N' of the Shelly
- Connect a blue wire from the Wago clamp to the neutral connector on the plugsocket
- Connect a brown wire from the 'O' on the Shelly to the live connector on the plugsocket
For each connection that uses a flexible wire please use an insulated cable end sleeve (pictures don't show them as I ran out. When delivered I will add them before closing the case). This is important for electrical safety!
Step 2: Placing It Inside the EnclosurePlace the Shelly inside the enclosure, make sure the wires run cleanly and not where 2 pieces of plastic casing will squeeze them or a screw might pierce.
A good idea is to attach and secure the wires and the Shelly with a little dab of hot glue.
Before closing double check all your wires are securely attached and the Shelly is fixed in place.
Step 3: TestingOnce everything is closed-up you can plug the power cord into a wall socket.
If this is the first time you power up the Shelly you will need to use the APP to go through the configuration.
This is very simple - just follow the steps in the APP to perform the inclusion.
Once all is done you can control the power socket with your APP and see the actual power consumption.
It's a good idea to also set/correct the power limit. Shelly can go up to 3600w, but the cord I used is only rated to 2500w. In the APP you can modify this so that Shelly will switch off at the same power rating.
Step 4: SummaryYou can choose to keep control to your local network only, with or without the APP (there is a web interface as well) or you can connect it all up to Shelly.cloud so you can control it when not at home.
I have mine also connected to a Samsung SmartThings hub where Shelly provides a full integration.
A Shelly is really the easiest and safest way (CE and UL certification) to get started with home automation. For the cost (between 10 and 19 euro depending on the model 1, 1PM, 2.5) and the wide configuration options you can't go wrong. Itlead Sonoff has some great models as well (4CH Pro) but Shelly nailed it with size and service for me.


Comments
Please log in or sign up to comment.