Everything is also available in video form:
It's very simple example to shows how to start.
To Raspberry Pi we have attached LED. LED state is controlled by website or by mobile application. To Raspberry Pi we have also attached button which changed state to opposite a button on the site.
Android Application(It's not mandatory if you don't need Android app. Just go to webpage step.)
Install application Arduino Remote LITE and sign up to you remoteMe account. If you don't have account create for free here.
After signing up at variable list there is plenty new variables added automaticly by application:
- Variables tab
- Variables
- It's good to turn on persistant state - by clicking save icon
We can already change varialbes state by mobile app:
After change at relay tab, values are snet to remoteMe.
Adding Webpage(It's not mandatory but then You have to install Android app.)
Webpages are freely stored at remoteMe cloud and using them You can control your devices.
We will add one webpages with two buttons. Buttons are going to change state of relay_01 and relay_02 variables.
Add webpage:
- Devices tab
- New device at right top corner
- New webpage
- Name :controlWeb
- DeviceId:10
- Template - leave default
- More about adding webpage here
- At new created webpage, click index.html then edit with wizard
- Insert component button
- And fill adding window:
- THIS new created button will change variable Relay_01
- Add second button with RELAY_02 as name and label relay2
- Close the window
- Click at index.html and click open in new tab
- By clicking at relay 1 and relay 2, you can change button states. If you have opened Android application, relay states are changing each time buttons at webpage are clicked.
Now we will connect our Raspberry Pi, and when RELAY_01 variable is true, we will turn on an LED. When button at Rasbperry Pi is clicked, RELAY_02 will change state to opposite.
Install RemoteMe program to your Rasbperry Pi. Instructions here
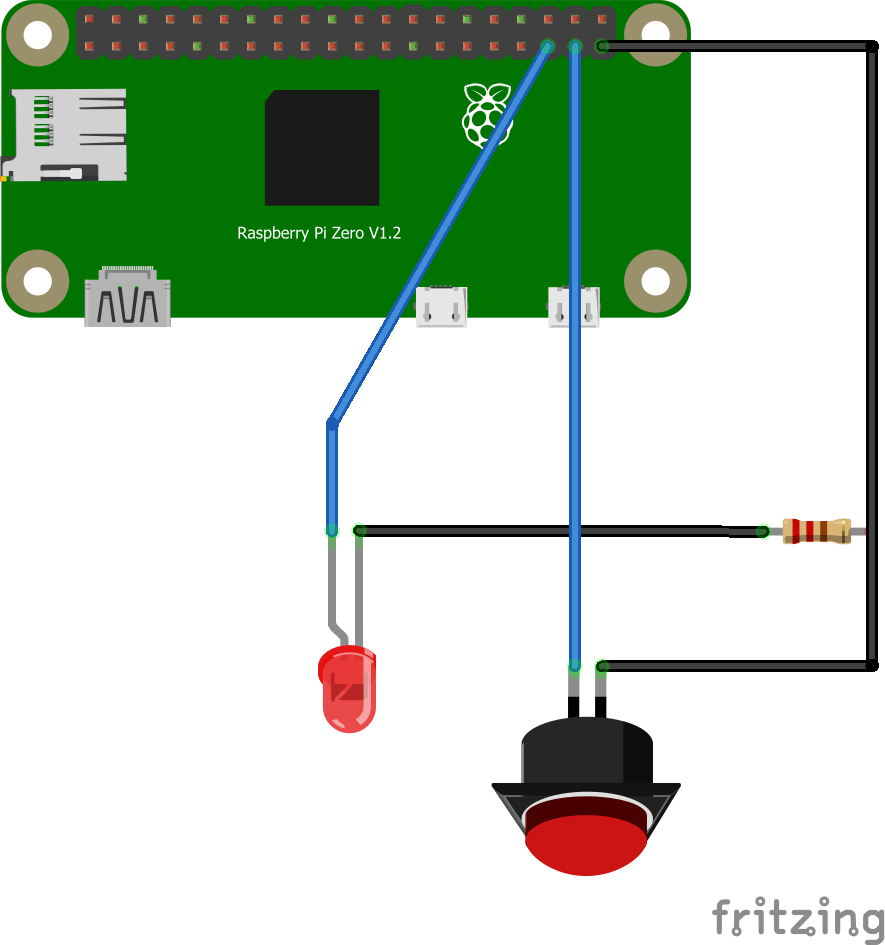
Connect diode button to your Raspberry Pi:
- LED anode is conencted to Pin 19
- LED cathode is connected by resistor to GND
- Button one leg is connected to GND second to pin 26
Be careful! Otherwise you can destroy your Rasbperry Pi. And double check connections.
When connections are made, we can add your control script. More details here
On Raspberry Pi, choose burger menu and "Add external script with wizard."
At first step, choose:
Second step dediveId:5, name Python.
At last step choose "create device." When Rasbperry Pi program is restarted, you will see:
It means that on your Rasbperry Pi device, you can have one script, and both Raspberry Pi and Python script are connected.
Of course now diode and buttons will not work. so let's edit our Python script.
- Expand Python script device
- Then click at python.py and edit
Paste code:
import socket
import struct
import sys
import os
os.chdir(sys.argv[1])
sys.path.append('../base')
import remoteme
import RPi.GPIO as GPIO
LED_PIN=19
BUTTON_PIN=26
relay2=False;
def setRELAY_01(b):
   remoteMe.getVariables().setBoolean("RELAY_01", b)
def setRELAY_02(b):
   remoteMe.getVariables().setBoolean("RELAY_02", b)
def changeButtonState(channel):
   global relay2
   relay2=not relay2
   setRELAY_02(relay2)
   pass
def onRELAY_01Change(b):
   GPIO.output(LED_PIN, GPIO.HIGH if b else GPIO.LOW)
   pass
def onRELAY_02Change(b):
   global relay2
   relay2=b
   pass
def setupPins():
   GPIO.setmode(GPIO.BCM)
   GPIO.setup(LED_PIN, GPIO.OUT)
   GPIO.output(LED_PIN, GPIO.LOW)
   GPIO.setup(BUTTON_PIN, GPIO.IN, pull_up_down=GPIO.PUD_UP)
   GPIO.add_event_detect(BUTTON_PIN,GPIO.RISING,callback=changeButtonState,bouncetime=200)
   pass
try:
   logging.basicConfig(level=logging.DEBUG,
   format='%(asctime)s %(name)-12s %(levelname)-8s %(message)s',
   datefmt='%d.%m %H:%M',
   filename="logs.log")
   logger = logging.getLogger('application')
   setupPins()
   remoteMe = remoteme.RemoteMe()
   remoteMe.startRemoteMe(sys.argv)
   remoteMe.getVariables().observeBoolean("RELAY_01" ,onRELAY_01Change);
   remoteMe.getVariables().observeBoolean("RELAY_02" ,onRELAY_02Change);
   remoteMe.wait()
finally:
   pass
- Into window and click save. After restart, you will be able to control your LED by webpage and app. :-)
When you open variables tab and expand Relay_01 and Relay_02, you will get:
It means all three devices are observing RELAY_01 and RELAY_02 variable, and if its change at one by one of the device change is propagate to all other devices. More about Variable, and devices section here , here and here.
When the RELAYs variable is changed by the webpage, its propagate to android application and its redrawing state of relay. When the change comes to python this functions is called:
def onRELAY_01Change(b):
    GPIO.output(LED_PIN, GPIO.HIGH if b else GPIO.LOW)
    pass
And this function just change output of the pin to light or turn off the diode.
When to Raspberry Pi comes change or Relay2, it's called:
def onRELAY_02Change(b):
    global relay2
    relay2=b
    pass
We just remember the state of this relay in global variable "relay2"
When the button on RPI is pressed we calling this function:
def changeButtonState(channel):
    global relay2
    relay2=not relay2
    setRELAY_02(relay2)
    pass
This function change global variable relay2 into opposite and this state is sending to remoteMe by calling funtcion setRELAY_02(relay2) and then remoteMe propagate new state of variable to the Android app and webpage.
Webpage and Android app automaticly recognize this variable and change connected into this component.


Comments
Please log in or sign up to comment.