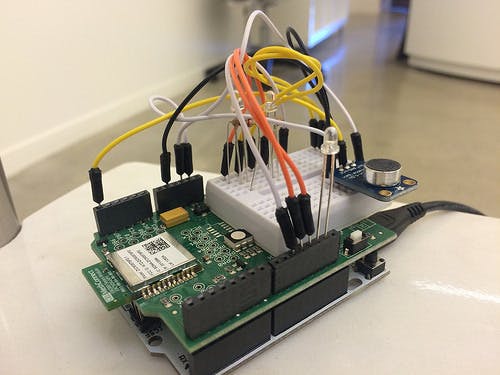
When my colleague @thegibertchan first set up his homemade "Clapper" in our office, I knew immediately that I had to learn how it was made.
The way it works is simple. A small microphone listens to two claps (within four seconds of each other) and it triggers a switch to turn on or off.
Gilbert even simplified the code so it uses the built-in LED in the our SmartThings Arduino Shield.
I will try to explain how to build it here.
You'll need the following items:
- 1 Arduino Uno board ($24.95)
- 1 tiny breadboard ($4)
- 1 SmartThings ThingsShield ($35)
- 1 microphone amplifier ($6.95)
- 3 jumper wires ($0.50)
- 1 smart outlet ($55)
Maybe the actual Clapper is less expensive, but this one is definitely more fun.
Step 1 - Pair the ThingShield with SmartThings
If you haven't used Arduino before, make sure you have their software installed. Then download the ThingShield Library and copy the files to your sketchbook location, which is set in the Arduino IDE preferences. By default, the location should be:
Windows: My Documents\Arduino\libraries\SmartThings
OSX: ~/Documents/Arduino/libraries/SmartThings
To join the shield to your SmartThings hub, go to "Add SmartThings" mode in the SmartThings app by hitting the "+" icon in the desired location, and then press the "Switch" button on the shield. You should see the shield appear in the app.
IMG_1785.PNG640x1136 461 KB
Step 2 - Update the Device Type of the ThingShield
Log into http://graph.api.smartthings.com/ and click on "Devices". Find your Arduino ThingShield then click on "Edit" on the bottom left of the page.
Select the "Type" drop down menu and choose "On/Off Shield". Now click "Update".
Now the shield will be able to accept on and off commands to control a switch. You can test it in the IDE by creating a new device type and selecting "On/Off Shield" from the dropdown. Here is the code for it.
Inside the app, your ThingShield should look like this:
IMG_1786.PNG640x1136 438 KB
Step 3 - Set up the Arduino with the Clapper code
Fire up your Arduino code editor and paste in this sketch. Read through it if you want. It's essentially detecting the number of claps from the microphone and then firing on or off commands. After the first clap, the LED turns red and after the second clap it turns green.
One thing you might want to change is the offset variable. I was in a loud room so 250 worked best for me. In our office, that value is set to 100 since it's pretty quiet there.
Attach your shield on top of your Arduino and grab your mini breadboard. Connect the microphone and attach the three wires like so:
- Microphone OUT to Arduino A5
- Microphone GND to Arduino GND
- Microphone VCC to 5V
It should look exactly like this:
IMG_1787.jpg2448x2448 1.4 MB
Our shield doesn't have the best labeling, so you might have to eyeball the Arduino to see where you're connecting wires.
Load the code onto the Arduino and test it out. Clap twice and you should see red and green LED lights if it's working.
Step 4 - Connect the ThingShield to the smart outlet
You're almost done. Go into the mobile app and tap the "+" button. Now tap the magnifying glass in the top right and search for the SmartApp called "The Big Switch". I prefer this one but you can use any switch-to-switch app.
In the first section under "Where?", find your shield, and in the second section under "Which?", find the smart outlet. Click "Install". It should look like this:
IMG_1788.PNG640x1136 233 KB
Once that SmartApp is installed, you should be able to clap twice to turn on and off the switch.
Here is Gilbert demoing V1 of the Clapper:
That's it! Let me know if you build upon or improve it.
Big shoutout to Gilbert for helping me set this up and teaching me how it works.


_ztBMuBhMHo.jpg?auto=compress%2Cformat&w=48&h=48&fit=fill&bg=ffffff)


Comments
Please log in or sign up to comment.