Amith Gopakumar
Published © CC0

DIY Smart Cane Using Arduino Nano

Smartcains detect the obstacle in front of the person and respond to the person by vibrating the stick and with a warning sound

BeginnerFull instructions provided5 hours1,347
DIY Smart Cane Using Arduino Nano

Things used in this project

Hardware components

Arduino Nano R3
Arduino Nano R3
×1
9V battery (generic)
×1
Solar Cockroach Vibrating Disc Motor
Brown Dog Gadgets Solar Cockroach Vibrating Disc Motor
×1
Ultrasonic Sensor - HC-SR04 (Generic)
×1
pcp pipe
×1
Jumper wires (generic)
×1
JS Series Switch
C&K Switches JS Series Switch
×1

Hand tools and fabrication machines

Soldering iron (generic)
Solder Wire, Lead Free

Story

Read more

Schematics

Schematics

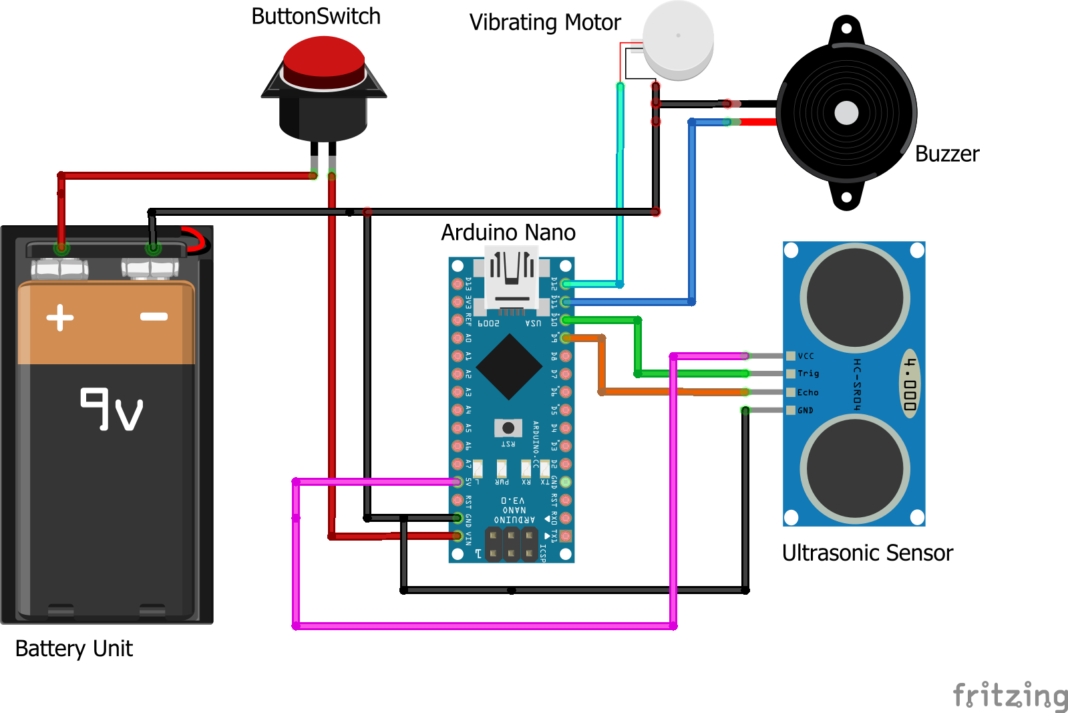
Refer to the schematics and make connections accordingly, First, we are going to connect the Ultrasonic sensor with Nano

Here we are Using Digital pins 10 and 9 for connecting the Trigger pin and Echo Pins. Along with VCC connect to %V and Gnd is connected to the GND pin in Nano.

Next is we are going to connect Buzzer, Positive terminal of the buzzer to Digital pin 11, and Negative terminal to ground.

Next, we connect the Vibrating motor +ve terminal to digital pin 12 and another pin to the ground.

The battery connecter and switch module are connected separately, Arduino Nano Vin pin can take voltage from 9 to 12v so we connect the pin for the Button switch to Vin and –ve terminal from battery to GND Nano.

After that, I just Assemble these items in the PVC stick I created

We are making this a separate circuit because while programing we don’t need this module. If Those who don’t have a battery connecter and switch can avoid this circuit and try with the power bank you have, you just need to power the Nano using the same USB cable used for programming

Code

Code

C/C++
Now it’s time to upload the Arduino sketch to nano. Just copy and paste the code to your Arduino IDE and plug your Arduino nano into the PC. Verify the code and Upload it. After successfully uploading, unplug the Arduino board and connect the power supply
// defines pins numbers
 
const int trigPin=9;
const int echoPin=10;
const int motor=12;
const int buzzer=11;
 
// define the duration and distance variables
 
long duration, distance;
void setup()
{ 
  pinMode(trigPin, OUTPUT); // Sets the trigPin as an Output
  pinMode(echoPin, INPUT);  // Sets the echopin as an Input
  pinMode(motor, OUTPUT);  // Sets the motor as an Output
  pinMode(buzzer,OUTPUT);   // Sets the buzzer as an Output
}
 
void loop()
{
    // Clears the trigPin
  digitalWrite(trigPin, LOW); 
  delayMicroseconds(2); 
  // Sets the trigPin on HIGH state for 10 micro seconds
  digitalWrite(trigPin, HIGH);
  delayMicroseconds(10); 
  digitalWrite(trigPin, LOW);
// Reads the echoPin, returns the sound wave travel time in microseconds
duration = pulseIn(echoPin, HIGH);
// Calculating the distance
distance = duration*0.034/2;
 
if (distance < 20) // Checking the distance, you can change the value
{ 
digitalWrite(motor,HIGH); // When the the distance below 20cm
digitalWrite(buzzer,HIGH);
} else
{
digitalWrite(motor,LOW);// when greater than 20cm
digitalWrite(buzzer,LOW); 
} delay(500);
}

Credits

Amith Gopakumar
1 project • 0 followers

Comments