


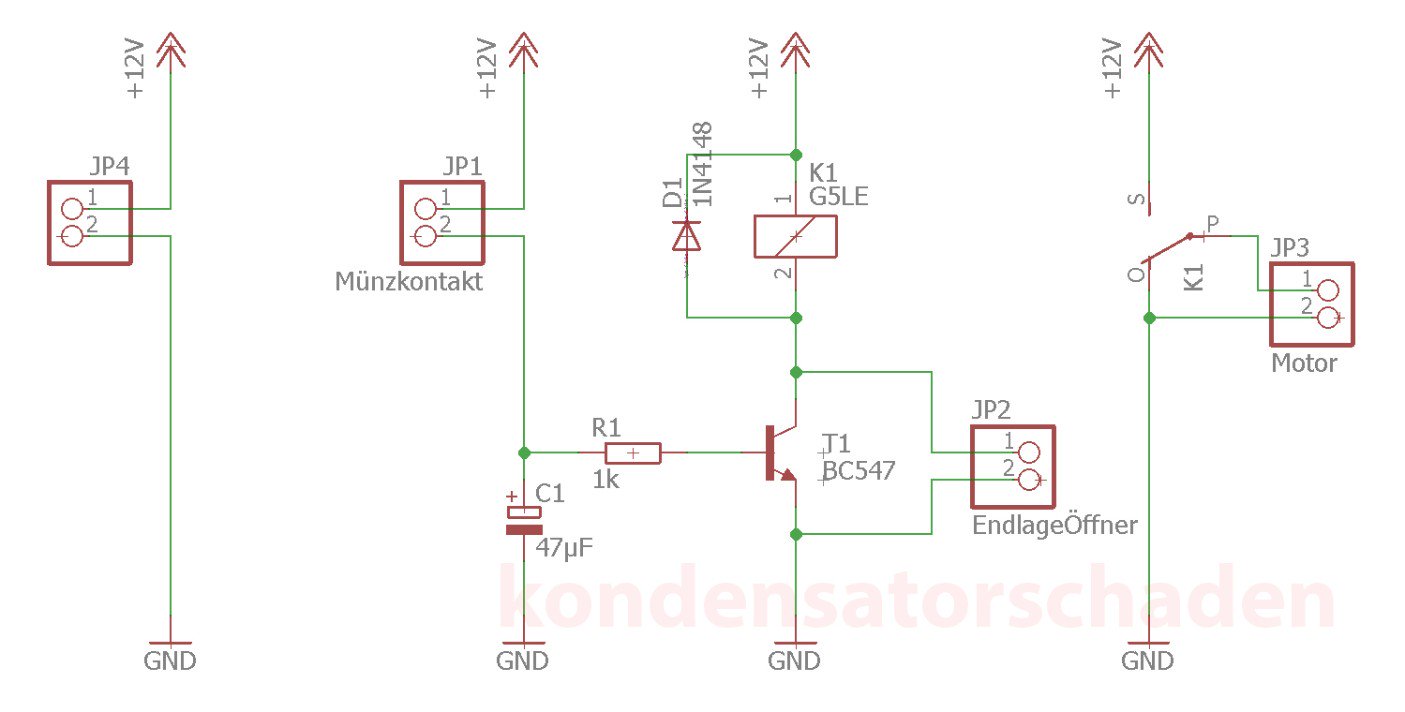
How does the snack machine actually work?As soon as you insert a coin into the coin slot next to the window, it interrupts the light barrier behind the coin slot. The interruption of the light barrier triggers an electrical signal. The built-in soldering kit from Conrad then activates the engine that ejects the paid snack. The output of the circuit (motor activation) remains energized until the motor has returned to the starting position and has actuated a limit switch. To deliver the power that the motor needs, the output of the circuit is connected to a relay at theSupply voltage connected. The motor movement is rotative, but should throw a linear snack. The combination of slot and eccentric generates this linear movement.
Build your own snack machine
First build the Conrad light barrier kit 196037 - 62. Insert the components one after the other into the board and make sure you have the correct position and polarity. Solder the wires to the pads on the board so that they are wet right to the edge, creating a smooth surface of the solder.
1. Light barrier kit
Use the wiring diagram to set up the light barrier and observe the corresponding instructions from Conrad.
- Insert the resistors and the diode. Pay attention to the polarity of the diode. The correct position is marked with a black / white ring on the diode and the circuit board. Solder the components.
- Insert the potentiometer and solder it. A potentiometer is an adjustable resistor with that (in this Project) the light barrier intensity (switching point) to the lighting conditions (ie the brightness of the LED) can be adjusted.
- Insert the Signal LED and solder it. The status of the light barrier (object detected / not detected) is signaled.
- Transistors (npn) are used for signal amplification. Insert and solder in the transistors according to the wiring diagram.
- Insert relay according to the wiring diagram and solder. With this component, the end load (here motor) is switched.
- Do not solder the photosensitive resistor (LDR) into the board yet. The distance of the board to the coin slot is greater than the wiring. The distance is bridged with an additional stranded wire.
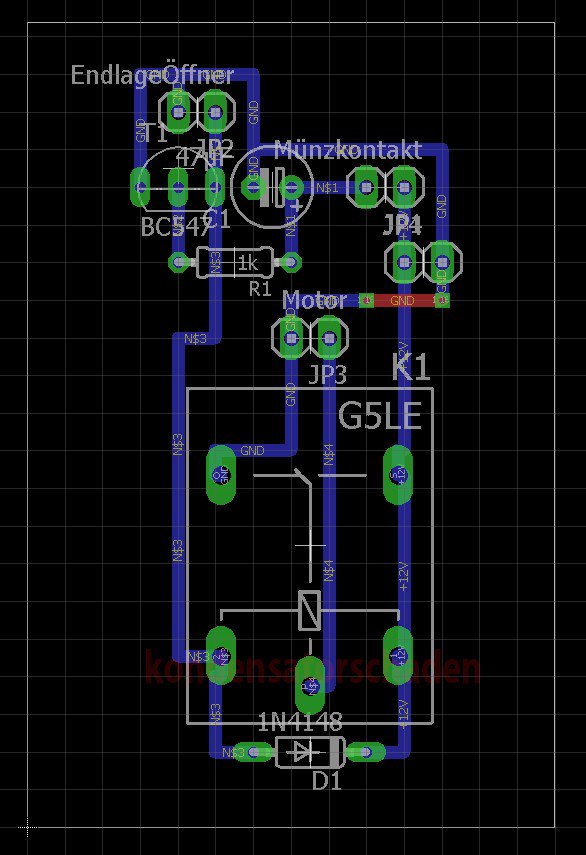
Engines have a caster, to stop them exactly a motor brake is necessary. After inserting a coin, only one snack should be spent. As soon as the limit switch is pressed (in the end position), the snack dispensing is finished and the motor should stop directly. The remaining energy from the inertia of the engine is "consumed".Position the components on the breadboard and solder them according to the circuit diagram.The direction of the motor does not matter. In each case, the rotational movement is converted into a linear forward movement. The polarity (which wire is connected to + or -) is irrelevant.
Cut out the parts for the housing from the plywood board.
- The feet are fastened to the base plate with washers and nuts.
- Cut off the spacers (battens) and fix them with screws in the appropriate place on the bottom plate.
- Insert the side walls and the base plate into one another and glue them together. Let the housing dry sufficiently.
- Build the lid from the wooden plate according to the template and paint it in the desired color.
- LDR and LED must be positioned exactly opposite, so that the light barrier can be triggered by an inserted coin! Attach the components behind the coin slot.
- Extend the wires of LDR and LED with one cable each and provide this with a PCB connector.
- Pull the power cord inside the case.
- Insert the acrylic glass.
- Cut the parts for the shelf out of the plywood board and glue them together.
- Cut out the slider for the shelf, align it with the slot and insert it into the shelf. The slider must be able to move freely.
- Mount the motor on the shelf so that the eccentric pin penetrates the slot of the slider.
- Fix the limit switch at the rear edge. Make sure that the slider actuates exactly the button in the retracted state.
- Mount the boards on the shelf and connect them as indicated in the wiring diagram. Connect the LDR and LED to the boards.
- Attach two warm white LEDs to the lighting on the supply. Do not forget the suitable series resistors (1kOhm).Fill your new machine with snacks and put the lid on.
If you drop a coin but you do not receive a snack, the light barrier is not interrupted or the LED is too bright. Check the light barrier and adjust the sensitivity of the LDR if necessary.
If you want to serve snacks with packaging in other dimensions, you'll need to make a few adjustments:
- For a different snack height, adjust the height of the ejector (board with slot). Check that the top of the ejection is high enough.
- For snacks with a different footprint, the outer dimensions of the snack magazine must be changed. Do not forget to adjust the length of the ejector, the slot and the eccentric distance.
- After ejection, your snack should not jam in the dispensing bowl. If simple removal is not possible, use higher roof battens if necessary.

Comments
Please log in or sign up to comment.