Life is all about little victories and with a busy life it’s very easy to oversee important things that can give you a little bit of joy and motivation bit by bit every single day.
I would love to get an “Internet high five” every time someone likes one of my articles or when I get a nice mention on Twitter for one of my talks.
Let’s build a high five machine powered by Android Things and the power of Firebase to give us instant gratification when one of those things happen.
What are we doing?I want to write as little backend code as possible and make this application completely serverless. For this example we’re going to focus on the following actions:
- Get an action from Twitter (this could be a mention or a follow)
- Have a Firebase Function capture that action
- Add that action to a Firebase Realtime Database
- Move our servo arm to give us a high five when step 1 is triggered
Open up Android Studio and create a new Android project with Kotlin support called “High Five Machine”. You can read more about how to get started with Android Things and setup a project here.
Remember the "Minimum SDK" needs to be 24 or above
Open up your project level build.gradle and add a dependency to Google Services.
dependencies {
    classpath 'com.android.tools.build:gradle:3.0.0-alpha1'
    classpath 'org.jetbrains.kotlin:kotlin-gradle-plugin:$kotlin_version'
    classpath 'com.google.gms:google-services:3.0.0'
}
Now open your project level build.gradle and apply the Google Services plugin to the project at the top of the file.
apply plugin: 'com.android.application'
apply plugin: 'kotlin-android'
apply plugin: 'com.google.gms.google-services'
On that same file add dependencies to Firebase and Android Things along with the Servo driver.
compile 'com.google.firebase:firebase-core:10.2.6'
compile 'com.google.firebase:firebase-database:10.2.6'
provided 'com.google.android.things:androidthings:0.4-devpreview'
compile 'com.google.android.things.contrib:driver-pwmservo:0.2'
Android Studio will now sync and once that’s done we’re ready to start writing some code. Open up MainActivity.kt and create the following member variables at the top of the class:
private var mDatabaseRef: DatabaseReference? = null
private var mServo: Servo? = null
private val TAG = MainActivity::class.java.simpleName
We now need to make sure we initialise the Database and the servo. We want our application to respond to any new-follower in the database, so let’s initialise it with that reference inside the onCreate method.
mDatabaseRef = FirebaseDatabase.getInstance().reference.child("new-follower")
Still inside the onCreate method initialise the servo on the “PWM0” pin and make sure it’s enabled.
mServo = Servo("PWM0")
mServo?.setPulseDurationRange(1.0, 2.0)
mServo?.setAngleRange((-90).toDouble(), 90.0)
mServo?.setEnabled(true)
Our servo moves from -90 to 90 degrees and because we’re setting those boundaries we can use the maximumAngle and minimumAngle to control it.
Create a new method called highFive with the following code:
fun highFive(){
    mServo?.angle = mServo?.maximumAngle!! //up
    Thread.sleep(3000)
    mServo?.angle = mServo?.minimumAngle!! //down
}
Now every time we get a new child inside the new-follower reference we can call this method and get a high five.
In oncreate add a child event listener to the database reference.
mDatabaseRef?.addChildEventListener(object : ChildEventListener{
    override fun onCancelled(p0: DatabaseError?) {
        Log.d(TAG, "Cancelled")
    }
    override fun onChildMoved(p0: DataSnapshot?, p1: String?) {
        Log.d(TAG, "Child Moved")
    }
    override fun onChildChanged(p0: DataSnapshot?, p1: String?) {
        Log.d(TAG, "Child Changed")
    }
    override fun onChildAdded(dataSnapshot: DataSnapshot?, prevChildKey: String?) {
        Log.d(TAG, "Background Service" + dataSnapshot?.key)
        highFive()
        // Remove the item once user has been high-fived
        mDatabaseRef?.child(dataSnapshot?.key)?.removeValue()
    }
    override fun onChildRemoved(p0: DataSnapshot?) {
        Log.d(TAG, "Child Removed")
    }
})
}
In onChildAdded we’re logging the fact that a new child was added calling the highFive method and then deleting that new child from Firebase so we don’t get a chain of high fives every time we restart our application.
If you try run this application on the Pi you will see that it errors because you’re missing the google-services.json file. We will get it in a minute but let’s hook up our servo first.
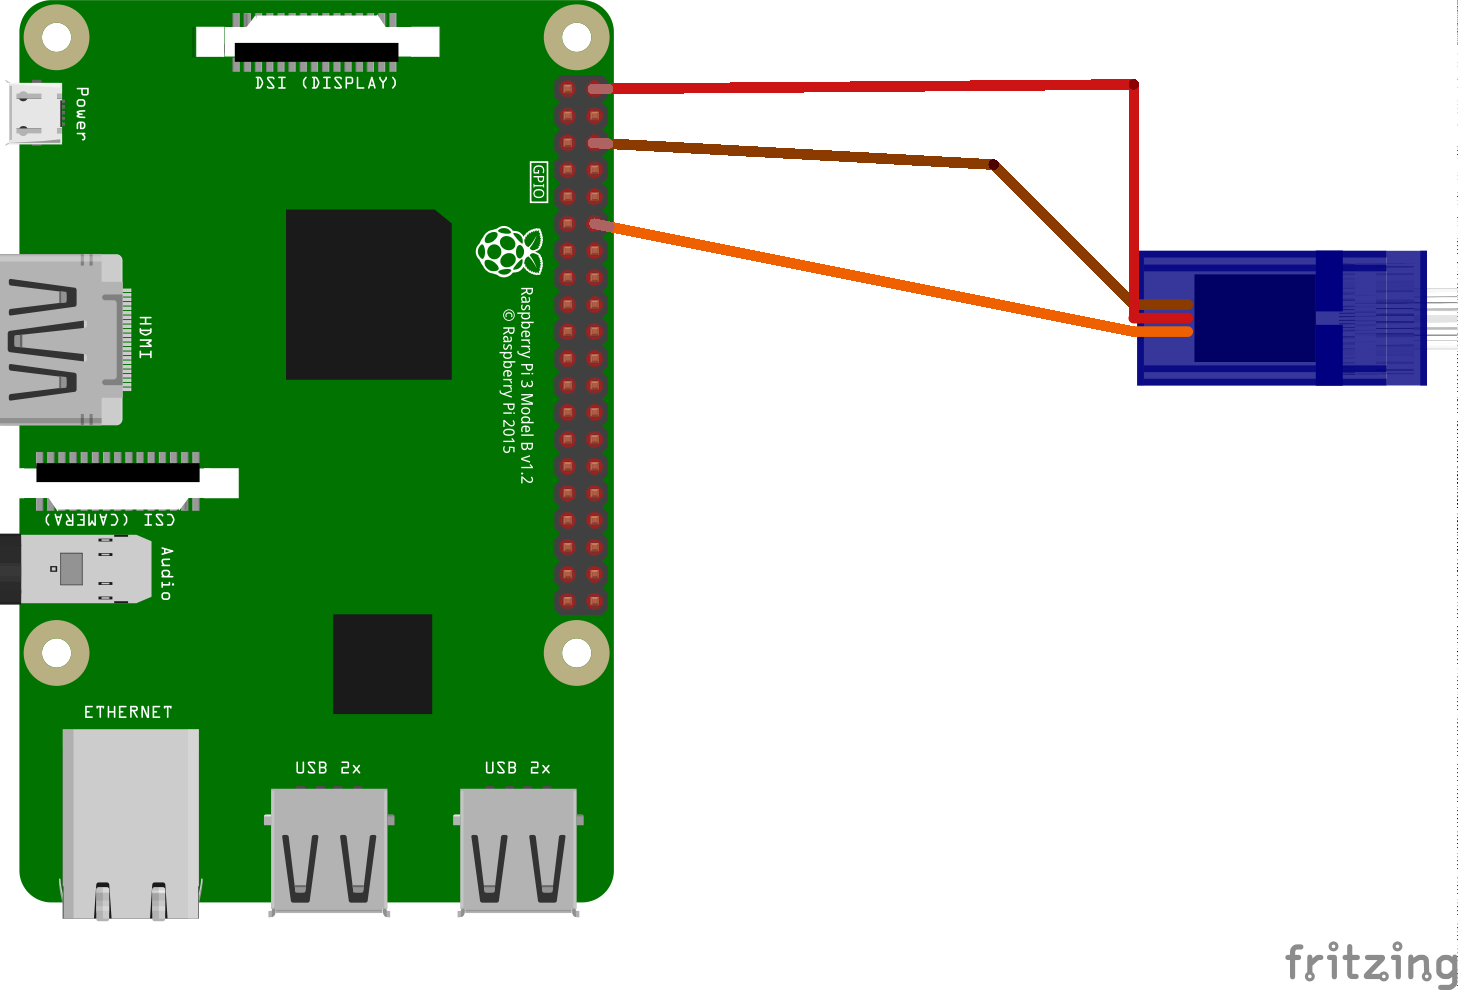
On the raspberry Pi connect the following:
- Servo red wire to 5v
- Servo brown wire to 0v
- Servo orange wire to Pi’s PWM0
Once that’s connected we’re ready to setup our Firebase project.
Setting up FirebaseOpen the Firebase Console and click the “Add Project” button. Give your project a name and choose a country.
When your project is created add an app of type Android and in “Android Package Name” add the same package name as you’ve chosen for your Android Things application.
Click “Register App” and on the second screen you will will be able to download your project file as well as get directions to how to add it to your project.
Add that file to your Android project and run it and you should no longer see any errors.
Click on the Database menu item in the Firebase Console and choose Rules. We will add a new rule that will allow us to read and write on our database as follows:
{
  "rules": {
    ".read": true,
    ".write": true
  }
}
But we need a way to add new messages to our database.
Creating a Firebase Cloud FunctionThe Get Started Page fore Firebase Cloud Functions shows you all you need in order to create and deploy a cloud function into your Firebase project.
In terminal open a directory that is different from where your Android application is and once you’ve installed the Firebase CLI run the following:
firebase login
firebase init functions
Choose the project you’ve just created as we want this function to live inside of it and type y to install the dependencies.
Open up functions/index.js and add the following to it.
const functions = require('firebase-functions');
const admin = require('firebase-admin');
admin.initializeApp(functions.config().firebase);
exports.addMessage = functions.https.onRequest((req, res) => {
    const username = req.query.username;
    admin.database().ref('/new-follower').push({ username: username }).then(snapshot => {
        var message = `${username} created`
        res.status(201).send( message );
    });
});
Our function accepts HTTP requests and every time it’s invoked with a username parameter in the query string, it will open the new-follower reference and add that user name as a new entry.
Deploy the function by running the following in your terminal:
firebase deploy --only functions
Once that’s completed you’ll get the URL for your function which if you append ?username=mplacona to the end, a new entry will be created in your Firebase database.
If your Pi is running the app, you should now see that the servo will move forward and then backwards after 3 seconds.
This is great but we want to to able to trigger this when we actually get a new Twitter follower and doing this is probably the easiest part of this article as we will “cheat” a little bit.
Triggering high fives via IFTTTHead to IFTTT and create a new Applet using Twitter that uses the “New Follower” trigger. Choose “Maker Webhooks” as the action service and you should end up with a screen that looks like this:
In the URL field add the URL to your function as follows:
https://my-function-name.cloudfunctions.net/addMessage?username=<<<{{FullName}}>>>Remember to replace the URL above with the one you got when you deployed your function but keep the value of username
as <<<{{FullName}}>>>
. This is a placeholder for the Twitter user name that will be passed to the Firebase Function.
This IFTTT applet will be triggered every time you get a new follower now
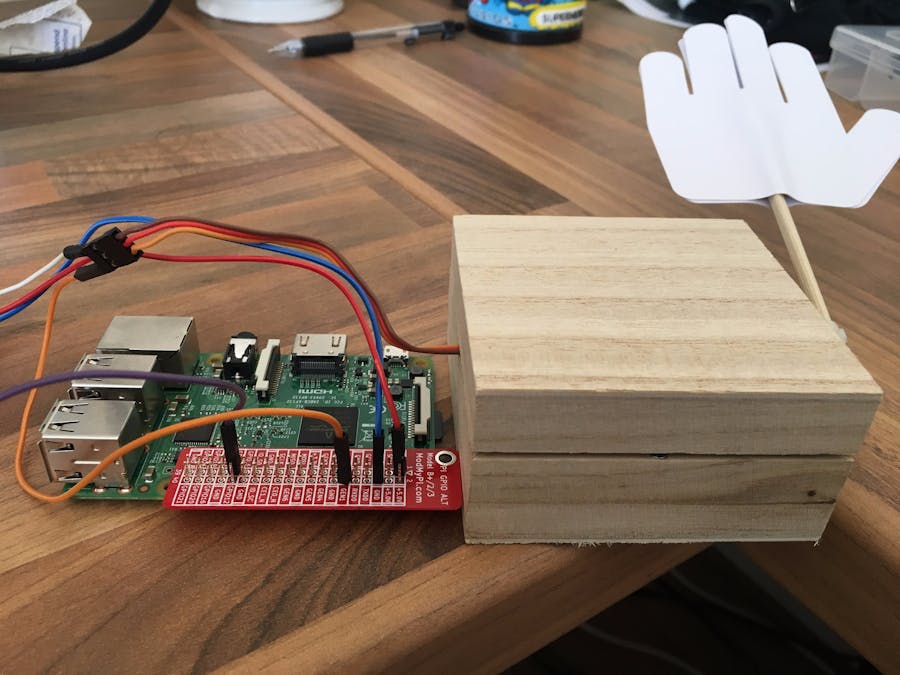
The “five” in high fiveIt is time to get creative and get a nice five fingered hand attached to a chopstick and then get that attached to your servo. I will leave that one to you, but I’ve done mine like this.
And here’s a quick video of it in action.
With only a few steps and the power of Firebase databases and functions we’ve just created a really nice hardware hack that gives you a high five when we get a new Twitter follower.
This hack will work well with pretty much anything that can send a webhook request to your Firebase function, so it’s completely up to you when you want to get high-fived.
You can download the Android code here and the Firebase Function here


Comments
Please log in or sign up to comment.