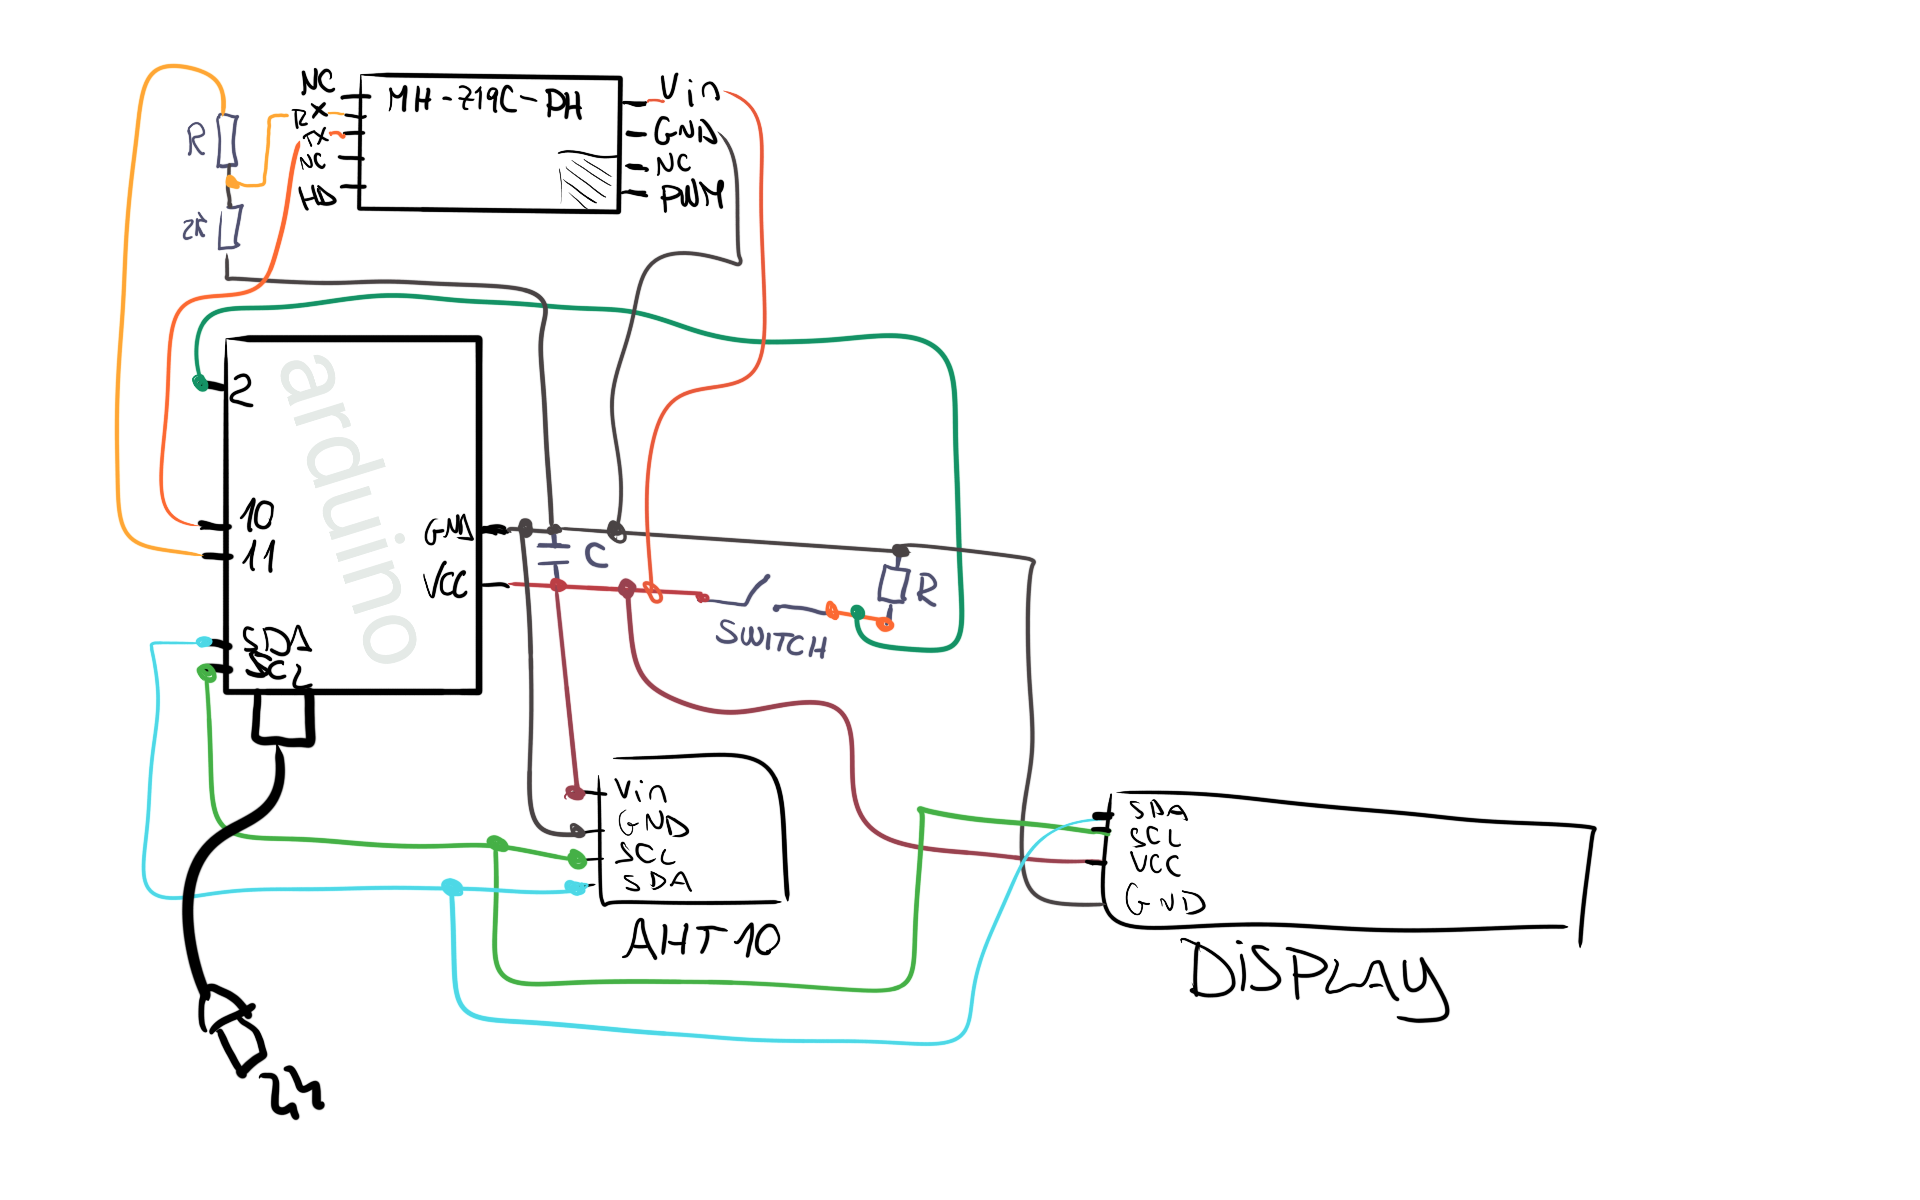
#include <SPI.h>
#include <Wire.h>
#include <Adafruit_GFX.h>
#include <Adafruit_SSD1306.h>


#include <Arduino.h>
#include "MHZ19.h"
#include <SoftwareSerial.h>                                // Remove if using HardwareSerial

#define RX_PIN 10                                          // Rx pin which the MHZ19 Tx pin is attached to
#define TX_PIN 11                                          // Tx pin which the MHZ19 Rx pin is attached to
#define BAUDRATE 9600                                      // Device to MH-Z19 Serial baudrate (should not be changed)

#define buttonPin 2     // the number of the pushbutton pin


MHZ19 myMHZ19;                                             // Constructor for library
SoftwareSerial mySerial(RX_PIN, TX_PIN);                   // (Uno example) create device to MH-Z19 serial

unsigned long getDataTimer = 0;
unsigned long getDataHour = 0;


#define SCREEN_WIDTH 128 // OLED display width, in pixels
#define SCREEN_HEIGHT 32 // OLED display height, in pixels

// Declaration for an SSD1306 display connected to I2C (SDA, SCL pins)
// The pins for I2C are defined by the Wire-library.
// On an arduino UNO:       A4(SDA), A5(SCL)
// On an arduino MEGA 2560: 20(SDA), 21(SCL)
// On an arduino LEONARDO:   2(SDA),  3(SCL), ...
#define OLED_RESET     4 // Reset pin # (or -1 if sharing Arduino reset pin)
#define SCREEN_ADDRESS 0x3C ///< See datasheet for Address; 0x3D for 128x64, 0x3C for 128x32
Adafruit_SSD1306 display(SCREEN_WIDTH, SCREEN_HEIGHT, &Wire, OLED_RESET);

#include <Adafruit_AHT10.h>
Adafruit_AHT10 aht;


void setup() {
  Serial.begin(9600);

  // SSD1306_SWITCHCAPVCC = generate display voltage from 3.3V internally
  if(!display.begin(SSD1306_SWITCHCAPVCC, SCREEN_ADDRESS)) {
    //Serial.println(F("SSD1306 allocation failed"));
    for(;;); // Don't proceed, loop forever
  }

  // Show initial display buffer contents on the screen --
  // the library initializes this with an Adafruit splash screen.
  display.display();
  delay(2000); // Pause for 2 seconds

  // Clear the buffer
  display.clearDisplay();


  if (! aht.begin()) {
    //Serial.println("Could not find AHT10? Check wiring");
    while (1) delay(10);
  }
  //Serial.println("AHT10 found");


  mySerial.begin(BAUDRATE);                               // (Uno example) device to MH-Z19 serial start
  myMHZ19.begin(mySerial);                                // *Serial(Stream) refence must be passed to library begin().

  myMHZ19.autoCalibration();                              // Turn auto calibration ON (OFF autoCalibration(false))

  pinMode(buttonPin, INPUT);
}

char CO2String[10];
char outstr[6];

void loop() {
  // put your main code here, to run repeatedly:
  static int buttonState = 0;         // variable for reading the pushbutton status
  static int level = 0; //level 0 normal working, level 1 graph, level 2 off

  buttonState = digitalRead(buttonPin);


  // determina livello in cui mi trovo alla rpessione del bottone
  if (buttonState == HIGH) {
    level++;
  }
  if(level==3) {
    level=0;
  }


    static int CO2=0;
    if (millis() - getDataTimer >= 2000)
    {
        CO2 = myMHZ19.getCO2();  // Request CO2 (as ppm)
        //Serial.print("CO2 (ppm): ");Serial.println(CO2);
        getDataTimer = millis();
    }

    if (level==0){ //operazione normale
      display.clearDisplay();

       sensors_event_t humidity, temp;
       aht.getEvent(&humidity, &temp);// populate temp and humidity objects with fresh data

       ScreenPrint("Temperature:",4,3,1,false);
       dtostrf(temp.temperature,5, 2, outstr);
       ScreenPrint(outstr,78,3,1,false);
       ScreenPrint("*C",112,3,1,false);

       ScreenPrint("Humidity:",4,11,1,false);
       dtostrf(humidity.relative_humidity,5, 2, outstr);
       ScreenPrint(outstr,59,11,1,false);
       ScreenPrint("%rH",95,11,1,false);

       ScreenPrint("CO2:",4,21,1,false);
       sprintf (CO2String, "%i", CO2);
       ScreenPrint(CO2String,30,21,1,false);
       ScreenPrint("ppm",60,21,1,false);

      display.drawRect(1,1,126,31,WHITE);
      display.display();
    }
    if (level==1){ //mostra grafico
      display.clearDisplay();
      printGraph();
    }
    if (level==2){ //spegne schermo
      blackScreen();
    }

    if (millis() - getDataHour >= 1800000){ //se passa un ora salva dati(3600000) /1800000 mezzora
       SaveDataGraph(CO2);//salva dati CO2
       getDataHour = millis();
    }


  delay(500);


}

 int graph[23]={400,400,400,400,400,400,400,400,400,400,400,400,400,400,400,400,400,400,400,400,400,400,400};

uint8_t moment=0; //momento in cui mi trovo

void SaveDataGraph(int data){
  graph[moment]=data;
  moment++;
  if (moment==23){
  moment=0;
  }
  }

void printGraph(void){
  static int tempo=0;
  int resizeData;
  int PosizioneX=0;
  while(tempo!=23){
    resizeData = 30-(graph[tempo]*0.012); //range da 0 a 2500
    display.drawLine(PosizioneX+4,resizeData,PosizioneX+4,32,WHITE); // draw a rectangle from x1,y1 to x2,y2
    PosizioneX=PosizioneX+5;
    tempo++;
  }
  display.drawLine(0,24,1,24,WHITE);  // linea 500ppm
  display.drawLine(0,18,128,18,WHITE);  // linea 1000ppm
  display.drawLine(0,12,1,12,WHITE);  // linea 1500ppm
  display.drawLine(0,6,128,6,WHITE);  // linea 2000ppm

  display.drawLine((moment+1)*5,0,(moment+1)*5,1,WHITE);  // linea riferimento mom corrente

  display.display(); // Update screen
  PosizioneX=0;
  tempo=0;
  }


void blackScreen(void){
    display.clearDisplay();
    display.display();
  }


void ScreenPrint(String text, int x, int y, int size, bool d){

  display.setTextSize(size);
  display.setTextColor(WHITE);
  display.setCursor(x,y);
  display.println(text); //testo da mandare a display
  if(d){
    display.display(); //se voglio stampare subito d=1
    }
  }


_ztBMuBhMHo.jpg?auto=compress%2Cformat&w=48&h=48&fit=fill&bg=ffffff)


Comments
Please log in or sign up to comment.