Have you ever spent hours reading through endless wikis, trying to memorize all of their contents?
I know I have, and that is what inspired me to build this project.
My project first originated around one central issue I have always had with wikis. As a time limited high school student, developer, and gamer, I often find myself spending more time researching different aspects of a game, instead of actually playing the game.
My solution? I created a way to not only talk to a wiki, but to also quickly build many wiki skills.
The first wiki skill I built was for the Elite: Dangerous wiki. I decided to use this wiki for a couple of reasons:
- I often found myself being kicked from the game after spending too much time on the wiki.
- I wanted to create an information gathering skill to pair with one of my other skills, Elite Dangerous Ship Assistant.
My project has 2 parts. As we go through each part, I will describe the part's processes and will give you a walk-through on how to construct each part. Alternatively, you can enable my published skill for use with your Alexa enabled device to use my Elite: Dangerous wiki skill.
Let's begin!
Part 1: The Wiki Skill Dependency CreatorFor the first part of my project, I needed a way to create all of the dependencies for my skill. This includes getting slot values, uploading images to S3, creating article maps, etc. When I started building the skill, I quickly realized how time consuming it was to make slots for every article, subpage, and section in the entire wiki. As a result, I looked to Wikia's Content API, the same API I use in my skill. With the help of this API and Node.js, I built a script to find all of the articles in a wiki (in my case, the Elite: Dangerous Wiki), remove all of the articles that have no content, associate redirect articles with their actual articles, upload all images in the wiki to a publicly readable S3 bucket, and create the following files:
- LIST_OF_ARTICLES_WITH_SUBPAGES - Slot values for all articles with subpages.
- LIST_OF_ARTICLES - Slot values for all articles.
- LIST_OF_SUBPAGES Slot values for all subpages.
- LIST_OF_SECTIONS - Slot values for all sections.
- articlesWithSubpages.js - JavaScript Object containing all articles with subpages.
- imageSrcs.js - JavaScript Object containing all Wikia URLs associated with their S3 URLs.
- articleIds.js - JavaScript Object containing all articles, their IDs, and their sections.
These files are crucial for the skill to identify the exact information the user is requesting.
How to use:
1.) You must first have Node.js installed on your machine.
2.) Download my git repository here and unzip.
3.) Open a command prompt or terminal and navigate to the folder "helperFiles" in the folder you unzipped.
5.) Type the command: "npm install" - This installs all of the Node.js modules my script is dependent on.
6.) While the install is running, create a AWS account.
7.) Navigate to the IAM service, click on "Users", then click on "Add User".
8.) Name your user, check the box "Programmatic access", and click "Next: Permissions".
9.) Click on "Attach existing policies directly".
10.) Copy this ("s3full lambdafull cloudwatchfull" ), paste it in the search box, select all three options, and click "Next: Review".
11.) Click "Create User".
12.) Download and open the ".csv" file.
13.) Create a credentials file at ~/.aws/credentials on Mac/Linux or C:\Users\USERNAME\.aws\credentials on Windows and input the your information from the ".csv" file.
14.) Go back to IAM and click "Close".
15.) Click on your new User and note its User ARN.
14.) Navigate to "Roles", then click on "Create new role".
15.) Select AWS Lambda.
16.) Copy this("dynamoDBFull cloudwatchfull lambdafull s3full"), paste it in the search box, select the top four options, and click "Next Step".
17.) Name your role and click "Create Role".
18.) Click on your newly created role, navigate to "Trust relationships", and click "Edit trust relationship"
19.) Make sure your trust relationship looks like this, replacing "<USER ARN>" with your User ARN you noted earlier. When you are finished, click "Update Trust Policy"
20.) Now, navigate to the S3 service.
21.) Click "Create bucket".
22.) Name your bucket, note your bucket name, and click "Next".
23.) Click "Next".
24.) Open "Manage public permissions and check all read boxes.
25.) Click "Next".
26.) Click "Create bucket".
27.) In file explorer or finder, navigate to the folder "helperFiles" in the folder you unzipped.
28.) Open "alexaWikiSkillDependencyCreator.js" in an editor.
29.) Edit line 20 as follows:
var wikiaSubdomain = "<your wiki subdomain>";
30.) Edit line 27 as follows:
var bucket = "<your S3 bucket name>";
31.) Save the file and go back to your command prompt or terminal.
32.) Type "node alexaWikiSkillDependencyCreator.js" and wait for script to finish.
33.) When you see "All Done", you can go back to to your file explorer or finder, navigate to the folder "helperFiles", and you will see the newly created dependencies. You can also go to your S3 bucket and you should see a new folder in your bucket. These are the images the skill will use.
Congratulations! You finished the first part of the project! You can now move onto part 2.
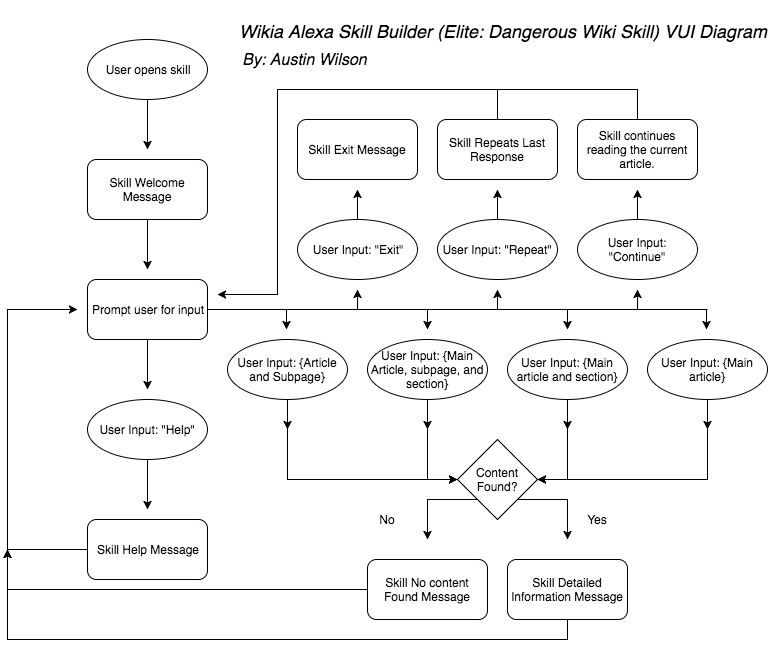
Part 2: The Alexa SkillMy Alexa skill was written in Node.js and is hosted on Amazon's Lambda web service. It uses the dependencies that were created by The Wikia Skill Dependency Creator to accurately identify the information the user is requesting. To open the skill, simply say, "Alexa, open elite dangerous wiki." By asking the skill for help or referencing the Voice User Interface Diagram provided below, you should be able to navigate the skill with ease. When you ask Alexa about information in a wiki, the request is sent through a Wikia's API and responds with updated information on the topic.
How to set up:
1.) In file explorer or finder, navigate to the folder you unzipped in part 1.
2.) Copy the following files from the "helperFiles" folder into the folder "src".
- articleIds.js
- articleWithSubpages.js
- imageSrcs.js
3.) Open "index.js" in an editor.
4.) Edit line 5 as follows:
var wiki = new Wikia("<your wikia subdomain>");
5.) Edit the language strings starting at line 384 to match your skill.
6.) Save the file and go back to your file explorer or finder. Zip or compress the contents of "src". (Not the folder, but everything inside the folder).
7.) Go to your AWS console and navigate to Lambda.
8.) Click "Create a Lambda function".
9.) Click "Blank Function".
10.) Choose the "Alexa Skills Kit" trigger and click "Next".
11.) Give your skill a name.
12.) Change code entry type to "Upload a .ZIP file".
13.) Click upload and choose your .ZIP file.
14.) Choose "lambda_basic_execution" as the Existing role and click "Next".
15.) Review and click "Create function"
16.) Take note of your newly created function's ARN in the upper right corner.
17.) Sign in to developer.amazon.com.
18.) Navigate to Alexa.
19.) Select "Alexa Skills Kit".
20.) Click "Add new skill".
21.) Give your skill a name and invocation name, click "Save", then click "Next".
22.) Open the following files from "helperFiles/speechAssets in an editor:
- intentSchema.json
- LIST_OF_ARTICLES_WITH_SUBPAGES.txt
- LIST_OF_ARTICLES.txt
- LIST_OF_SECTIONS.txt
- LIST_OF_SUBPAGES.txt
- utterences.txt
23.) Copy and paste the contents of "intentSchema.json" into Intent Schema.
24.) Create new slot types with the same names (minus .txt) and contents of the following files:
- LIST_OF_ARTICLES_WITH_SUBPAGES.txt
- LIST_OF_ARTICLES.txt
- LIST_OF_SECTIONS.txt
- LIST_OF_SUBPAGES.txt
Also add one more named "MORE_INFO" with the value "continue".
25.) Copy and paste the contents of "utterances.txt" into Utterances.
26.) Click "Save", then click "Next".
27.) Paste ARN in the Lambda link box.
28.) Save and click next.
29.) You can now test the skill.
Congratulations! You finished the second part of the project!
Additional InformationMy project is not endorsed by Frontier Developments PLC, Elite Dangerous, or Wikia Inc.
You can get the code from my GitHub.


Comments
Please log in or sign up to comment.