Download the SD Card image for Raspberry Pi. Use one of the many programs available for burning a bootable SD Card. Insert the card into your Raspberry Pi in the slot on the back.
You can use any Raspberry Pi equipped with a 40 pin expansion connector (2, 3 or Zero). If you buy the cheapest Zero, you will need to solder a 40 pin connector, and to buy a separate USB to Ethernet adapter. If you want to choose the easier path, just buy a Raspberry Pi 3 for $35 and you are ready to go.
Step #2: Hardware SetupIf you have less than eight zones, you will need one 8-Relay card. If you have more zones, you will need one 8-Relay card for every eight zones, for a maximum of eight cards (64 zones).
Piggy-back the 8-Relay card to your Raspberry Pi. Use the provided stand-offs, screws and nut. Tighten the top screws without bending the board.
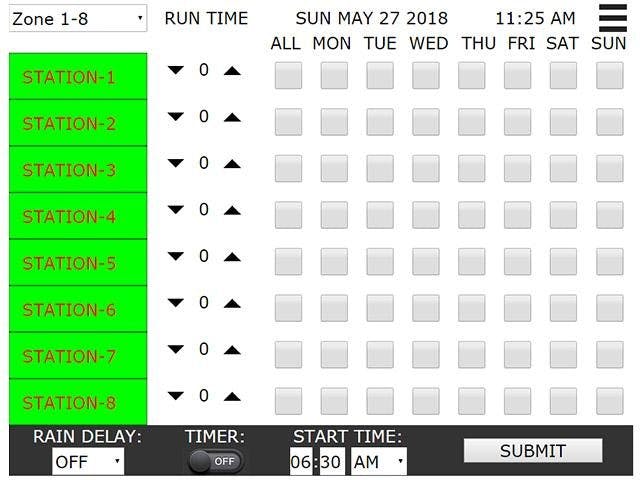
Connect the Pi to your local network and to the 5V power supply. Load the address of your router (something like 192.168.0.1), into your browser, look for the Local Client Table and find the address of your Raspberry Pi (something like 192.168.0.x). Point your browser to this address and you should see the start-up page of your sprinkler controller:
The Zone names can be edited from the SETTINGS menu. The RUN TIME can be either typed or adjusted from the arrows. The RUN DAYS can be selected from the check-boxes. The TIMER turns ON or OFF system. Press the icon in the upper right corner to open the SETTINGS menu.
When the SETTINGS page is loaded, it looks for all the 8-Relay cards installed. The Card# column activates only the installed cards shown in the Check column. In order to be discovered, each 8-Relay card installed needs to have the address jumpers set as indicated in the Jumpers column.
Change the Zone Names to something significant to your landscape, so you can easily recognize each zone by name. Press SAVE and close the SETTINGS windows. The names of the zones will be transferred to the main page.
Rain Delay
Rain Delay can be set in the main menu to OFF, AUTO or a preset number of days. In order to use the AUTO Rain Delay, enter your Zip Code (in the US) or your City and 2 letter Country Code, elsewhere in the world. Select also the precipitation level at which the watering will be turned off.
- Rain Delay OFF: Rain is ignored
- Rain Delay AUTO: The system stops watering when the forecast at your location calls for more rain than your limit.
- Rain Delay (1 to 7) days: The system stops watering for the preset number of days
Program all the active stations with 1 minute run time, set the Start Time 1 minute ahead of current time, turn on the system and watch the relays turning on and off in sequence.
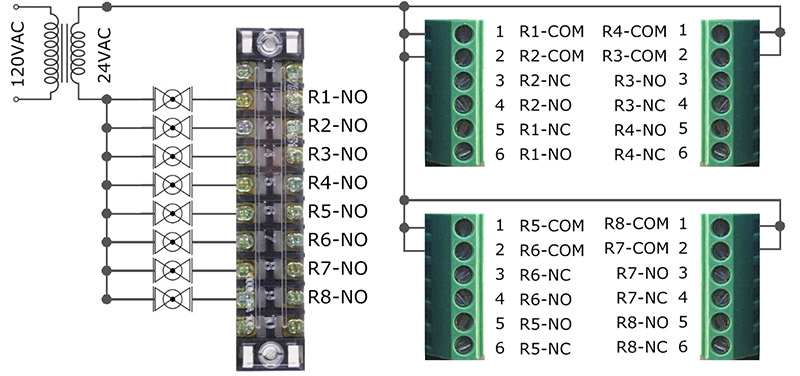
Step #5: Wire your Irrigation ValvesInstall your Raspberry Pi in a location where you can run all the sprinkler valve wires. Connect one end of each valve to the 24V power supply and to the Normal Open side of a relay. Connect the other end of the 24V power supply to the Common side of the relay, as shown below:
Your Irrigation Controller is ready, for about $5 per zone - less if you need more than eight zones. Please send us feedback about this project.


Comments
Please log in or sign up to comment.