mdraber
Published © GPL3+

Simplifying IoT: Build an LED Controller with Blynk and ESP8

Blynk makes IoT easy! Create an LED controller on ESP8266 and manage it worldwide with just a few lines of code.

IntermediateFull instructions provided1 hour43
Simplifying IoT: Build an LED Controller with Blynk and ESP8

Things used in this project

Hardware components

NodeMCU ESP8266 Breakout Board
×1
LilyPad LED Blue (5pcs)
SparkFun LilyPad LED Blue (5pcs)
×1

Software apps and online services

Arduino IDE
Arduino IDE
Blynk
Blynk

Story

Read more

Schematics

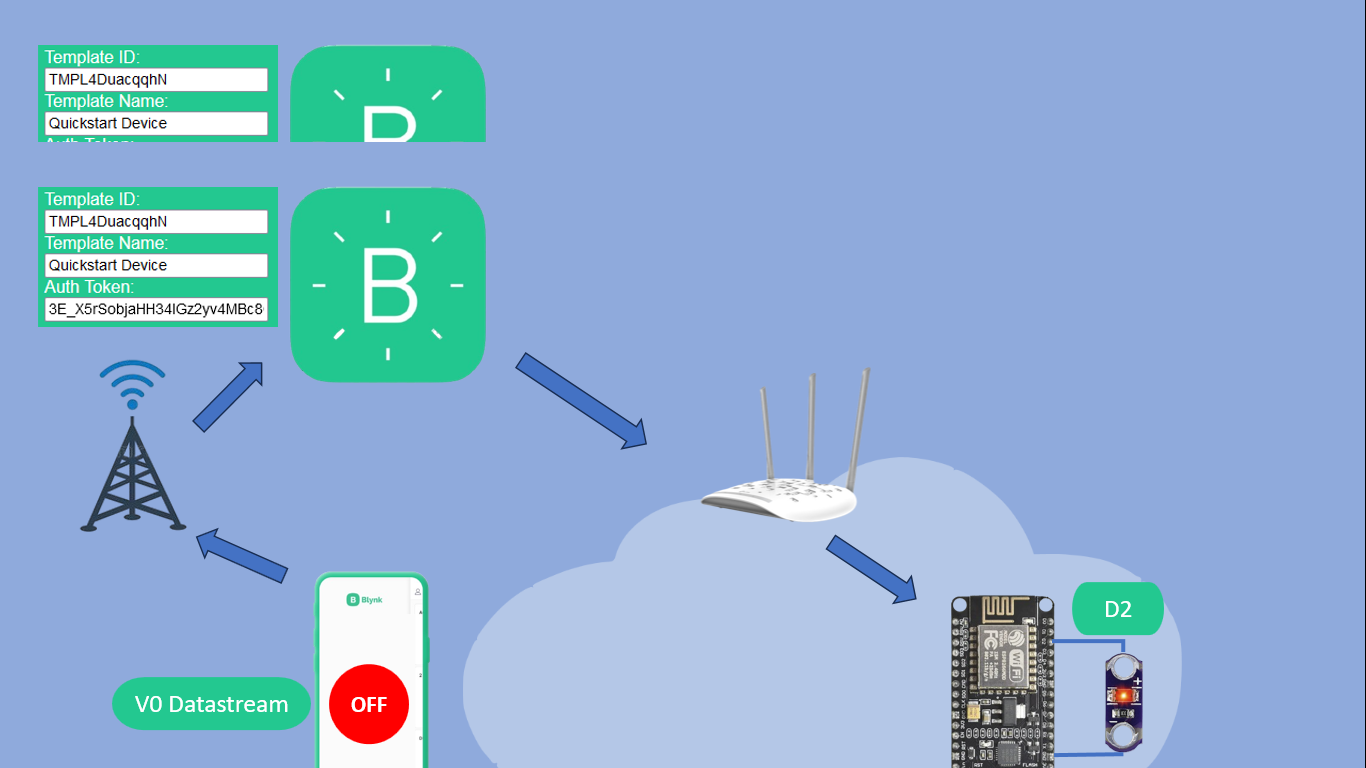
Connection (mobile device, Blynk cloud, Microcontroller)

Code

Controlling LED with ESP8266 and BLYNK app

Arduino
Adjust code adding your Blynk cloud and hotspot credentials
#define BLYNK_TEMPLATE_ID           "TMPL4auv4TEh5"
#define BLYNK_TEMPLATE_NAME         "LEDcontrol"
#define BLYNK_AUTH_TOKEN            "JSNDzCPaWyAyop0q1R_6Nn9oVco717HY"

#include <ESP8266WiFi.h>
#include <BlynkSimpleEsp8266.h>

char ssid[] = "******";
char pass[] = "******";

const int ledPin = D2;  // Pin D2 (GPIO 4)

BLYNK_WRITE(V0)  // This function is triggered when Virtual Pin V1 changes
{
  int value = param.asInt();  // Get the value from the Blynk app (0 or 1)
  digitalWrite(ledPin, value);  // Set the LED pin to HIGH or LOW
}

void setup() {
  pinMode(ledPin, OUTPUT);
  digitalWrite(ledPin, LOW);  // Ensure LED is OFF initially
  
  Serial.begin(9600);
  Blynk.begin(BLYNK_AUTH_TOKEN, ssid, pass);
}

void loop() {
  Blynk.run();
}

Credits

mdraber
50 projects • 71 followers

Comments