


Hardware components | ||||||
| × | 1 | ||||
_ztBMuBhMHo.jpg?auto=compress%2Cformat&w=48&h=48&fit=fill&bg=ffffff) |
| × | 1 | |||
 |
| × | 1 | |||
| × | 1 | ||||
 |
| × | 1 | |||
 |
| × | 1 | |||
Software apps and online services | ||||||
 |
| |||||
Hand tools and fabrication machines | ||||||
 |
| |||||
 |
| |||||
 |
| |||||
 |
| |||||
Ever tangled with a SIM800L? It's like a Swiss Army knife for your projects—calls, SMS, even internet. But it's not without quirks! Join our blog for SIM800L + Arduino Uno mastery, with troubleshooting tips served on the side. We've dabbled with SIM800L + ESP32 too—check it out! Once you've got the basics, dive into our other wild ideas: GSM Home Automation, DIY IVR, even Raspberry Pi internet-on-the-go. But first, let's decode GSM and GPRS: mobile magic with a side of speedy data. Because who doesn't love a tech mystery with a punchline?Connecting SIM800L with Arduino Uno: Voltage Tango
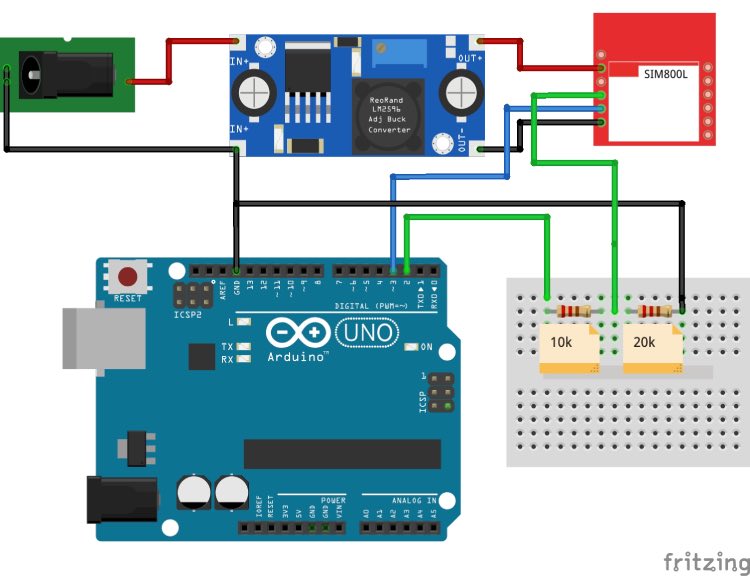
When pairing the SIM800L with your Arduino, remember they have different dance moves—3.3V versus 5V! Avoid shocking surprises with a voltage divider (think of it as their translator).
Feel free to tweak resistor values for a smoother connection. It's like finding the perfect recipe for voltage salsa—just the right mix!So, to get most of the Trubleshooting and Guidance Feel free to forward our Site which has Lot of Information about Sim800L.
SIM800L Circuit Connection: Wiring Without Soldering DramaYou've set up your SIM800L circuit—hopefully without any sparks flying! Double-check those jumper connections, because loose wires can lead to unexpected phone silence (not the mysterious, cool kind).
Troubleshooting SIM800L: The Network Blinking TangoSo, your SIM800L isn't singing? First, make sure you've introduced the SIM card correctly—it's a 2G affair, no 4G glitz here! If the network LED isn't shimmying (blinking every three seconds, ideally), don't panic—here's your SIM800L dance-off checklist:
- Check your SIM card—no backstage mishaps, please!
- Give that buck converter some pep (but not too much—it's a voltage balancing act).
- Scout for better network coverage—it's like searching for phone reception gold!
- If all else fails, consider a SIM800L understudy—your module might need a replacement encore.
To test the SIM800L's wit, send it some AT commands (it's like texting your module "Are you there?"). If it responds with "OK, " you've got a communicative SIM800L ready for the mobile stage!Hey there, before you start texting your SIM800L, make sure your Arduino is prepped with this code. It's like giving your Arduino a script to follow before the big show!
And hey, if you're feeling fancy, you can use a USB to TTL converter instead of the Arduino—because who doesn't love a quick change of actors?
// Create a SoftwareSerial object to communicate with the SIM800L module
SoftwareSerial mySerial(3, 2); // SIM800L Tx & Rx connected to Arduino pins #3 & #2
void setup()
{
  // Initialize serial communication with Arduino and the Arduino IDE (Serial Monitor)
  Serial.begin(9600);
  // Initialize serial communication with Arduino and the SIM800L module
  mySerial.begin(9600);
  Serial.println("Initializing...");
  delay(1000);
  mySerial.println("AT"); // Handshake test, should return "OK" on success
  updateSerial();
  mySerial.println("AT+CSQ"); // Signal quality test, value range is 0-31, 31 is the best
  updateSerial();
  mySerial.println("AT+CCID"); // Read SIM information to confirm whether the SIM is inserted
  updateSerial();
  mySerial.println("AT+CREG?"); // Check if it's registered on the network
  updateSerial();
}
void loop()
{
  updateSerial();
}
void updateSerial()
{
  delay(500);
  while (Serial.available())
  {
    mySerial.write(Serial.read()); // Forward data from Serial to Software Serial Port
  }
  while (mySerial.available())
  {
    Serial.write(mySerial.read()); // Forward data from Software Serial to Serial Port
  }
}If your SIM800L is giving you the silent treatment, first, play detective with those RX and TX connections. Maybe they're having an identity crisis—try reversing them briefly and see if the serial monitor throws a plot twist your way!
SIM800L AT Command Testing: Unlocking the Communication CharmIf your serial monitor starts chatting back after the RX/TX shuffle, you're ready to level up to calls and texts! Feeling curious? Dive into the SIM800L AT commands manual for the full repertoire of commands—because who doesn't love a little command-line drama?Sending SMS with SIM800L and Arduino: The Texting Code
Ready to unleash the SMS magic with your SIM800L and Arduino? Just tweak the code below with your recipient's number (+XXXXXXXXXXXX) and the message you want to send. Then, hit upload and watch the SIM800L work its texting mojo!
#include <SoftwareSerial.h>
// Create a SoftwareSerial object to communicate with the SIM800L module
SoftwareSerial mySerial(3, 2); // SIM800L Tx & Rx connected to Arduino pins #3 & #2
void setup()
{
  // Initialize serial communication with Arduino and the Arduino IDE (Serial Monitor)
  Serial.begin(9600);
  // Initialize serial communication with Arduino and the SIM800L module
  mySerial.begin(9600);
  Serial.println("Initializing...");
  delay(1000);
  mySerial.println("AT"); // Handshake test, should return "OK" on success
  updateSerial();
  mySerial.println("AT+CMGF=1"); // Configuring TEXT mode
  updateSerial();
  mySerial.println("AT+CMGS=\"+ZZxxxxxxxxxx\""); // Change ZZ with the country code and xxxxxxxxxxx with the phone number to send an SMS to
  updateSerial();
  mySerial.print("Circuitdigest | circuitdigest.com"); // SMS text content
  updateSerial();
  mySerial.write(26); // Send the CTRL+Z character to terminate the SMS
}
void loop()
{
}
void updateSerial()
{
  delay(500);
  while (Serial.available())
  {
    mySerial.write(Serial.read()); // Forward data from Serial to Software Serial Port
  }
  while (mySerial.available())
  {
    Serial.write(mySerial.read()); // Forward data from Software Serial to Serial Port
  }
}
If your SIM800L is feeling shy about sending SMS, it might be time to chat with the network provider. Ask them if 2G SMS is on the menu—it's like checking if the carrier speaks the right language for your SIM800L's texting ambitions!
Making Calls with SIM800L and Arduino: The Number Swap DanceNow, let's turn up the volume with some calling action! Grab the code below, swap out the placeholder phone number (+XXXXXXXXXXXX) with your recipient's digits, and get ready to make some noise (literally) with your SIM800L.
#include <SoftwareSerial.h>
// Create a SoftwareSerial object to communicate with the SIM800L module
SoftwareSerial mySerial(3, 2); // SIM800L Tx & Rx connected to Arduino pins #3 & #2
void setup()
{
  // Initialize serial communication with Arduino and the Arduino IDE (Serial Monitor)
  Serial.begin(9600);
  // Initialize serial communication with Arduino and the SIM800L module
  mySerial.begin(9600);
  Serial.println("Initializing...");
  delay(1000);
  mySerial.println("AT"); // Handshake test, should return "OK" on success
  updateSerial();
  mySerial.println("ATD+ZZxxxxxxxxxx;"); // Change ZZ with the country code and xxxxxxxxxxx with the phone number to dial
  updateSerial();
  delay(20000); // Wait for 20 seconds...
  mySerial.println("ATH"); // Hang up the call
  updateSerial();
}
void loop()
{
}
void updateSerial()
{
  delay(500);
  while (Serial.available())
  {
    mySerial.write(Serial.read()); // Forward data from Serial to Software Serial Port
  }
  while (mySerial.available())
  {
    Serial.write(mySerial.read()); // Forward data from Software Serial to Serial Port
  }
}
For More Detailed Information About Sim800L, Feel Free to Visit our Site that Explaining Interfacing GSM Module with Arduino to send SMS and make Calls.


Comments