// This #include statement was automatically added by the Particle IDE.
//#include <Adafruit_SSD1306.h>

// This #include statement was automatically added by the Particle IDE.
#include <SparkFunMicroOLED.h>
#include "math.h"
#include <blynk.h>
#define BLYNK_PRINT Serial

char auth[] = "229a6a4dac0e4237ae0058ea8db243da";
BlynkTimer timer;
double pres_front = 0;
double pres_rear =0;
/*
Micro-OLED-Shield-Example.ino
SparkFun Micro OLED Library Hello World Example
Jim Lindblom @ SparkFun Electronics
Original Creation Date: June 22, 2015

This sketch prints a friendly, recognizable logo on the OLED Shield, then
  goes on to demo the Micro OLED library's functionality drawing pixels,
  lines, shapes, and text.

  Hardware Connections:
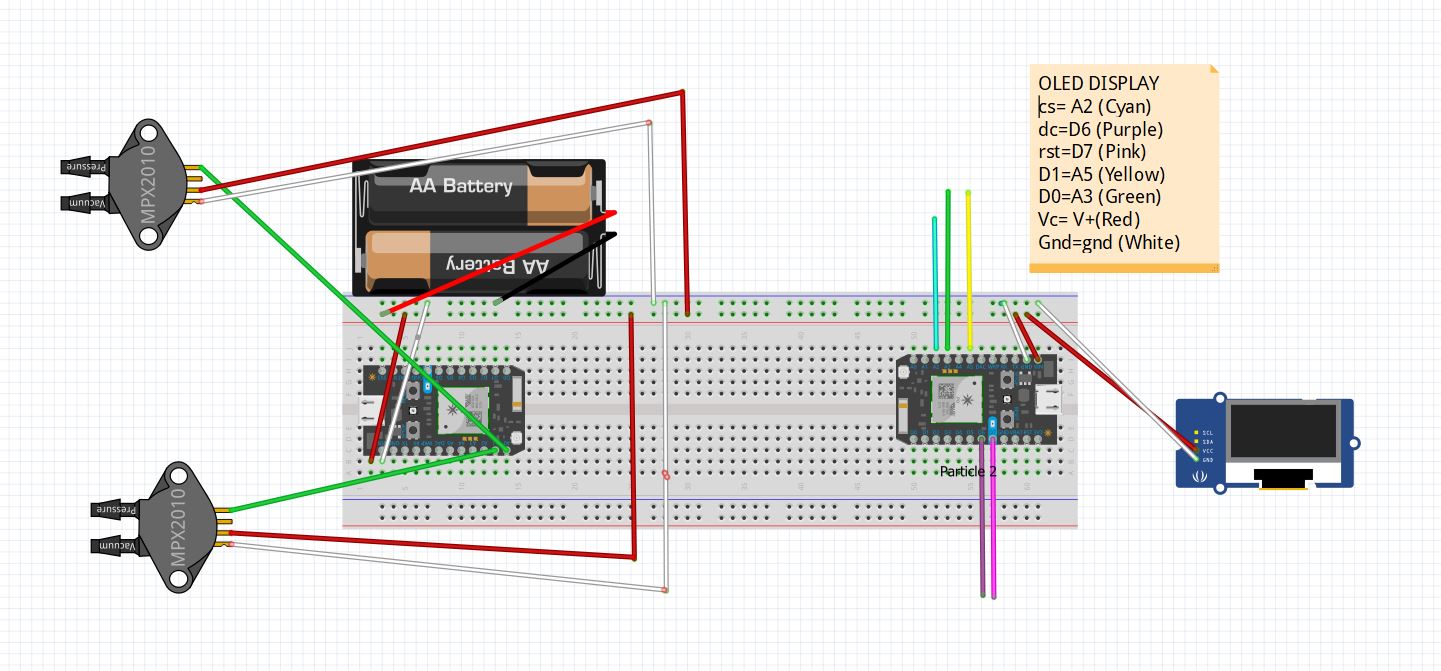
  This sketch was written specifically for the Photon Micro OLED Shield, which does all the wiring for you. If you have a Micro OLED breakout, use the following hardware setup:

    MicroOLED ------------- Photon
      GND ------------------- GND
      VDD ------------------- 3.3V (VCC)
    D1/MOSI ----------------- A5 (don't change)
    D0/SCK ------------------ A3 (don't change)
      D2
      D/C ------------------- D6 (can be any digital pin)
      RST ------------------- D7 (can be any digital pin)
      CS  ------------------- A2 (can be any digital pin)

  Development environment specifics:
    IDE: Particle Build
    Hardware Platform: Particle Photon
                       SparkFun Photon Micro OLED Shield

  This code is beerware; if you see me (or any other SparkFun
  employee) at the local, and you've found our code helpful,
  please buy us a round!

  Distributed as-is; no warranty is given.
*/

//////////////////////////////////
// MicroOLED Object Declaration //
//////////////////////////////////
// Declare a MicroOLED object. If no parameters are supplied, default pins are
// used, which will work for the Photon Micro OLED Shield (RST=D7, DC=D6, CS=A2)

MicroOLED oled;

void myTimerEvent()
{

}

void setup()
{
    Particle.subscribe("FrontPSI", FrontPSI, "2e0047000e51353338363333");
    Particle.subscribe("RearPSI", RearPSI, "2e0047000e51353338363333");
    oled.begin();    // Initialize the OLED
    oled.clear(ALL); // Clear the display's internal memory
    Serial.begin(9600);
    Blynk.begin(auth);

    timer.setInterval(250L, myTimerEvent);

}


void FrontPSI(const char *event, const char *data)
{
  pres_front = atof(data) ;
  Particle.variable("FPressure", pres_front);
  oled.clear(PAGE);
  oled.setFontType(1);

  oled.setCursor(0,0);
  oled.print("F:");
  oled.print(pres_front,2);
}

void RearPSI(const char *event, const char *data)
{
  pres_rear = atof(data) ;
  Particle.variable("RPressure", pres_rear);
  oled.setCursor(0,32);
  oled.print("R:");
  oled.print(pres_rear,0);

  oled.display();
}
void loop()
{


  oled.clear(PAGE);
  oled.setFontType(0);

  oled.setCursor(0,0);
  oled.print("F:");
  oled.print(pres_front,0);

  oled.setCursor(0,32);
  oled.print("R:");
  oled.print(pres_rear,0);

  oled.display();

 Blynk.virtualWrite(V1, pres_front);
 Blynk.virtualWrite(V2, pres_rear);

 Blynk.run();


 delay(250);

}


Comments
Please log in or sign up to comment.