


Hardware components | ||||||
 |
| × | 2 | |||
| × | 2 | ||||
 |
| × | 2 | |||
 |
| × | 1 | |||
 |
| × | 2 | |||
 |
| × | 4 | |||
 |
| × | 5 | |||
 |
| × | 1 | |||
| × | 1 | ||||
 |
| × | 1 | |||
 |
| × | 1 | |||
| × | 22 | ||||
 |
| × | 11 | |||
| × | 1 | ||||
Software apps and online services | ||||||
 |
| |||||
 |
| |||||
 |
| |||||
| ||||||
User
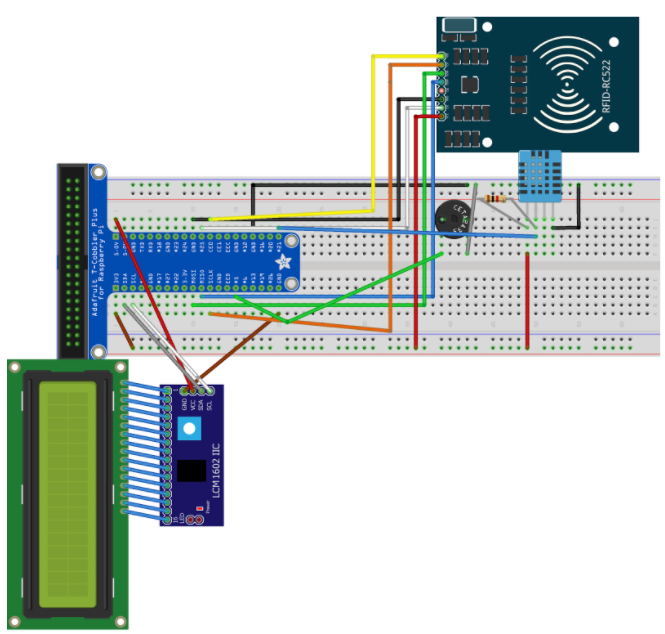
Firstly, we would be connecting the RFID MFRC522 reader to the breadboard. There are about 9 pins on the MFRC522 card reader, we will only be using 7 of them. Connect the pins on the MFRC522 card reader to the Raspberry Pi as indicated below.
Secondly, we would set up our DHT11 sensor. The DHT11 sensor has a total of 4 pins. Connect them to the Raspberry Pi pins with the corresponding color jumper cables as shown in the diagram below. Add in a 10k ohms resistor in the DATA and VCC line.
Thirdly, we would set up our Buzzer. The buzzer has a total of 2 pins. Connect the Buzzer with the Raspberry Pi as shown in the diagram below.
Lastly, we would set up our LCD Screen. The LCD Screen has a total of 4 pins. Connect them to the Raspberry Pi pins with the corresponding color jumper cables as shown in the diagram below. Add in a 10k ohms resistor in the DATA and VCC line.
Admin
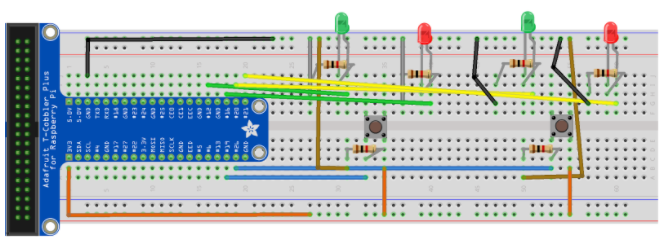
Firstly, we would be connecting the first set-up to the breadboard. There are about 2 actuators and 1 sensor on the first set-up. We will connecting the button first, the button has 4 legs which 2 of them needed to be connected to a voltage point and a GPIO pin. However, the button also has to be grounded with 1k ohms resistor.
Secondly, we will be connecting the 2 LED (Green and Red) onto the breadboard. Each LED are accompanied by a 330 ohms resistor. The anode of the green LED will be connected to the GPIO12, while the anode of the red LED will be connected to the GPIO16. Each cathode of the LED will be connected to one end of the 330 ohms resistors, while on the other end of the resistor there will be a jumper that is connected to the ground which can be seen connected on the bus strips.
Repeat Step 1, for step 2 to connect the second part of the set-up.
We will be connecting the 2 LED (Green and Red) onto the breadboard. Each LED are accompanied by a 330 ohms resistor. The anode of the green LED will be connected to the GPIO20, while the anode of the red LED will be connected to the GPIO21. Each cathode of the LED will be connected to one end of the 330 ohms resistors, while on the other end of the resistor there will be a jumper that is connected to the ground which can be seen connected on the bus strips.
Step 2: Setting up a Telegram BotOpen the Telegram desktop / mobile app and start Botfather.
Key in the command /newbot to create a new bot.
Assign a name for your new bot.
Assign a username to your bot. It must end with the suffix ‘bot’.
Copy down the access token that is generated when the bot is successfully created.
Install the Telegram API on your Raspberry Pi using pip on the command terminal.
$ sudo pip install telepot
Run raspi-config, choose menu item “5 Interfacing Options” and enable SPI.
$ sudo rasp-config
Modify the /boot/config.txt to enable SPI.
$ sudo nano /boot/config.txt
Ensure these lines are included in config.txt:
device_tree_param = spi = on
dtoverlay=spi-bcm2835
Install the Python development libraries:
$ sudo apt-get install python-dev
Set up the SPI Python libraries, since the card reader uses the SPI interface.
$ git clone https://github.com/lthiery/SPI-Py.git
$ cd /home/pi/SPI-Py
$ sudo python setup.py install
Clone the MFRC522-python library and copy out the required files to your project directory.
$ git clone https://github.com/rasplay/MFRC522-python.git
$ cd MFRC522-python
$ sudo cp *.py ~/CA2
In the left pane, click on the “Manage” tab to expand it, and click on “Things”.
In the top right-hand corner, click the “Create” button to begin creating a new Thing. When given options to register either a single thing or many things, click “Create a single thing”.
Assign a name to your newly registered device. In the screenshot below, we assigned “AdminRaspberryPi” to the new thing. Click on the “Next” button after doing so.
Next, click “Create certificate” to generate a one-click certificate creation for AWS authentication purposes.
Once the certificates have been generated, you should be redirected to a page with the certificate download links. Download the certificate for the newly registered thing, public key, private key, and root CA. Click on “Done” as we have not created any new policies to be attached to the Thing.
After clicking “Done”, return to the “Things” page under the “Manage” tab and click on the newly created thing, AdminRaspberryPi. Click on the “Interact” tab and copy the Rest API Endpoint to a text editor of your choice.
In the left pane, click on the “Secure” tab to expand, and click on “Policies”.
In the top right-hand corner, click on the “Create” button to begin creating a new policy. Fill in the fields with the following information. Click on the “Create” button once you have completed filling in all the fields.
In the left pane, click on the “Secure” tab to expand it, and click on “Certificates”. Check the X.509 certificate that you just generated. Then, click on the “Actions” drop down menu to view all the possible actions to perform on the certificate, and click on “Attach policy”.
A popup showing the certificate name and list of available policies should appear. Check the newly created “LibaceSecurityPolicy” and click on the “Attach” button to attach the policy.
Open the AWS SNS console. In the left pane, click on the “Topics” tab. Then click on the “Create New Topic” button to begin creating a topic for the admin to subscribe to.
In both Topic name and Display name fields, input “alertTopic” as the unique identifier for the Amazon Resource Name (ARN), which is used to specify a resource unambiguously across any AWS applications.
After creating the topic, check the newly created “alertTopic”, and click on the “Actions” drop down menu. Click the “Edit topic policy” option.
In the basic view tab, click on the “Everyone” radio button for both “Allow these users to publish messages to this topic” and “Allow these users to subscribe to this topic”. Then click on the “Update Policy” button.
After creating the topic, check the newly created “alertTopic”, and click on the “Actions” drop down menu. Click the “Subscribe to topic” option.
A popup showing the Topic ARN, Protocol, and Endpoint fields will be shown to create the subscription for “alertTopic”. Choose “Email” as the protocol and fill in your own desired email as the Endpoint. Click on the “Create subscription” button once completed.
After creating the subscription, a subscription confirmation notice will be sent to the email that you have specified as your endpoint earlier. Click on the “Confirm subscription” hyperlink to confirm the subscription properly and begin sending SNS notifications from AWS to your email.
Upon clicking the hyperlink, a popup should appear similar to the screenshot below.
In the AWS IoT console, in the left navigation pane, choose Act, then “Create a rule”.
On the Create a rule page, in the Name field, type a name for your rule. In the Description field, type a description for the rule.
Scroll down to Message source. Choose the latest version from the Using SQL version drop-down list. In the Attribute field, type *. This specifies that you want to send the entire MQTT message that triggered the rule.
The rules engine uses the topic filter to determine which rules to trigger when an MQTT message is received. In the Topic filter field, type “space1/alert”. Leave the condition blank.
In set one or more actions, choose Add action
On the Select an action page, select Send a message as an SNS push notification, and then choose Configure action.
On the Configure action page, from the SNS target drop-down list, choose the Amazon SNS topic you created earlier.
Now you need to give AWS IoT permission to publish to the Amazon SNS topic on your behalf when the rule is triggered. Choose Create a new role. Enter a name for your new role in the IAM role name field.
After you have entered the name, choose Create a new role again. Select the newly created role from the IAM role name drop-down list. Choose Update role to apply the permissions to the newly created role, and then choose Add action.
Choose Add action. You will be returned to the previous screen as shown below.
On the Create a Rule page, choose Create rule.
Run the CA2_program_data.py.
$ sudo python CA2_program_data.py
Test the Rule through the Test console on AWS IoT.
After a while, you should receive an email from AWS SNS notifying you when user booked the space for more than 15 seconds shown below.
Install the AWS Python SDK on the Linux command line:
$ sudo pip install AWSIoTPythonSDK
Code the program as shown below. Replace my_bot_token and host variables with your own Telegram token and AWS IoT host endpoint respectively.
CA2_program_data.py
from gpiozero import LED, Buzzer
from time import time
from time import sleep
import datetime
import json
import paho.mqtt.client as mqtt
import RPi.GPIO as GPIO
import MFRC522
import signal
import sys
import Adafruit_DHT
from AWSIoTPythonSDK.MQTTLib import AWSIoTMQTTClient
from rpi_lcd import LCD
import telepot
# Global Variable Here
my_bot_token = "XXXXXXXXXXXXXXXXXXXXXXXXXXX"
book_time = 0
lcdmsg = "AVAILABLE!"
#Define gpiozero ports and parts here
uid = None
prev_uid = None
current_uid = None
continue_reading = True
bz = Buzzer(5)
pin = 21
lcd = LCD()
# This is the Publisher
client = mqtt.Client()
client.connect("localhost",1883,60)
# Custom MQTT message callback
def customCallback(client, userdata, message):
	print("Received a new message: ")
	print(message.payload)
	print("from topic: ")
	print(message.topic)
	if message.payload == "1":
		global book_time
		global lcdmsg
		global current_uid
		print("Space has been unbooked")
		bz.on()
		sleep(3)
		bz.off()
		current_uid = None
		lcd.text("Space's unbooked",1)
		lcd.text("by Admin!",2)
		sleep(5)
		book_time = 0
		current_uid = None
		lcdmsg = "AVAILABLE!"
		lcd.text(lcdmsg,2)
		my_rpi.publish("room1/booking", "0",1)
	print("--------------\n\n")
# Custom MQTT message callback
def callLCD(client, userdata, message):
	print("Received a new message: ")
	print(message.payload)
	print("from topic: ")
	print(message.topic)
	print("--------------\n\n")
	if message.payload == "off":
		lcd.clear()
	else:
		lcd.text(message.payload,1)
		lcd.text("",2)
def callBuzz(client, userdata, message):
	print("Received a new message: ")
	print(message.payload)
	print("from topic: ")
	print(message.topic)
	print("--------------\n\n")
	if message.payload == "1":
		bz.on()
	else:
		bz.off()
host = "XXXXXXXXXXXXXXXXXXXXX.iot.region-code-number.amazonaws.com"
rootCAPath = "rootca.pem"
certificatePath = "certificate.pem.crt"
privateKeyPath = "private.pem.key"
my_rpi = AWSIoTMQTTClient("basicPubSub")
my_rpi.configureEndpoint(host, 8883)
my_rpi.configureCredentials(rootCAPath, privateKeyPath, certificatePath)
my_rpi.configureOfflinePublishQueueing(-1)  # Infinite offline Publish queueing
my_rpi.configureDrainingFrequency(2)  # Draining: 2 Hz
my_rpi.configureConnectDisconnectTimeout(10)  # 10 sec
my_rpi.configureMQTTOperationTimeout(5)  # 5 sec
# Connect and subscribe to AWS IoT
my_rpi.connect()
#Subscribe to Admin Channel
my_rpi.subscribe("admin/space1/unbook", 1, customCallback)
my_rpi.subscribe("admin/lcd",1,callLCD)
my_rpi.subscribe("admin/buzz",1,callBuzz)
#Capture SIGINT for cleanup when the script is aborted
def end_read(signal,frame):
	global continue_reading
	print("Ctrl+C captured, ending read.")
	contine_reading = False
	GPIO.cleanup()
#Hook the SIGINT
signal.signal(signal.SIGINT,end_read)
#Create an object of the class MFRC522
mfrc522 = MFRC522.MFRC522()
#welcome message
print("Welcome to the MFRC522 data read example")
print("Press Ctrl-C to stop")
def respondToMsg(msg):
	global temperature_value
	chat_id = msg['chat']['id']
	command = msg['text']
	print('Got command: {}'.format(command))
	if command == '/space1':
		bot.sendMessage(chat_id, 'Space 1 is now: %s' % (lcdmsg))
		bot.sendMessage(chat_id, 'Temperature at Room 1: %s degree celsius' % (temperature_value))
bot = telepot.Bot(my_bot_token)
bot.message_loop(respondToMsg)
# this loop keeps checking for chips
# if one is near it will get the UID
while True:
	update = True
	old_time = time()
	new_time = time()
	#scan for cards
	lcd.text('Space is',1)
	lcd.text(lcdmsg,2)
	(status,TagType) = mfrc522.MFRC522_Request(mfrc522.PICC_REQIDL)
	if status == mfrc522.MI_OK:
 	# get the UID of the card
		(status,uid) = mfrc522.MFRC522_Anticoll()
		if current_uid == None:
			book_time = time()
			print("Spaced Booked by card with UID of {}".format(uid))
			bz.on()
			sleep(3)
			bz.off()
			current_uid = uid
			my_rpi.publish("room1/booking", "1",1)
			# my_rpi.publish("room2/booking","1",1)
			lcdmsg = "BOOKED!"
			lcd.text(lcdmsg,2)
			try:
				print("")
			except KeyboardInterrupt:
				update = False
		elif uid != current_uid:
			print("Space has been booked by card with UID of {}".format(current_uid))
			bz.on()
			sleep(3)
			bz.off()
		elif uid == current_uid:
			print("Space has been unbooked")
			bz.on()
			sleep(3)
			bz.off()
			current_uid = None
			lcdmsg = "AVAILABLE!"
			lcd.text(lcdmsg,2)
			book_time = 0
			my_rpi.publish("room1/booking", "0",1)
			# my_rpi.publish("room2/booking","0",1)
			try:
				print("")
			except KeyboardInterrupt:
				update = False
	if book_time > 1:
		con_time = time()
		print(con_time)
		print(book_time)
		time_diff = con_time - book_time
		if time_diff > 15:
			my_rpi.publish("space1/alert", "Booking at Space 1 is too Long, Check on Space." ,1)
			print("Booking Over")
			lcd.text("Please Unbook",1)
			lcd.text("Now",2)
			my_rpi.publish("room1/booking", "2",1)
			# my_rpi.publish("room2/booking","2",1)
			bz.on()
			sleep(2)
			bz.off()
	humidity,temperature = Adafruit_DHT.read_retry(11,pin)
	temperature_value = temperature
	humidity_value = humidity
	print('Temperature:',temperature_value)
	print('Humidity:',humidity_value)
	sleep(3)
	if temperature_value > 15:
		try:
			print("")
		except KeyboardInterrupt:
			update = False
	old_time = new_time
	new_time = time()
	print("Wait 5 secs before getting next temperature values...")
	sleep(5)
When the python file is called, the program will run, it will sense for motion if motion is detected the MFRC522 card reader will be reading for a NFC card nearby. If no NFC card is being read it will move on to collect the data from the DHT11 and upload it to the Database. If a NFC card was scanned by the reader, it would check if the space is book by through the if-else loop. If the space is available it will be booked by that NFC card as shown below. If the space is not available it will output that the space is booked by another NFC card. If the NFC card being read is the same as the previous NFC card being read it will mention that the space has been unbooked.
You will also hear a the ringing of the buzzer.
Using Card #1 to book the space:
Using Card #2 to book the space while Card #1 has booked it:
Using Card #1 to unbook the space:
To implement this part of the project, you will to have the Python Flask library and gevent library on your Raspberry Pi.
Flask is a Python micro framework that provides you with tools, libraries and technologies that allow you to build web applications easily.
Install Flask (http://flask.pocoo.org/)
$ sudo pip install flask
Install gevent (http://www.gevent.org)
$ sudo pip install gevent
Create a python script server.py with the code below.
server.py
 # Import SDK packages
from AWSIoTPythonSDK.MQTTLib import AWSIoTMQTTClient
import paho.mqtt.client as mqtt
import datetime
import gevent
import gevent.monkey
from gevent.pywsgi import WSGIServer
gevent.monkey.patch_all()
from flask import Flask, request, Response, render_template
from gpiozero import LED, Buzzer
from rpi_lcd import LCD
from time import sleep
space1_green = LED(12)
space1_red = LED(16)
space2_green = LED(20)
space2_red = LED(21)
bz = Buzzer(5)
host = "XXXXXXXXXXXXX.iot.region-code-number.amazonaws.com"
rootCAPath = "rootca.pem"
certificatePath = "certificate.pem.crt"
privateKeyPath = "private.pem.key"
my_rpi = AWSIoTMQTTClient("libacePubTest")
my_rpi.configureEndpoint(host, 8883)
my_rpi.configureCredentials(rootCAPath, privateKeyPath, certificatePath)
my_rpi.configureOfflinePublishQueueing(-1)  # Infinite offline Publish queueing
my_rpi.configureDrainingFrequency(2)  # Draining: 2 Hz
my_rpi.configureConnectDisconnectTimeout(10)  # 10 sec
my_rpi.configureMQTTOperationTimeout(5)  # 5 sec
# Connect and subscribe to AWS IoT
my_rpi.connect()
def ledOn():
	space1_green.on()
	space1_red.on()
	space2_green.on()
	space2_red.on()
	return "LEDs have been turned on!"
def ledOff():
	space1_green.off()
	space1_red.off()
	space2_green.off()
	space2_red.off()
	return "LEDs have been turned off!"
def buzzOn():
	mqtt_message = "1"
	my_rpi.publish("admin/buzz", mqtt_message, 1)
	print("MQTT Sent")
       sleep(2)
def buzzOff():
	mqtt_message = "0"
	my_rpi.publish("admin/buzz", mqtt_message, 1)
	print("MQTT Sent")
       sleep(2)
def lcdOn():
	mqtt_message = "This is a test."
   	my_rpi.publish("admin/lcd", mqtt_message, 1)
	print("MQTT Sent")
       sleep(2)
def lcdOff():
	mqtt_message = "off"
   	my_rpi.publish("admin/lcd", mqtt_message, 1)
	print("MQTT Sent")
       sleep(2)
app = Flask(__name__)
@app.route("/")
def index():
	return render_template('index.html')
@app.route("/writeLED/<status>")
def writePin(status):
	if status == 'On':
		response = ledOn()
	else:
		response = ledOff()
	templateData = {
		'title': 'Status of LED',
		'response': response
	}
	return render_template("pin.html", **templateData)
@app.route("/writeBuzz/<status>")
def writePinBuzz(status):
	if status == 'On':
		response = buzzOn()
	else:
		response = buzzOff()
	templateData = {
		'buzztitle': 'Status of Buzzer',
		'buzzresponse': response
	}
	return render_template("pinbuzz.html", **templateData)
@app.route("/writeLcd/<status>")
def writePinLcd(status):
	if status == 'On':
		response = lcdOn()
	else:
		response = lcdOff()
	templateData = {
		'lcdtitle': 'Status of LCD',
		'lcdresponse': response
	}
	return render_template("pinlcd.html", **templateData)
if __name__ == '__main__':
	try:
		http_server = WSGIServer(('0.0.0.0',8002), app)
		app.debug = True
		http_server.serve_forever()
	except:
		print("Exception")
Create a HTML file called index.html in the templates folder with the code below.
index.html
<!DOCTYPE html>
 <head>
 <title>{{ title }}</title>
 <meta charset="utf-8">
 <meta name="viewport" content="width=device-width, initial-scale=1">
 <script src="https://code.jquery.com/jquery-3.1.0.min.js"></script>
 <script src="http://d3js.org/d3.v3.min.js"></script>
 <script src="http://dimplejs.org/dist/dimple.v2.1.6.min.js"></script>
 <link rel="stylesheet" href="https://maxcdn.bootstrapcdn.com/bootstrap/3.3.7/css/bootstrap.min.css">
 <script src="https://maxcdn.bootstrapcdn.com/bootstrap/3.3.7/js/bootstrap.min.js"></script>
 <script src="https://ajax.googleapis.com/ajax/libs/jquery/3.2.0/jquery.min.js"></script>
 <script>
 function turnon(){
 $.ajax({
 url: "writeLED/On",
 success: function(result){
                            }
                    })
                }
 function turnoff(){
 $.ajax({
 url: "writeLED/Off",
 success: function(result){
                            }
                    })
                }
 function buzzeron(){
 $.ajax({
 url: "writeBuzz/On",
 success: function(result){
                        }
                    })
            }
 function buzzeroff(){
 $.ajax({
 url: "writeBuzz/Off",
 success: function(result){
                        }
                    })
            }
 function lcdon(){
 $.ajax({
 url: "writeLcd/On",
 success: function(result){
                        }
                    })
            }
 function lcdoff(){
 $.ajax({
 url: "writeLcd/Off",
 success: function(result){
                        }
                    })
            }
 $(document).ready(function(){
 $("#b1").click(function(){
 turnon();
                });
 $("#b2").click(function(){
 turnoff();
                });
 $("#buzz1").click(function(){
 buzzeron();
                });
 $("#buzz2").click(function(){
 buzzeroff();
                });
 $("#lcd1").click(function(){
 lcdon();
                });
 $("#lcd2").click(function(){
 lcdoff();
                });
                });
 </script>
 </head>
 <body>
 <div class="navbar navbar-default" style="background-color: purple;">
 <div class="container">
 <a href="#" class="navbar-brand"><img src='https://imgur.com/nHKr1Yi.png' width='15%' alt='Libace Logo'/></a>
 </div>
 </div>
 <div class="container">
 <div class="row">
 <div class="col-lg-8 well">
 <h1> LED Testing </h1>
 <button class="btn btn-success" id="b1">Turn on</button>
 <button class="btn btn-danger" id="b2">Turn off</button>
 <h2 id="status"></h2>
 </div>
 </div>
 <div class="row">
 <div class="col-lg-8 well">
 <h1> Buzzer Testing </h1>
 <button class="btn btn-success" id="buzz1">Turn on</button>
 <button class="btn btn-danger" id="buzz2">Turn off</button>
 <h2 id="buzzstatus"></h2>
 </div>
 </div>
 <div class="row">
 <div class="col-lg-8 well">
 <h1> LCD Screen Testing </h1>
 <button class="btn btn-success" id="lcd1">Turn on</button>
 <button class="btn btn-danger" id="lcd2">Turn off</button>
 <h2 id="lcdstatus"></h2>
 </div>
 </div>
 </div>
 </body>
</html>
Run the command by running the server.py on the raspberry pi command prompt:
In your laptop’s browser, type in the IP address of your Raspberry Pi followed by the port number on which the server is listening on. For example, mine looks like this - xxx.xxx.x.xx:8002
Click on the “Turn On” button. The function will send a MQTT message to the User Device and unbook the space.
You should be able to see the LCD output has changed to “Space’s unbooked by Admin!”
You will also see the following output on your Raspberry Pi Terminal Window.
When you click on the “Turn Off” button, the LCD should clear.
You can try the other buttons as it works on the 4 individual LEDs and the buzzer.
Step 10: Coding in Python - Making a Telegram ChatbotNote: The code for the bot program is mentioned in Step 7: ca2_program_data.py.
import telepot
# Global variable here
my_bot_token = XXXXXXXXXXXXXXXXXXXXX
def respondToMsg(msg):
global temperature_value
   chat_id = msg['chat']['id']
   command = msg['text']
print('Got command: {}'.format(command))
if command == '/space1':
       bot.sendMessage(chat_id, 'Space 1 is now: %s' % (lcdmsg))
       bot.sendMessage(chat_id, 'Temperature at Room 1: %s degree celsius' % (temperature_value))
bot = telepot.Bot(my_bot_token)
bot.message_loop(respondToMsg)
# this loop keeps checking for chips
# if one is near it will get the UID
Run the same program ca2_program_data.py in the Linux terminal as follows:
$ sudo python ca2_program_data.py
Open the Chatbot you have just created on Telegram.
Key in ‘/space1’ in the input field and hit send to send a command to the bot to retrieve the availability of the specific space in the library.


_3u05Tpwasz.png?auto=compress%2Cformat&w=40&h=40&fit=fillmax&bg=fff&dpr=2)
Comments