


Hardware components | ||||||
_zhWsCcSEcl.jpg?auto=compress%2Cformat&w=48&h=48&fit=fill&bg=ffffff) |
| × | 1 | |||
 |
| × | 1 | |||
 |
| × | 1 | |||
| × | 1 | ||||
Software apps and online services | ||||||
 |
| |||||
 |
| |||||
Hand tools and fabrication machines | ||||||
 |
| |||||
When I'm in my room relaxing sometimes, my parents will claim that my TV is too loud. So the purpose of this array is for me to get notified via blinking led when the television volume has become too loud!
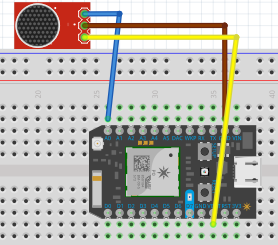
The ProcessThis is a Big Sound Sensor! It measures sound based on pressure, not frequencies. You'll notice it has 4 pins: Analog Pin, Ground Pin, Positive Pin, and a Digital Pin. For the purpose of the this project you'll only need to worry about the Analog, Ground, and Positive. Positive and Ground to get the sensor powered up, and the analog pin because the type of data this sensor records is analog data, not digital.
A potentiometer is an important component that's a part of this sensor. In laymen's terms, the potentiometer regulates the sensitivity of the Big Sound Sensor. In order to adjust the sensitivity, you have to twist the Flathead screw that's located on top of the blue potentiometer box either left or right (based on preference). *I have short nails and was able to twist it using my pointer finger. However a tiny Flathead screwdriver may be necessary*
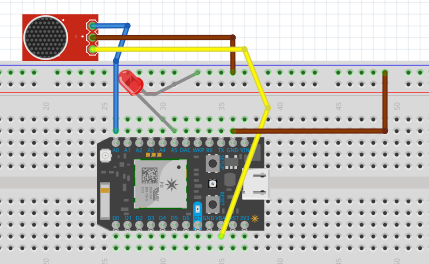
Connect the positive pin on the sensor to the vusb pin on the argon (using a jumper wire). This supplies the sensor with the 5 volts necessary to turn on.
The Sensor won't power up if the circuit isn't grounded! Plug the ground pin on the sensor to the ground pin on the argon (using a jumper wire). In order for the sensor to capture any data, make sure you plug the analog pin on the sensor to the A0 pin on the argon (using a jumper wire).
*Additional circuit details provided in the schematics section*
If you connected everything well, the Sensor LEDS will turn on to let you know!
If you use particle.publish to monitor the analog data, click this icon on the build.particle website to see data values *Further detail provided in the code sections*
My Unique SituationIdeally, you want to monitor data values directly using your computers com ports and an installed IDE (like the Arduino IDE) to use the serial monitor. This is because it gives you the best data "refresh rate." The reason I couldn't use this (Arduino IDE) however is because for whatever reason my windows laptop doesn't have "com ports" installed (computers should have these automatically). Which is why I used the build.particle console to circumvent this.
Unfortunately for whatever reason my data values were staying stagnant regardless of sensor,code, and sensitivity adjustments. For reference the data values should be spiking upwards of 600.
Ultimately I was unable to execute my project as a result.... however the process detailed here should allow other users to recreate it.
Schematics


Comments