


Hardware components | ||||||
 |
| × | 1 | |||
Software apps and online services | ||||||
 |
| |||||
| ||||||
Summary
This tutorial is about how to connect to WiFi on an ESP8266 using the Arduino IDE (vs NodeMCU Lua), query an XML API, and get the data you need.
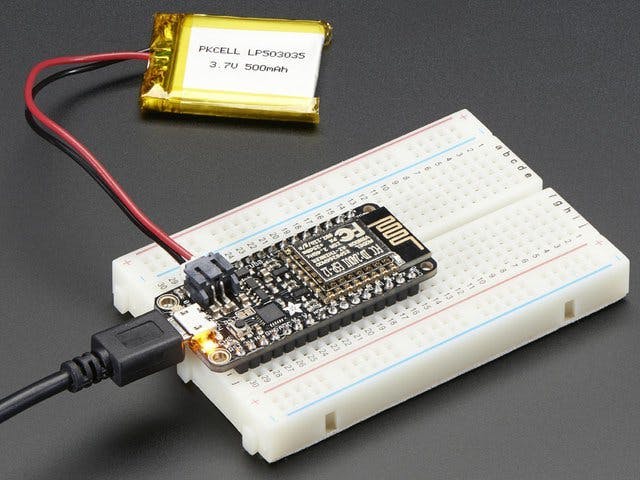
RationaleOutside my wife's store in Portland Oregon is a streetcar stop, and customers often stop in to browse, but are worried about missing their bus. She asked me to make some signage inside the store that would display the bus arrival times so customers wouldn't have to worry. Trimet, Portland's transit authority, has a great API for accomplishing just such a task. I first prototyped a very simple web query for arrival data (which you can see in this gist), but knew that for the signage, I wanted everything to be powered by a small, low-power device, and thought the ESP8266 (in the form of a Feather Huzzah, in my case) would be perfect.
The following guide may be super obvious to an experienced coder, but for me, it took a lot of hunting through forums and articles and documentation to assemble a fully working example, and any time that happens to me, I feel obligated to post a tutorial in the hopes that it'll make things easier for the next person. So here goes...
Setting up the Arduino IDEThe Huzzah, by default, uses Node MCU Lua by default, but since I'm more familiar with Arduino, I wanted to use its IDE for programming. I won't cover that setup here, but Adafruit has a great guide for installing Arduino as the IDE for your Feather, if that's what you're using.
Connecting to WifiThe first thing you'll need if you want internet data is make an internet connection:
#include <ESP8266WiFi.h>
//WIFI
const char* ssid = "[YOUR_NETWORK_NAME]";
const char* password = "[YOUR_NETWORK_PASSWORD]";
void setup() {
 Serial.begin(115200);
 connectToWifi();
}
void connectToWifi() {
 //connect to wifi
 Serial.print("connecting to ");
 Serial.println(ssid);
 WiFi.mode(WIFI_STA);
 WiFi.begin(ssid, password);
 while (WiFi.status() != WL_CONNECTED) { //WAITING FOR WIFI
   delay(500);
   Serial.print(".");
 }
 Serial.println("");
 Serial.println("WiFi connected");
 Serial.println("IP address: ");
 Serial.println(WiFi.localIP());
}
Here, we're including the ESP8266 Wifi Library for Arduino, which should be installed by default, but is available here in case you don't have it. Next, we're declaring a couple of variables for our Wifi username and password - make sure you replace everything from the starting `[` to ending `]` with your credentials for the ssid and password.
Next, we have the typical Arduino `setup` function. Here, I'm going to initialize the serial monitor to be able to debug whether the connection is happening. Thin I'm going to call the `Wifi.Begin()` method to connect to my Wifi, and when it is connected, I'm just printing out my local IP so I know we're good.
Querying the APINow that the ESP is connected to the internet, I need to query the API. I could do this all in the setup function, but I want to make repeated calls to the API, so I'll handle that in Arduino's `loop` function:
#include <WiFiClientSecure.h>
//API
const char* host = "developer.trimet.org";
String url = "/ws/V1/arrivals/locIDs/5901/appID/[MY_APP_ID]";
const int httpsPort = 443;
WiFiClientSecure client;
bool awaitingArrivals = true;
bool arrivalsRequested = false;
void loop() {
 if (awaitingArrivals) {
   if (!arrivalsRequested) {
     arrivalsRequested = true;
     getArrivals();
   }
 }
}
void getArrivals() {
 // Use WiFiClientSecure class to create TLS connection
 Serial.print("connecting to ");
 Serial.println(host);
 if (!client.connect(host, httpsPort)) {
   Serial.println("connection failed");
   delay(retryWifiDelay);
   return;
 }
 //Query the API
 Serial.print("requesting URL: ");
 Serial.println(url);
 client.print(String("GET ") + url + " HTTP/1.1\r\n" +
              "Host: " + host + "\r\n" +
              "User-Agent: BuildFailureDetectorESP8266\r\n" +
              "Connection: close\r\n\r\n");
 Serial.println("request sent");
 while (client.connected()) {
   String line = client.readStringUntil('\n');
   if (line == "\r") {
     Serial.println("headers received");
     break;
   }
 }
 String matchString = "";
 while (client.available()) {
   String line = client.readStringUntil('\r');
   if (line.endsWith("</resultSet>")) { //this signals the end of the response from XML API
     matchString = line;
   }
 }
 Serial.println(matchString); //log result xml response from server
 awaitingArrivals = false;
 client.stop();
}
There's a lot happening above, and some of it is specific to my particular use case, but here's the gist of it.
Trimet uses `https` for its API requests, so I'm including the WifiClientSecure library from Arduino (available here, if you don't have it by default)
I then declare some variables for the API itself. My API host is Trimet, yours would be everything up to the `.com` or `.org`, minus any `http` or `https`. That `url` string variable is the specific address within `trimet.org` I want to query for data, also known as an API endpoint. `[MY_APP_ID]` is a place holder for my Application ID I registered for through trimet - most APIs require you to get an API token. This is where that would go.
Because I don't want to query the API every time my `loop` function runs, I'm creating a couple of boolean variables. `awaitingArrivals` is true until I get data back from the API. `arrivalsRequested` is false until I actually make the API request.
In the loop, once I first make the API request via the `getArrivals()` function, I immediately set my `arrivalsRequested` variable to false so it won't keep asking for data.
The `getArrivals` function first makes a connecting to the host and url I specified. This is an `HTTP Get` request, and any time you do that, you need to send what are called headers letting the server know you want to get data from it. That's what this does:
client.print(String("GET ") + url + " HTTP/1.1\r\n" +
              "Host: " + host + "\r\n" +
              "User-Agent: BuildFailureDetectorESP8266\r\n" +
              "Connection: close\r\n\r\n");
Once I send my headers and my APP ID, I wait for the server to respond:
String matchString = "";
 while (client.available()) {
   String line = client.readStringUntil('\r');
   if (line.endsWith("</resultSet>")) { //this signals the end of the response from XML API
     matchString = line;
   }
 }
 Serial.println(matchString); //log result xml response from server
 awaitingArrivals = false;
 client.stop();
That `matchString` variable will keep track of the data I need from the API's response. This particular API returns data as XML (though I later learned it can also return JSON, which might have been easier to parse).
Originally, inside the `while(client.available()){}` conditional, I was printing each line to the serial monitor with `Serial.println(line)`. This allowed me to see what the server's response to my request was. It turns out, for trimet, there's a bunch of lines I didn't need. What I did need was all the data within a block of XML called the `<resultSet>`. So I wrote a conditional that said, if we know the line ends with `</resultSet>` then that's the line we want to save the data from. So I saved that to the `matchString` variable. I then told the client to stop the connection. I will reopen the connection for future information about arrival times later.
What parsing XML looks likeNow, before you go and copy all this down, the following is specific to my use case only, but I'm including it because I think it might be helpful to see how you might parse your own XML data. Each person's use case will be unique, but the methods available to you are all the same.
Serial.println(matchString); //log result xml response from server
 int lineEstimated = matchString.indexOf("estimated=");
 if (lineEstimated == -1) {
   Serial.println("NO ESTIMATED TIME!");
   delay(retryWifiDelay);
   return;
 }
 int lineStart = lineEstimated + 11; //exclude `estimated="`
 int lineEnd = matchString.indexOf(" fullSign") - 4; //exclude ending zeroes and quote ( `000"` )
 String timeString = matchString.substring(lineStart, lineEnd);
 int timeInt = timeString.toInt();
 Serial.println("estimated arrival timestamp: ");
 Serial.println(timeInt);
 timeEstimated = timeInt; //assign this to a timestamp
 awaitingArrivals = false;
This is a screenshot of what my particular XML response looks like:
I know from logging out each `line` of the XML data, that the info I want is inside the `estimated="1544746514000"` parameter of the `<arrival>` XML node. That number is a UNIX timestamp, and man are they confusing! You can read more about it here, but the timestamp is the amount of time that has elapsed since January 1, 1970. What??? It may make no sense, but it is the system we have adopted, so we're going to roll with it. In order to make this remotely usable, we'll have to do some conversion, but that comes later.
I first look for the existence of the `estimated` parameter, because my API doesn't always include it if it doesn't have an ETA for my bus stop. That's this code:
if (lineEstimated == -1) {
   Serial.println("NO ESTIMATED TIME!");
   delay(retryWifiDelay);
   return;
 }
If it does list an estimated time, I want to store it to a variable. That's this code:
int lineStart = lineEstimated + 11; //exclude estimated="
int lineEnd = matchString.indexOf(" fullSign") - 4; //exclude ending zeroes and quote ( `000"` )
 String timeString = matchString.substring(lineStart, lineEnd);
 int timeInt = timeString.toInt();
 Serial.println("estimated arrival timestamp: ");
 Serial.println(timeInt);
 timeEstimated = timeInt; //assign this to a timestamp
 awaitingArrivals = false;
This code is kinda funny, and there's probably a better way to do it. But what I wanted to do is just get that time stamp, as a number, so I can convert it to a proper time that a human being would understand. And the first part of that is to get rid of the `estimated=""` stuff. So my `lineStart` variable does just that, identifying at what character of `lineEstimated` my timestamp begins. Subsequently, my `lineEnd` variable figures out where the timestamp ends by looking for the XML parameter that always follows the `estimated` parameter in the XML response. For me, that's the `" fullSign` parameter. By getting the index of where this starts, I now have a beginning and ending character index, and I can just grab everything inbetween these characters, and know that that is my timestamp.
I assign that to the `timeString` variable, and then convert that variable to an integer so I can do some math on it with the `int timeInt` variable. I then set my `awaitingArrivals` boolean to false, so that in my loop function, we know that we have the arrival data and no longer need to keep waiting for it.
Doing something with the dataRemember that conditional in our loop that checks whether we're still waiting for data?
if (awaitingArrivals) {
   ...
 }
Well, we're no longer awaiting arrivals, so we need to add an `else` to that statement. In this block of code, you'd put what you want to do with your newly acquired data. For me, it looks like this:
else {
   if (awaitingCurrentTime) {
     awaitingCurrentTime = false;
     getCurrentTime();
   }
}
I'm not going to go through the `getCurrentTime` function in too much detail, but basically, because my ESP8266 does not have an RTC (clock) module, it has no concept of what time it is. And since I am already making web requests for my API data, the `getCurrentTime` function is a way for me to query another API to get the current time from the internet. I will make another post about this, but for now, just now that that's what I'm doing, and it's something you can do as well if you don't have or want to add a clock module to your microcontroller.
Creating usable dataWhile I'm not going to post the code I used to get the current time, you can assume it also returned a Unix timestamp with the current time, which I've saved to a variable called `timeNow`.
By subtracting the `timeNow` from the `timeEstimated` I have the number of seconds until the next bus arrives. We'll save that to a variable called `timeDiff`. And with this number of seconds, we can print out a readable time duration until the next bus arrives. I do that in this function:
timeDiff = timeEstimated - timeNow;
showDuration(timeDiff);
void showDuration(time_t duration)
{
 int numMinutes;
 int numSeconds;
 // prints the duration in days, hours, minutes and seconds
 if (duration >= SECS_PER_DAY) {
   Serial.print(duration / SECS_PER_DAY);
   Serial.print(" day(s) ");
   duration = duration % SECS_PER_DAY;
 }
 if (duration >= SECS_PER_HOUR) {
   Serial.print(duration / SECS_PER_HOUR);
   Serial.print(" hour(s) ");
   duration = duration % SECS_PER_HOUR;
 }
 if (duration >= SECS_PER_MIN) {
   numMinutes = duration / SECS_PER_MIN;
   Serial.print(numMinutes);
   Serial.print(" minute(s) ");
   duration = duration % SECS_PER_MIN;
   numSeconds = duration;
 }
 Serial.print(duration);
 Serial.print(" second(s) ");
 resetCycle();
}
Here, I'm taking the number of seconds, and outputting it all to the serial monitor as days, hours, minutes, and seconds until the next bus arrives. I could skip all the days and hours stuff, it probably will never be more than an hour. But I've included it in case its helpful.
Getting continuous updatesAt the end of all this, I call a `resetCycle` function. This will let the Arduino code know that I have what I need, and it can query the API again for further updates as to the estimated arrival time.
//CONFIG
int pollDelay = 30000; //time between each retrieval
int retryWifiDelay = 1000;
void resetCycle() {
 awaitingArrivals = true;
 awaitingCurrentTime = true;
 arrivalsRequested = false;
 Serial.println("hold display...");
 delay(pollDelay);
 Serial.println("poll again");
}
Here I'm just resetting all those boolean variables back to their original states so the code knows that it can request data again. I add a delay, because I only want to get updates every so often. My `pollDelay` variable is set to `30000` milliseconds, or 30 seconds.
In actuality, delays in Arduino aren't that practical - if you know you are going to be waiting for awhile with nothing happening, it might be better to put the board into a low power mode, or use `millis()` function to get the current time that has elapsed so you're not locking the processor out of doing other computations, sensor monitoring, etc, but for now, a delay will work.
After the delay has passed, because we reset our variables, our `loop` function will repeat everything we just did above.
That's all for now!This should give you an idea of how to connect to wifi, parse XML data from an API, and use UNIX timestamps. The methods Arduino provides for working with API data (strings), can be found here under the `Functions` section.
And here is the full code, in case I've forgotten to include bits in the snippets above. I should note that in its current state, it serves to get the API data, get the current time, get the number of minutes til the next bus, and activate an Adafruit Neopixel Strip, lighting up the number of LEDs corresponding to the number of minutes left before the next bus. And eventually I will laser cut and engrave all the signage to display the bus info in a classy way. But in the meantime, hope this was useful. If you have any suggestions or questions, let me know.
#include <ESP8266WiFi.h>
#include <WiFiClientSecure.h>
#include <TimeLib.h>
#include <NTPClient.h>
#include <WiFiUdp.h>
#include <Adafruit_NeoPixel.h>
//WIFI
const char* ssid = "###";
const char* password = "###";
//const char* ssid = "Make + Think + Code";
//const char* password = "codethinkmake";
//API
const char* host = "developer.trimet.org";
String url = "/ws/V1/arrivals/locIDs/5901/appID/###";
const int httpsPort = 443;
WiFiClientSecure client;
//TIME
#define NTP_OFFSET   -8 * 60 * 60 //Portland is UTC - 8
#define NTP_ADDRESS  "pool.ntp.org" //Default NTP Address
#define NTP_INTERVAL 30 * 1000    // how often to update in milliseconds
WiFiUDP ntpUDP;
//NTPClient timeClient(ntpUDP,NTP_ADDRESS,NTP_OFFSET, NTP_INTERVAL); //use the custom ntp params
NTPClient timeClient(ntpUDP); //use the ntp defaults
//LIGHTS
#define PIN      15
#define N_LEDS 9
Adafruit_NeoPixel strip = Adafruit_NeoPixel(N_LEDS, PIN, NEO_GRB + NEO_KHZ800);
void lightsOnImmediate() { //turn lights on with no delay
 for (uint16_t i = 0; i < strip.numPixels(); i++) {
   strip.setPixelColor(i, strip.Color(255, 255, 255));
   strip.show();
 }
}
void lightsOffImmediate() {
 for (uint16_t i = 0; i < strip.numPixels(); i++) {
   strip.setPixelColor(i, strip.Color(0, 0, 0));
   strip.show();
 }
}
void activateLights(int numLights) {
 Serial.println("activating lights");
 Serial.println(numLights);
 for (uint16_t i = 0; i < numLights; i++) {
   strip.setPixelColor(i, strip.Color(255, 255, 255));
   strip.show();
 }
}
//STATE
time_t timeEstimated; //when the next bus will come
time_t timeNow; //what time it is now
time_t timeDiff; //difference between now and estimated arrival
bool awaitingArrivals = true;
bool awaitingCurrentTime = true;
bool arrivalsRequested = false;
//CONFIG
int pollDelay = 30000; //time between each retrieval
int retryWifiDelay = 1000;
void setup() {
 Serial.begin(115200);
 strip.begin();
 //start time client to get real time
 timeClient.begin(); //start the thing that tells us the current time
 connectToWifi();
}
void connectToWifi() {
 //connect to wifi
 Serial.print("connecting to ");
 Serial.println(ssid);
 WiFi.mode(WIFI_STA);
 WiFi.begin(ssid, password);
 while (WiFi.status() != WL_CONNECTED) { //WAITING FOR WIFI
   delay(500);
   Serial.print(".");
 }
 Serial.println("");
 Serial.println("WiFi connected");
 Serial.println("IP address: ");
 Serial.println(WiFi.localIP());
}
void getArrivals() {
 // Use WiFiClientSecure class to create TLS connection
 Serial.print("connecting to ");
 Serial.println(host);
 if (!client.connect(host, httpsPort)) {
   Serial.println("connection failed");
   delay(retryWifiDelay);
   return;
 }
 //Query the API
 Serial.print("requesting URL: ");
 Serial.println(url);
 client.print(String("GET ") + url + " HTTP/1.1\r\n" +
              "Host: " + host + "\r\n" +
              "User-Agent: BuildFailureDetectorESP8266\r\n" +
              "Connection: close\r\n\r\n");
 Serial.println("request sent");
 while (client.connected()) {
   String line = client.readStringUntil('\n');
   if (line == "\r") {
     Serial.println("headers received");
     break;
   }
 }
 String matchString = "";
 while (client.available()) {
   String line = client.readStringUntil('\r');
   if (line.endsWith("</resultSet>")) { //this signals the end of the response from XML API
     matchString = line;
   }
 }
 Serial.println(matchString); //log result xml response from server
 int lineEstimated = matchString.indexOf("estimated=");
 if (lineEstimated == -1) {
   Serial.println("NO ESTIMATED TIME!");
   turnSignOff();
   delay(retryWifiDelay);
   return;
 }
 int lineStart = lineEstimated + 11; //exclude `estimated="`
 int lineEnd = matchString.indexOf(" fullSign") - 4; //exclude ending zeroes and quote ( `000"` )
 String timeString = matchString.substring(lineStart, lineEnd);
 int timeInt = timeString.toInt();
 Serial.println("estimated arrival timestamp: ");
 Serial.println(timeInt);
 timeEstimated = timeInt; //assign this to a timestamp
 awaitingArrivals = false;
 client.stop();
}
void loop() {
 if (awaitingArrivals) {
   if (!arrivalsRequested) {
     arrivalsRequested = true;
     getArrivals();
   }
 } else {
   if (awaitingCurrentTime) {
     awaitingCurrentTime = false;
     getCurrentTime();
   }
 }
}
void getCurrentTime() {
 //get current time
 timeClient.update();
 timeNow = timeClient.getEpochTime();
 Serial.println("timeclient epoch time: ");
 Serial.println(timeNow);
 //get epoch time to next bus arrival
 timeDiff = timeEstimated - timeNow;
 showDuration(timeDiff);
}
void showDuration(time_t duration)
{
 int numMinutes;
 int numSeconds;
 // prints the duration in days, hours, minutes and seconds
 if (duration >= SECS_PER_DAY) {
   Serial.print(duration / SECS_PER_DAY);
   Serial.print(" day(s) ");
   duration = duration % SECS_PER_DAY;
 }
 if (duration >= SECS_PER_HOUR) {
   Serial.print(duration / SECS_PER_HOUR);
   Serial.print(" hour(s) ");
   duration = duration % SECS_PER_HOUR;
 }
 if (duration >= SECS_PER_MIN) {
   numMinutes = duration / SECS_PER_MIN;
   Serial.print(numMinutes);
   Serial.print(" minute(s) ");
   duration = duration % SECS_PER_MIN;
   numSeconds = duration;
 }
 Serial.print(duration);
 Serial.print(" second(s) ");
 if (numMinutes < 1) {
   turnSignOff();
 } else {
   showNumber(numMinutes);
 }
 resetCycle();
}
void turnSignOff() {
 lightsOffImmediate();
}
void showNumber(int numMinutes) {
 activateLights(numMinutes);
}
void resetCycle() {
 awaitingArrivals = true;
 awaitingCurrentTime = true;
 arrivalsRequested = false;
 Serial.println("hold display...");
 delay(pollDelay);
 Serial.println("poll again");
}


Comments