Global warming is a big problem that is already effecting our world. For an individual person it is sometimes hard to see how to help the environment. One of the things each of us can do is to reduce energy consumption in his or her household. The biggest energy consumption at the household level is heating during the winter. Reducing energy consumption also reduces the energy bill at the end of each month.
To keep low energy bill in the winter and reduce the environmental impact of central heating I decided to work on its automation. In this project I focused on the radiator thermostats that control the central heating.
As there is not a lot of development in the do-it-yourself space on the radiator thermostats and the commercial solutions are quite expensive and not that open source friendly I decide to create my own open source smart radiator thermostat. This project builds on my previous Smart Radiator Thermostat.
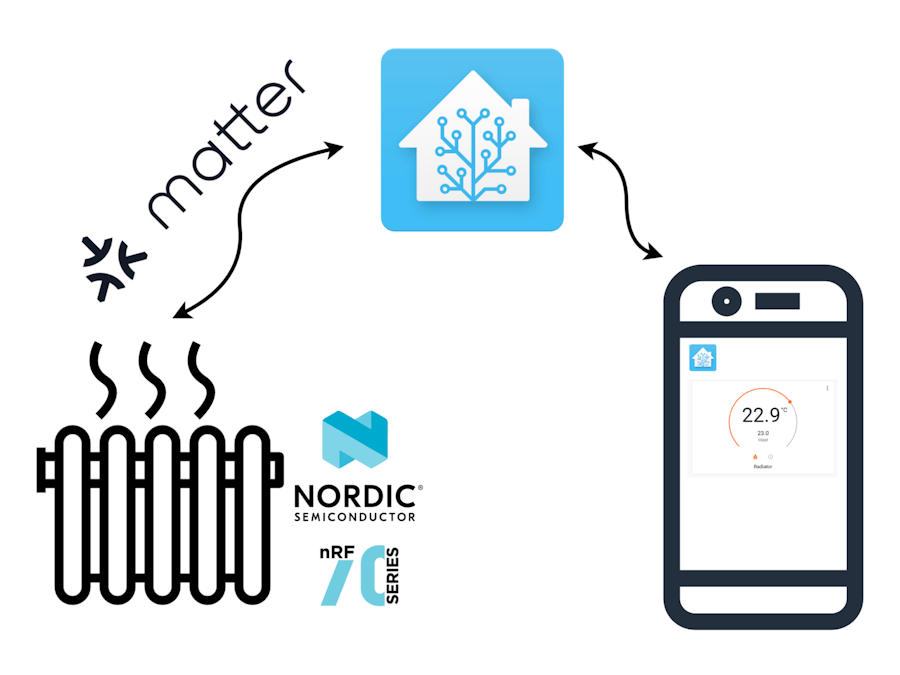
IdeaSmart radiator thermostat should consist of a motor that drives a shaft that opens and closes the radiator valve and should be able to sens temperature and communicate with the smart home. For the smart radiator thermostat communication I decided to use Matter as it is becoming more and more mature solution and promises a lot of potential.
As the basis for the Matter radiator thermostat platform I used Nordic Semiconductor wirelesses SoC offerings. As this project will be a prof of concept to test the Matter communication I mainly used their development kit nRF7002 DK for the Matter over WiFi. I also used their nRF5340 DK and nRF52840 DK and Dongle to test Matter over Thread. I tried Open Thread border router in docker setup with nRFF52840 Dongle but the tests were unsuccessful because of misconfiguration of the border router networking so in this project I will focus on Matter over WiFi even though the developed software is also running on the nRF5340 and nRF52840 with Thread.
Every Matter network needs a Matter controller for which I used open software project Home Assistant. I already use Home Assistant in my smart home and decided to try its Matter integration. The Home Assistant would manage and communicate with the Matter accessory devices. For the purpose of this project I installed a clean instance of Home Assistant on a Raspberry Pi 4 model B. Where I used installation with Docker. Home Assistant also provides nice commissioning option with the use of their mobile app as a Matter device must be first added to a Matter network.
In the next sections I will first present the developed thermostat software and how to build and flash it with nRF Connect SDK to the development boards. Later I will present how to prepare the hardware of the prototype thermostat to test motor operation and temperature sensing. Additionally there is a section about the steps for the installation of a Raspberry Pi, Docker and Home Assistant that a beginner developer can follow. In the last sections the commissioning of the Matter radiator thermostat and its operation with Home Assistant are presented and at the end some additional ideas for the future work.
Radiator thermostat firmwareFor the development of the Matter radiator thermostat firmware I used the nRF Connect SDK with the Visual Studio Code. I flowed Nordic installation guide. Where you first install the Visual Studio Code and inside the program the nRF Connect for Visual Studio Code. You also need the nRF Command Line Tools. In Visual Studio Code you then install the nRF Connect SDK toolchain and nRF Connect SDK. Here I would recommend that you create a workspace folder in which you install the SDK and where you later add the folders for your projects.
Firmware for the Matter radiator thermostat is accessible on my GitHub repository. It is designed as a freestanding application so it must be cloned or downloaded and extracted to your created workspace folder.
workspace/
    v2.5.0/
    matter_radiator_thermostat/
The project was developed with the nRF Connect SDK version v2.5.0. It is based on the Matter thermostat example. The example was modified so that the Matter device only contains the functionality that the Radiator thermostat needs. Because of this, Matter HVAC Thermostat cluster was modified to only contain attributes for a heating device, so the cooling attributes were removed. Additionally, functionality was added to measure temperature with ADC and to control the valve motor with 4 GPIOs and detect motor stall when the valve is fully opened or closed also with ADC measurement.
You can open the project in Visual Studio Code by selecting Open an existing application in nRF extension. Then configure the build configuration by clicking the Create new build configuration. In the configuration you can select between nRF7002 DK, nRF5340 DK and nRF52840 DK. All boards work with the project as the board overlays from the original example were modified and tested for all three. nRF7002 DK uses WiFi and the other two Thread. As mentioned before I had issues with Thread border router so in this project I focus on the nRF7002 DK. Then you can try to build it.
Then connect the development board to the PC and click Flash.
When the flashing finishes the LED should start blinking. How to connect the motor and temperature sensor and how to commission the device to your Matter network with Home Assistant app is described in the next sections.
Last note if you wan to configure Matter cluster use zap tool. For the zap tool installation follow the Nordic installation guide. Where you run a python script from the SDK and don't forget to add it to PATH environmental variables. Terminals and Visual Studio Code must be restarted for the update to PATH takes effect. You can run from it inside the Visual Studio Code terminal in the project folder:
zap src/thermostat.zap --zcl ../v2.5.0/modules/lib/matter/src/app/zap-templates/zcl/zcl.json --gen ../v2.5.0/modules/lib/matter/src/app/zap-templates/app-templates.jsonTo test how an the radiator thermostat operation I connected motor for radiator valve opening and temperature sensor to the development kit.
In this project I reused and old manually configurable electronic thermostat for the motor and motor driver which enables valve opening and closing. The thermostat reused is from eQ-3 company but probably other brands could be reused by the same principal or one can develop its own HW (which I am planning to in the near future).
In principal a DC motor is used with gearing to drive a linear shaft which pushes on the radiator valve. Depending on how much the shaft is extended the valve opens and closes. When the shaft is fully extended the valve is closed and vice versa when the shaft is fully retracted the valve is opened.
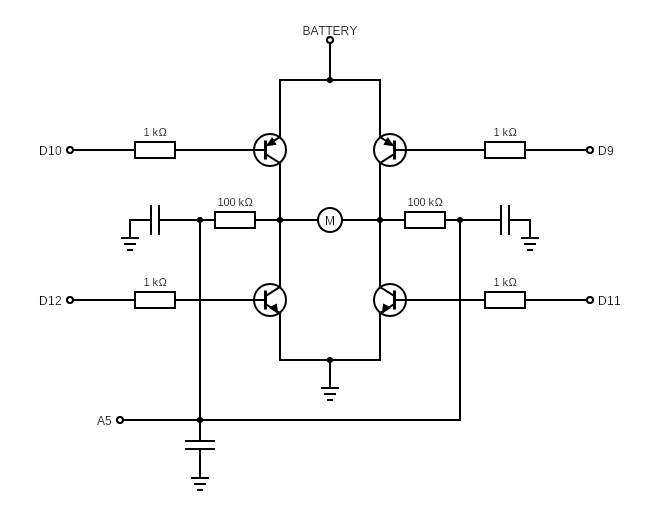
To drive a DC motor a H-bridge circuit is used. Where 4 transistors in pairs of two can connect DC motor leads between supply and ground in both polarities, which enables to drive the motor in both directions. Additionally, voltage divider is used to enable voltage measurements which indicate when the motor stalls, which means the motor reached one of the end positions of the shaft (fully retracted or fully extended).
A schematic of the H-bridge and its connections are presented below. On the schematic drive signals connections to the Arduino compatible pins of the nRF development boards are indicated. For the power of the motor I used two AA batteries as the nRF7002 DK operates on 1.8V. As the voltage of the DK is lower the motor driver in this setup is not optimal and works better with the other two development boards.
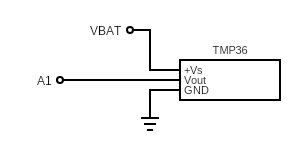
For the temperature measurement I used TMP36 temperature sensor. The schematic of the connections is shown above. For the power supply VBAT from the DK was reused which is again not very recommended to use.
Below is also a photo of the setup with all of the wire mess.
First flash an SD card with a Raspberry Pi OS image. For this it is best to use the Raspberry Pi Imager.
After installing and running the program select your Raspberry Pi Device. Then select the Raspberry Pi OS. For this project I used the Raspberry Pi OS Lite (64-BIT). It is under Raspberry Pi OS (other) option. The Light version is used as the Pi will be used as a server without a monitor, mouse and keyboard and to save compute resources. The installation will be so called headless installation. The 64-bit version is used as it allows for full Docker installation and the version is now also more mature. After that chose your the SD card on which to flash the OS.
The click next and edit settings on which you set the hostname on which the Pi will be accessible on your local network, set the username and password and configure the LAN where you input on which WiFi the Pi connects to and set timezone and keyboard layout. On the next tab enable SSH which will allow you to connect to the Pi from your PC. Save the settings and apply by clicking YES.
After that you confirm to proceed with flashing by clicking YES. The SD card will be flashed and verified after which you can eject the SD card if it is not already when the process finishes.
Below are also the screenshots of all the steps.
After the SD card is flashed insert it into the Pi optionally connect an Ethernet cable and apply the power supply. Then the OS will boot and start the installation which will take some time. You can just wait a few moments and tray to connect to the Pi with a SSH terminal. For this you can use PuTTY. Where you input Host Name as the hostname (example: raspberrypi.local) you set when lashing the OS. If the connection fails try after a few minutes and if it is still not successful you can connect the Pi to a monitor where you should se the Pi IP address which you put in the "Host Name (or IP address)" field in PuTTY.
A login prompt will be shown where you input the user and the password from the settings.
Then first update the Pi with the following commands that you input to the terminal line by line:
sudo apt update
sudo apt upgrade
Than install Docker from the official guide. If the hello-word example runs OK everything should be set up.
Then prepare directory structure for persistent files under home:
cd ~
mkdir apps
cd apps/
mkdir homeassistant
mkdir homeassistant/config
Then create docker-compose.yaml file. The contents is added to this project at the end. It sets up the homeassistant image and python-matter-server image which acts as the Matter controller. Create it with nano tool:
nano docker-compose.yamlCopy in the contents of the file attached: ctrl-a ctrl-c in text editor, click in terminal. Press ctrl-x in terminal then y and enter (to exit editing and to save).
Then bring up the containers:
sudo docker compose up -dWhen the both containers are running open browser and input the hostname or the IP address of the pi and add port 8123: http://raspberrypi.local:8123.
Setup the Home Assistant and log in. Go to Settings -> Devices & Services. Click on ADD INTEGRATION and search for Matter (BETA). Replace the localhost with the hostname of the Pi or its IP address and press submit. Now the Matter controller should be ready to go.
On the smart phone install the Home Assistant official app (Android, iOS). Set up the connection to Home assistant by providing the hostname or IP address and log in with the user you set up on the assistant (smart phone should be connected to the same network as the Pi).
If the mobile app receives the default sensors data everything should be ready for the commissioning of the Matter radiator thermostat.
Testing and commissioning radiator thermostatWhen the development board is flashed the thermostat sends LOG massages over USB to a COM port. To open the LOG in Visual Studio Code select your development board CONNECTED DEVICES and open the connect to a serial port (for nRF7002 DK select VCOM1).
To onboard Matter radiator thermostat with the mobile app to your Matter network, go to settings -> Devices & Services -> Devices inside the app and click ADD DEVICE. Search for Add Matter device after which you can scan the QR code of the device. The web link to QR code is printed out in LOG (press reset button on the DK to reset the program as the QR code web link is printed at start). When the QR is scanned and the commissioning process finishes the device should show up in the Home Assistant.
On startup (applied voltage or reset) the thermostat fully retracts valve shaft so it could be put on the radiator valve. With that the thermostat starts in heating mode. At the same time it starts looking for a WiFi network if the device was commissioned. When connected the Matter radiator thermostat sends its local measured temperature to Home Assistant trough Matter and receives commands about the heating mode (heating or off) with the requested set temperature. The settings can be controlled trough Home Assistant in the app or trough web interface. The widget in home assistant of the Matter radiator thermostat is shown below. With the circle dial you select the desired temperature and with the symbols you turn on the heating or turn it off. In the middle of the dial the reported current measured temperature is shown.
The presented project is based on Matter over WiFi and in the future I would like to solve the issues I was having with the Thread border router networking to also test Thread implementation of the thermostat as it would be more beneficial in lowering the power consumption of a battery powered device. Additionally, I would like to connect the radiator thermostat to an external temperature sensor. Part of this functionality is left in the code from the original example but it is not connected to the considered local temperature. Also the valve operation can be improved to be linear for finer temperature control. Another interesting project would be to se if Matter commissioning with NFC trough the Home Assistant app would be possible as during testing it did not work and it seems it is not implemented in the app.


Comments
Please log in or sign up to comment.