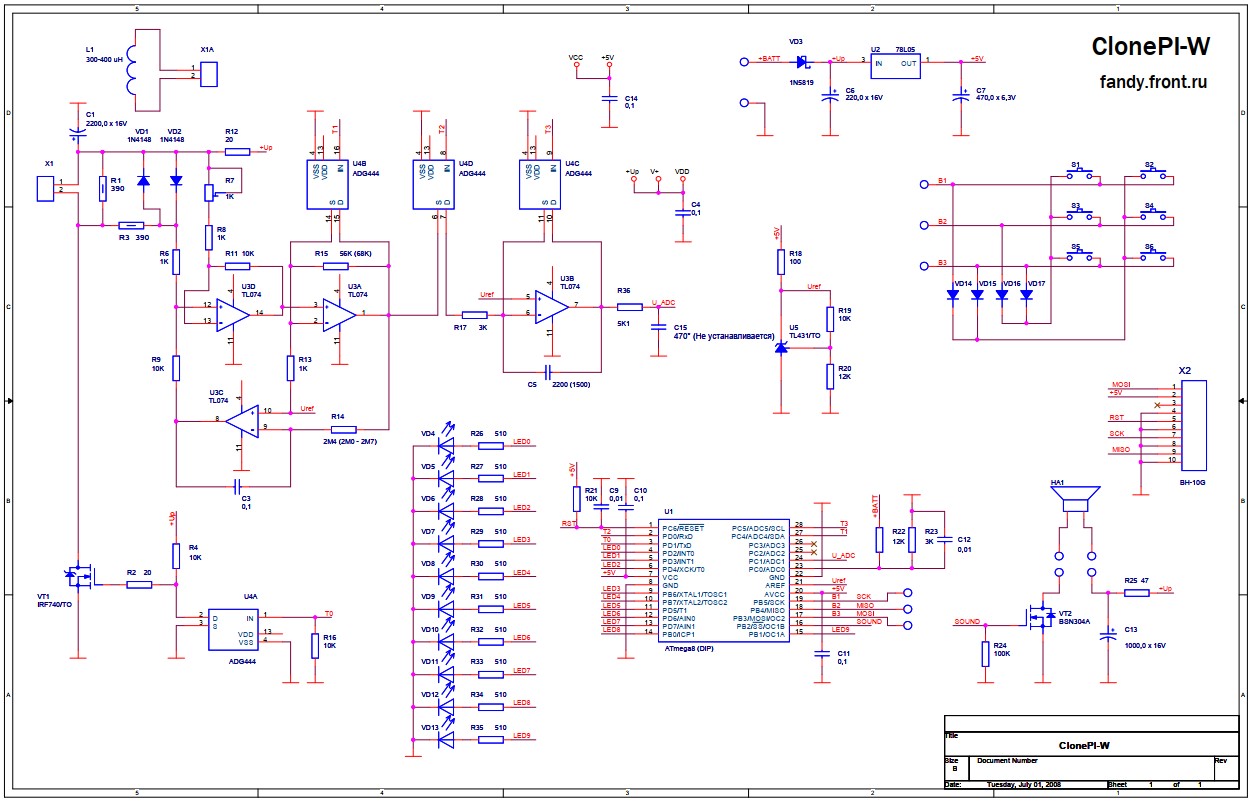
Quite by chance these days I got in my hands a "Clone PI W" metal detector module, so I decided to immediately do a small review and compare it with my previously made DIY Metal Detectors.
At first glance, the module is solidly made, the elements are precisely placed and well soldered. The price is less than $50, including postage.
In this case, it is an SMD version of this detector, and you can find the same metal detector made with standard components made according to an identical schematic diagram. For the power source I use three lithium-ion batteries connected in series and it is just under 12V.
The coil is identical to the one I use in my DIY Pulse Induction Metal Detectors, and consists of 25 turns of enameled copper wire with a diameter of 0.4 to 0.6mm. The diameter of the coil is 200 mm. This coil dimension represents a kind of compromise in relation to coils specialized for detecting small objects (which are mostly of smaller diameter), and those made for detecting larger massive objects at a greater distance (in these the diameter can be 1m or more ).
Several versions of Schematic diagrams of this detector, which are basically very similar, can be found on:
On this page there are also several blueprints for making PCBs that you can get the cheapest, fastest, and highest quality at PCBWay. How to order is very easy and you will get 10 Pcs PCB for $5 with very great PCB quality TG150-160. Also You can design your own Gerber files for this circuit and upload it on their site ( www.pcbway.com)Generally, shipping of the orders take only 3 to 5 days.
As I mentioned before, in order to put the metal detector into operation, it is necessary to solder only six wires, two from the power supply, two from the speaker, and two from the coil. The detector worked immediately after switching on, but only required some adjustment. As you can see on the plate there is a small multi-turn potentiometer that serves to adjust the metal detector. We need to set the maximum sensitivity of the device, but at the same time the stability during operation should be solid. SW3 and SW6 are barrier + and - buttons and by increasing the barrier we raise the response threshold of the Metal Detector to the metal, thereby lowering the sensitivity and vice versa. SW2 and SW5 are volume control buttons. SW4 is calibration (reset) button. First, with the Barrier buttons, we need to set three or 4 LEDs to light up, and with the Volume buttons, we set the desired volume. Next, we need to rotate the tuning resistor until the device begins to make sounds on its own, and then we turn the potentiometer a little so that the device is silent. At each position of the tuning resistor, we press the SW4 reset button and check sensivity. A good result by air can be considered 20-25cm for small coin. A well tuned device does not give false sounds at 3-4 barrier Leds. Let me mention that all these adjustments are made so that there should be no metal objects near the search coil. Just to emphasize that I purchased the device with my own funds, so I want to say that when testing the device there is no influence of any kind of sponsorship.
And finally, in conclusion, I am really pleasantly surprised by the features such as sensitivity and stability in operation, considering that it is a very inexpensive module, and to make a complete mid-range metal detector we need almost no knowledge from the field of electronics. All we have to do is solder a few wires, and the only thing is to be very careful about the polarity of the battery.


Comments
Please log in or sign up to comment.