


Hardware components | ||||||
| × | 1 | ||||
| × | 1 | ||||
 |
| × | 1 | |||
Software apps and online services | ||||||
 |
| |||||
Hand tools and fabrication machines | ||||||
 |
| |||||
These days I received a shipment from Elecrow that contains several components that I ordered a week ago. My shipment arrived unexpectedly quickly, and is well packed and protected in a branded box. It consists of Crow Panel 2.8" HMI 320x240 display SPI TFT LCD Touch screen compatible with Arduino, LVGL Library, and ESP microcontroller onboard with all necessary cables and touch pen.
These are laser machined housing parts for this ESP32 Display, then a waterproof temperature sensor and a BME 280 sensor board. The sensors contain appropriate cables that are compatible with the Display board, so that when making a project there is no need for soldering, and there is also no possibility of wrong connection. When the board is turned on for the first time, a demo application appears on the display to demonstrate some of the capabilities of this small device. After assembling the case, the display looks tidy and is protected from damage.
On Elecrow's site you can find a lot of detailed information and tutorials about this display module using the LVGL library and Square Line Studio software, which drastically simplify the creation of the graphical environment without writing code. This time, my idea was to explain to you how to use this module to create simple code yourself using the TFT-Espi library, which is very often represented in DIY projects.
I will only use Arduino IDE to write code and upload it to the board. I will also explain how to control external components, specifically an LED as the simplest example.
First we need to enable display module in the Arduino environment. For this purpose we go to Arduino IDE - File - Preferences - where we add the ESP32 URL to "Board Manager URLs" as follows:
(https://raw.githubusercontent.com/espressif/arduino-esp32/gh-pages/package_esp32_index.json)
Now click "Tool-->Board-->Board Manager", and search for "esp32". It is recommended to
install version 2.0.3 ESP32 package.
Next we go to Sketch-> Include Library-> Manage Libraries -> TFT_eSPI -> Install
After that "User_Setup.h" in "" library folder needs to be modified according to their screen drive. For this purpose, we copy the "User-Setup.h" file given below, to the "TFT_eSPI" library folder, replacing the original file.
Now, on Arduino IDE -> Tools -> Boards manager -> ESP32 Arduino we choose: ESP32-WROOM-DA Module, and set the parameters as given in the image
With this, the procedure for entering support for the specific Display Мodule in the Arduino IDE is completed.
Since TFT_eSPI library is customized for this display module, we can now successfully upload code from some previous projects that use it. Of course, a huge advantage is that there is no need for any soldering, especially if we use Elecrow sensors and modules, and the display together with the microcontroller is small, compact, and housed in a nice case. First I will test the device with test examples that are provided in the library itself. For this purpose I go to Examples - TFT_eSPI - and select an example. Then select the appropriate port and upload the code.
and now, another example
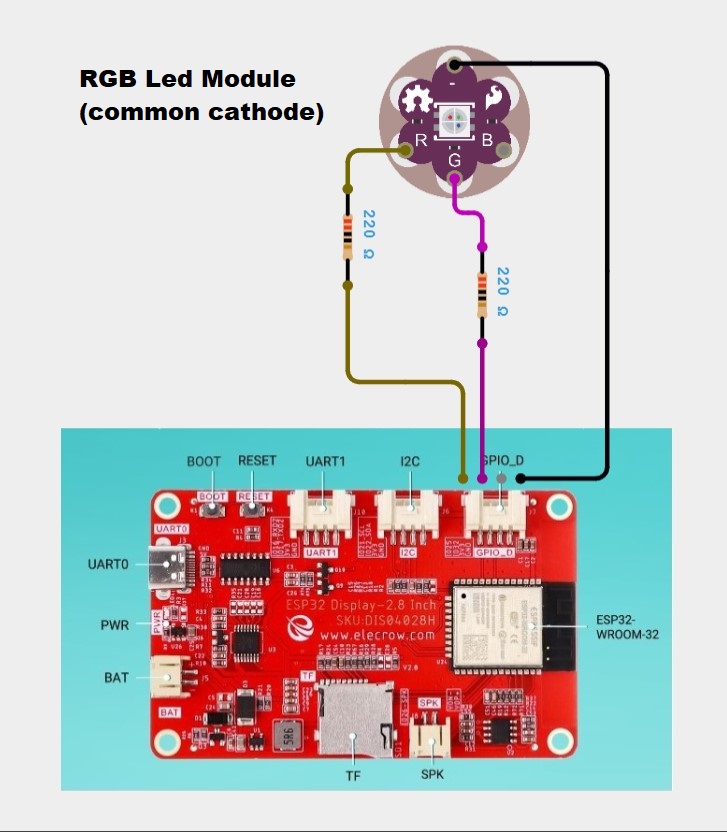
As I mentioned above in the text, next I will describe to you a simple example of how to control an LED. For this purpose, on the two input-output pins (IO25 and IO32) of the display I will connect two colors from the RGB LED module through 220 Ohm current limiting resistors. To simplify the code, we need to install the TFT_eWidget library which contains ready-made buttons, gauges or graphs, and also tft_setup library.
Here is what the finished project looks like with the uploaded code, which you can download from the given link. Pressing the buttons turns the LEDs of the corresponding color on and off.
You can also download the code and schematic for this project at the link given at the end of the project.
And finally, a short conclusion.
This time I tried to explain to you first how to install this nice display module in Arduino IDE, and then to make some simple projects using TFT-eSPI library which is very often used for various projects with graphic environment. In some of my next videos I will show you how to install some more complex useful code on this compact module.


_3u05Tpwasz.png?auto=compress%2Cformat&w=40&h=40&fit=fillmax&bg=fff&dpr=2)
Comments