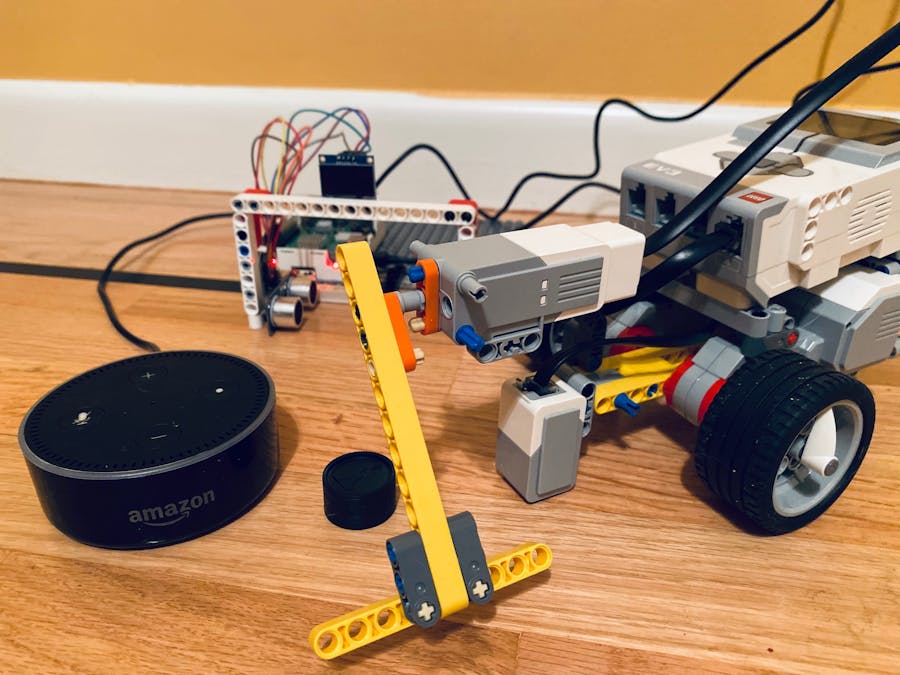
Lego Mindstorms EV3 is an excellent platform for Robotics. As a creator you bring your creativity and transform into a Robot built on Lego blocks. Alexa, on the other hand has introduced Alexa Gadget Tool Kit which enables you to build your own Alexa gadget connected to Echo devices over bluetooth. You can control your Alexa Gadget using voice commands through Echo devices. This project is an attempt to bring these two beautiful technologies together and create a Lego Mindstorms Robot which plays hockey by your voice commands.
Demo VideoHardware Components1.EV3 Robot
Sensors used in this Robot other than lego pieces are
- Two Large Motors connected to the wheels
- One Medium Motor connected to the hockey stick
- One Color Sensor to determine edge of the ground
2.Goal Post and Digital Scoreboard
Components used for this are
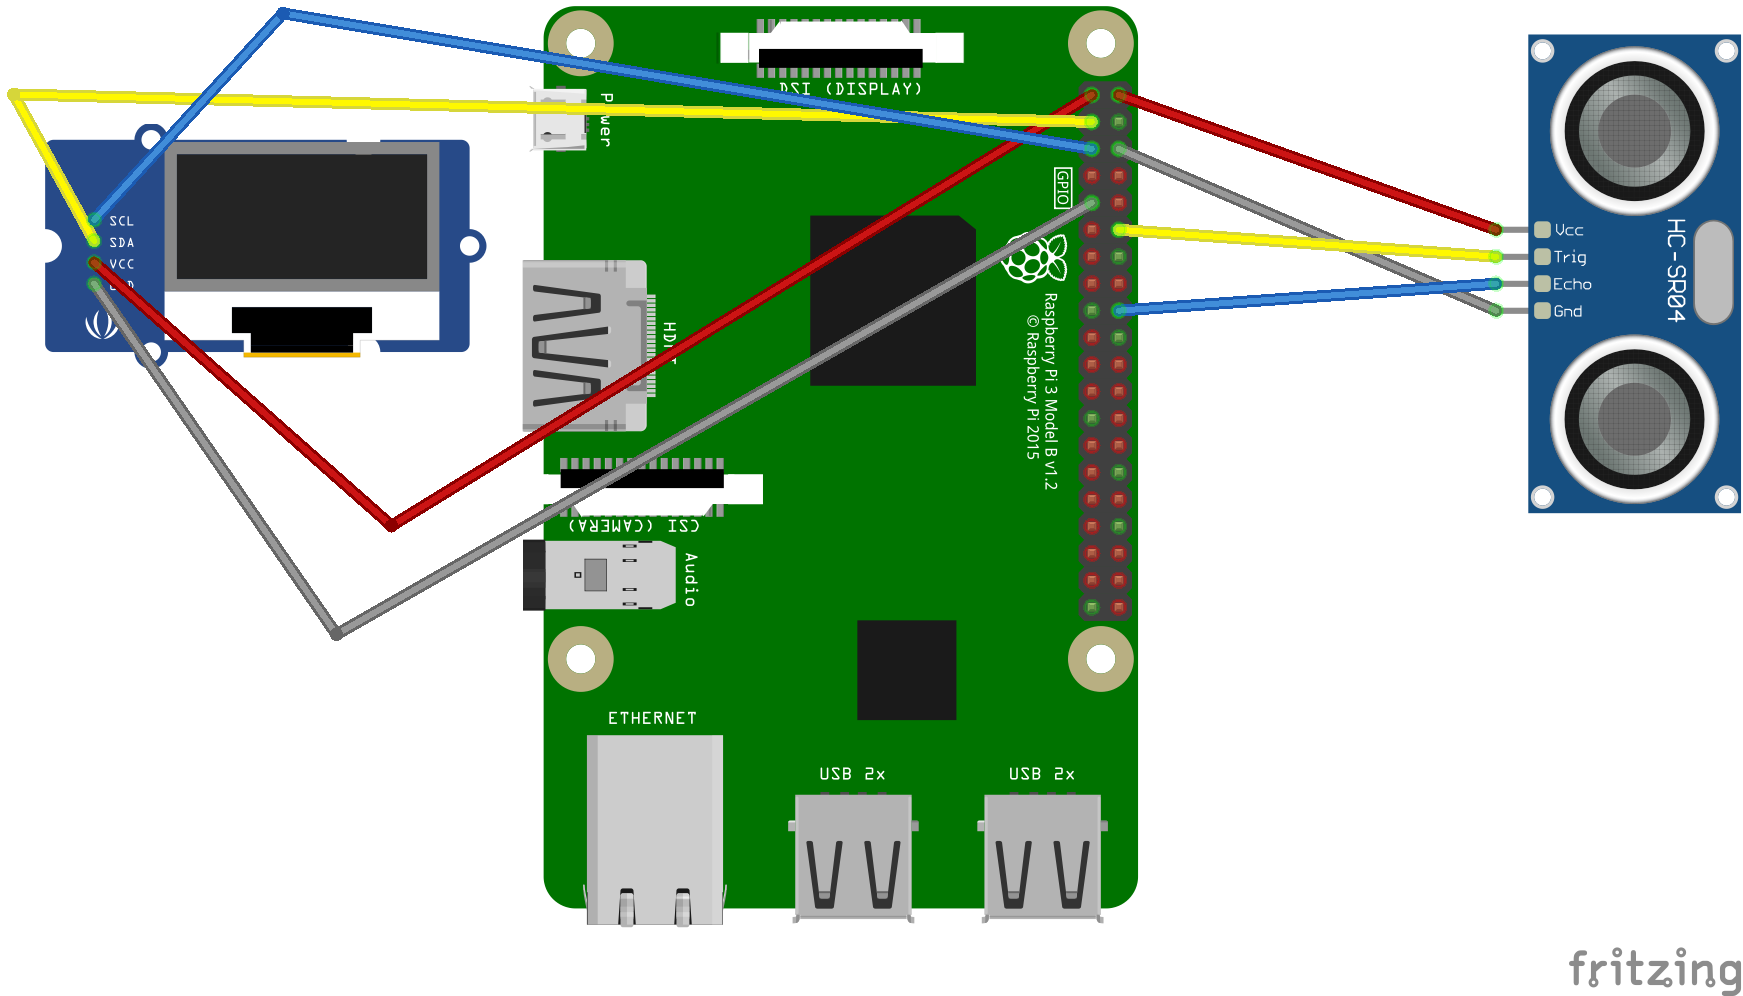
- One Raspberry Pi 3 Model B
- One HC-SR04 Ultrasonic Sensor to sense when puck enters the goal post
- One 128X64 OLED to display score and timer
I am assuming you already know how to program on EV3Dev on the brick and you know how to create custom alexa skills and register your gadget. If you are first timer or does not know how to do above things, I would request you to check out below links which will guide you step by step.
Setup - https://www.hackster.io/alexagadgets/lego-mindstorms-voice-challenge-setup-17300f
Mission 1 - https://www.hackster.io/alexagadgets/lego-mindstorms-voice-challenge-mission-1-f31925
Mission 2 - https://www.hackster.io/alexagadgets/lego-mindstorms-voice-challenge-mission-2-599072
Mission 3 - https://www.hackster.io/alexagadgets/lego-mindstorms-voice-challenge-mission-3-4ed812
1.Deploy code to Brick
By now you should have your EV3 Brick connected to your Echo device over bluetooth. Checkout the github repository.
git clone https://github.com/just4give/hockeybot-mindstorms-alexa-gadget.gitOpen folder gadget (inside hockeybot-mindstorms-alexa-gadget folder) on Visual Studio Code. Change your AWS Gadget ID and secrets inside hockey-bot.ini file. Then download workspace to your brick.
SSH into your brick and CD into gadget folder and execute below commands
sudo pip3 install paho-mqtt
sudo python3 hockey-bot.py
If everything goes fine, you should see a message on console that your gadget is connected.
2.DeployAlexa Skill Code.
Based on how you created your Alexa skill, you need to deploy your code. If you have chosen alexa hosted code, then simply copy the content of the files under skill-nodejs/lambda and deploy from the console.
If you have chosen custom hosting and assuming you already have created a lambda function, go inside skill-nodejs/lambda folder and issue below command.
npm installThen go back one level up to skill-nodejs folder. You will find a file deploy.sh. Open that file, update your lambda function name and execute the file as
sh deploy.shThis script assumes you have AWS CLI configured on your computer. If you have not done that before checkout this link https://docs.aws.amazon.com/cli/latest/userguide/cli-chap-install.html
If you rather decided not to use AWS CLI, you can comment last two line of deploy script. When you execute the script, a zip file will be created. Simply upload that zip file to your lambda.
Update your Alexa skill model by copying content from model.json inside skill-nodejs. Save and build the model on Alexa developer console.
Test out your skill from Alexa developer console to make sure it can connect to your lambda. If everything goes fine it should return
"I couldn't find an EV3 Brick connected to this Echo device. Please check to make sure your EV3 Brick is connected, and try again"
3. Deploy Scoreboard
You are almost done. The last part is running your Raspberry Pi. I assume you already have pre-configured Raspberry Pi with nodejs, npm and python3 installed. If you are new to Raspberry Pi development, there are many great tutorial on internet. You may look at https://www.w3schools.com/nodejs/nodejs_raspberrypi.asp. Raspbian OS comes with both Python 2 and 3 pre-installed.
Once you have your Pi booted, connected to internet, refer the schematic to connect OLED and Ultrasonic sensor to the Pi. Then copy the folder scoreboard to your pi. You can use any SFTP software such as FileZilla. You can download it from https://filezilla-project.org/download.php
Now SSH into your Pi ( if you are using Pi Desktop, open terminal window) and go inside scoreboard folder. Only dependency you need to download here is MQTT client. Issue below commands.
sudo pip3 install paho-mqtt
python3 scoreboard.py
That's it ! What the demo video who to engage your Robot through Alexa.
Challenges /Troubleshooting1. Sometimes when I rebooted EV3, it lost bluetooth connection. If that happens to your, remove all sensors from the brick and reboot.
2. Goal post is too small for ultrasonic to work properly. There is an obstacle on other side of the bar which is less than 8 cm. When the puck enters the goal post sometimes sensor does not detect it. believe with wider post, you will have better result.
3. Keeping the session alive when scoreboard sends game over event. Sometimes it conflicts which the speech in progress. As a result can't hear game over message.
Future improvementImagination has no limit, beyond sky. I was thinking to introduce difficulty levels for example, when difficulty is set High, we increase motor speed to run faster. Also attach a servo motor to the goal post which will move it to make it harder for the robot to score a goal. Add some sound effects when a goal is scored.
To make it further interesting, introduce two Robots controlled by Echo buttons. Multiple player can fight in the game!


_dyynx0bnuf_8u4Xi07d4z.png?auto=compress%2Cformat&w=48&h=48&fit=fill&bg=ffffff)


_3u05Tpwasz.png?auto=compress%2Cformat&w=40&h=40&fit=fillmax&bg=fff&dpr=2)
Comments
Please log in or sign up to comment.