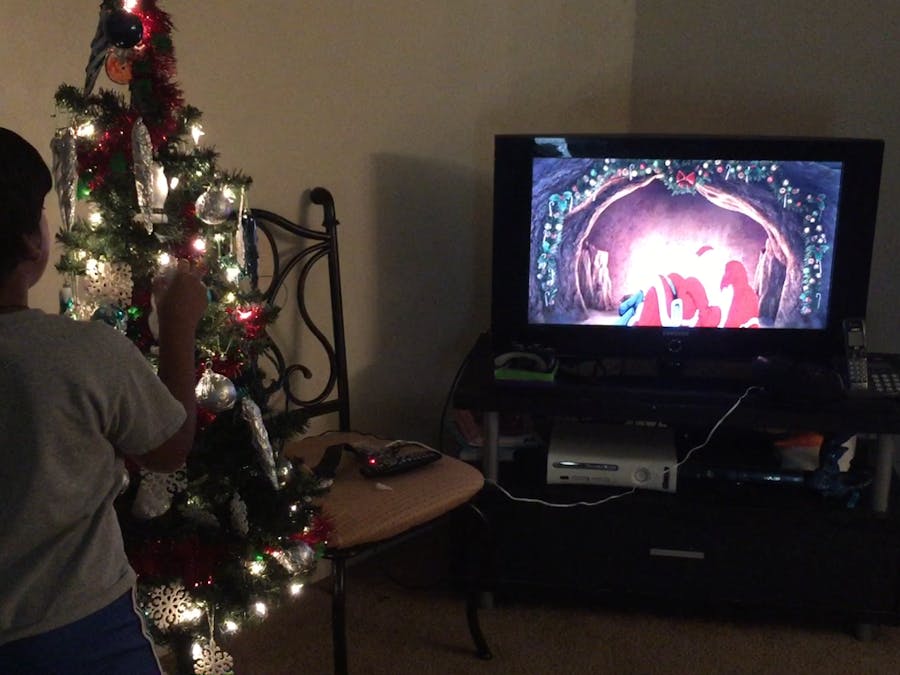
I wanted to check out Windows IoT Core and so got my Raspberry Pi 2 during Christmas. Naturally the first thing i wanted to do was get something done to the Christmas tree. So built touch sensitive Christmas tree ornaments with an MPR121 and interfaced it with Windows IoT core on Raspberry pi to my TV. Here is a brief video of the Christmas tree in action.
Here is a brief walk through on building this.
Wiring
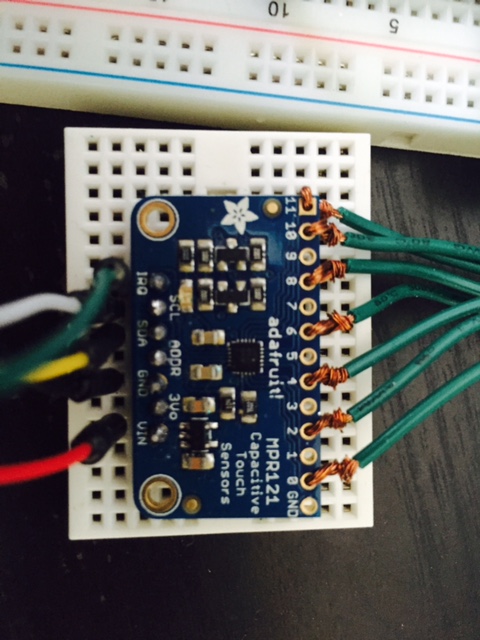
The MPR121 provides 12 channels for capacitive sensing. I wrapped some Christmas ornaments in aluminium foil and connected them independently to a capacitive sensing pin using long wire. Since i didn't do any soldering i just wrapped the wire around the pins.
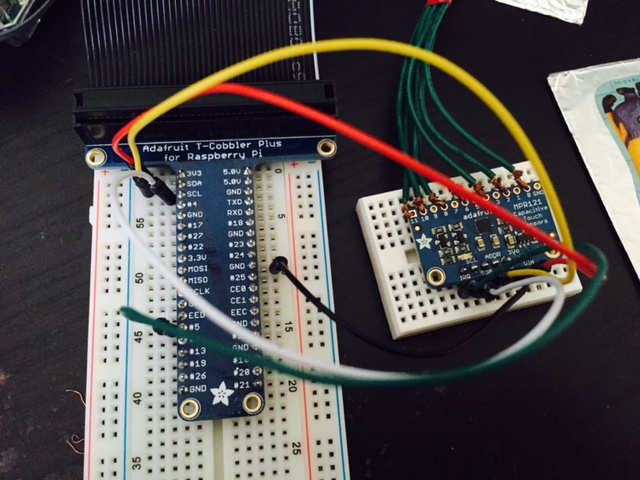
It also has an IRQ output pin that can be utilized to let the micro controller know that some change has happened to the capacitive touch pin. In the pictures below note that the IRQ pin from MPR121 is connected to the Pin#5.
Once wired, i hung the ornaments on the tree and plugged in the HDMI out from Raspberry Pi2 to my TV. I also plugged in speaker to the Pi's audio jack.
Windows IOT Core Application
The app i created was a simple universal windows app with a fireplace background and some Santa Claus images that becomes visible when an ornament is touched and is hidden when the ornament is released. It will also play a ho-ho-ho sound whenever the touch happens.
1. Created a new Windows Universal App in Visual Studio 2015
2. Add "Windows IoT Extensions for the UWP" in the References > Universal Windows > Extensions screen. This will allow the app to use GPIO, I2C and other Windows IoT core capabilities. The MPR121 library is dependent on this extension being present.
3. I wrote a MPR121 library (Windows.IoT.Core.HWInterfaces.MPR121) which is available in GitHub for any one to use and modify.
I have also made this available as a NuGet package and pushed the MPR121 library to Nuget Gallery. So i added it to the project from NuGet.
From NuGet Package Manager Console:
Install-Package Windows.IoT.Core.HWInterfaces.MPR121
From Nuget Package Manager UI, search for MPR121 and install :
4. Once the NuGet Package is installed, added the following import statements to the mainpage.xaml.cs
using Windows.Devices.Enumeration;
using Windows.Devices.I2c;
using Windows.IoT.Core.HWInterfaces.MPR121;
5. The library allows the MPR121 to be initialized with the default MPR121 I2C address and a default IRQ pin hookup of PIN#5 on Raspberry Pi 2. The library has an additional constructor that will allow you to use different address and different IRQ pin if desired. I used the default constructor.
Then the code obtains the I2C device list on Raspberry Pi 2 using the DeviceInformation class and the device selector advanced query string. The first device on the obtained list will contain the I2C master on the Raspberry Pi 2.
Then used this I2C master id to Open Connection to the MPR121. The library raises a PinTouched and PinReleased Events when the capsense pins are touched and released respectively. So if the connection is opened successfully, then i hooked up appropriate event handlers to these two events.
        private MPR121 __mpr121 = null;
        private async void __initMPR121()
        {
            __mpr121 = new MPR121();
            //Get the I2C device list on the Raspberry Pi.
           string aqs = I2cDevice.GetDeviceSelector(); //get the device selector AQS  (adavanced query string)
            var i2cDeviceList = await DeviceInformation.FindAllAsync(aqs); //get the I2C devices that match the device selector aqs
            //if the device list is not null, try to establish I2C connection between the master and the MPR121
            if (i2cDeviceList != null && i2cDeviceList.Count > 0)
            {
                bool connected = await __mpr121.OpenConnection(i2cDeviceList[0].Id);
                if (connected)
                {
                    //MPR121 will raise Touched and Released events if the IRQ pin is connected and configured corectly..
                    //Adding event handlers for those events
                    __mpr121.PinTouched += __mpr121_PinTouched; ;
                    __mpr121.PinReleased += __mpr121_PinReleased; ; ;
                }
            }
        }
6. Event Handling: The PinTouched and PinReleased events provide PinTouchedEventArgs and PinReleasedEventArgs respectively. These events contains a List of touched Pins and Released Pins respectively that caused the event to be raised. For this project i just used only the first pin in this list. Once the Pin is identified i use it to decide which of the Santa images in my UI should become visible.
Its important to understand that these events occur in the background thread. So in windows Universal applications its necessary to ensure any UI interactions from the background thread is invoked with in a Dispatcher async block. See code below.
        private void __mpr121_PinTouched(object sender, PinTouchedEventArgs e)
        {
            switch (e.Touched[0]) //using only the first pin in the list of touched pins
            {
                case PinId.PIN_0:
                    currentSanta = 0;
                    break;
                case PinId.PIN_2:
                    currentSanta = 1;
                    break;
                case PinId.PIN_4:
                    currentSanta = 2;
                    break;
                case PinId.PIN_6:
                    currentSanta = 3;
                    break;
                case PinId.PIN_8:
                    currentSanta = 4;
                    break;
                case PinId.PIN_10:
                    currentSanta = 5;
                    break;
                case PinId.PIN_11:
                    currentSanta = 0;   //just using six images
                    break;
            }
            var task = Dispatcher.RunAsync(CoreDispatcherPriority.Normal, () =>
            {
                mediaElement.Play();
                santas[currentSanta].Visibility = Visibility.Visible;
            });
        }
The complete code for the Santa Fireplace is on Github..
Windows IoT Core and HDMI Audio
While Raspberry Pi2 has HDMI audio support, Windows IoT Core doesn't support HDMI audio. So i couldn't just use the TV's audio. It was a bummer. So i had to hookup an external speaker. Hopefully future versions of Windows IoT core support HDMI audio.
Finally..
All in all it was fun to get the Raspberry Pi programmed with Windows IoT Core. Learned quite a few things while creating the MPR121 library and hooking up this project.
If you want to know more about the MPR121 library see here.


Comments
Please log in or sign up to comment.