


Hardware components | ||||||
_ztBMuBhMHo.jpg?auto=compress%2Cformat&w=48&h=48&fit=fill&bg=ffffff) |
| × | 1 | |||
 |
| × | 1 | |||
 |
| × | 4 | |||
 |
| × | 1 | |||
Software apps and online services | ||||||
 |
| |||||
 |
| |||||
Hand tools and fabrication machines | ||||||
 |
| |||||
 |
| |||||
 |
| |||||
 |
| |||||
 |
| |||||
·· ARDUINO UNO
· DC MOTOR
· CHASSIS FOR ROBOT BODY
· PCB BOARD BY JLCPCB
SOFTWARE COMPONENTS· EASYEDA
· JLCPCB
Hand tools· Glue Gun
Before starting let’s see first What you will learn from this instructable:· Making the right hardware selection for your project depending on its functionalities.
· Prepare the circuit diagram to connect all the chosen components.
· Assemble all the project parts (mechanical and electronic assembly).
· Finally designing your own ARDUINO-based Voice-controlled Robot.
How Arduino Voice Controlled Robot Works?As we have already mentioned that this is an Arduino-based project, so Arduino is working here as the brain of the robot. Everything we command to move the robot will be processed by the Arduino Microcontroller. We have to write a suitable code that will help the Arduino to process and follow our instructions.
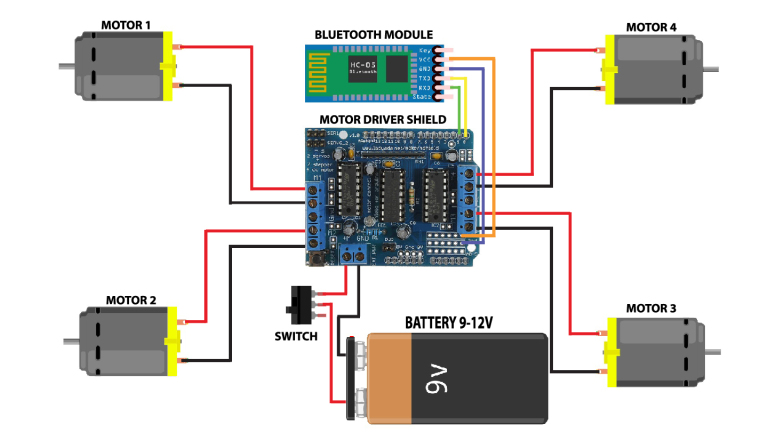
Next we need a motor driver to control the speed of the motors according to the instruction given by the Arduino Microcontroller. So, here we are going to use an L293D motor driver shield which is really very easy to connect with the motors as we as the Arduino Board.
Next, we want to send our voice command wirelessly. So here we have decided to use HC-05 Bluetooth Module which is compatible with Arduino & our Android Phone.
In the next step, we have to install an Android App and have to connect our phone with the boat via Bluetooth. Now we will send the voice command using the android app to move the boat as we wish.
Here we have added Five voice commands for Five different instructions. They are
Move Forward – The Boat will move in the forward direction for 2 second
Move Backward – The boat will move in any backward direction for 2 second
Turn Right – The boat will make a 90 ̊rotation on its right side
Turn Left – The boat will make a 90 ̊ rotation on its left side
Mechanical PartOur first step will be to make the robot body. so, here we have to make a DIY chassis and assemble the TT gear Motor with the robot chassis. Here is how it looks like in my case…
Now we are going to assemble all the components with the PCB. I have made a PCB file to make it easy to assemble and ordered my PCB from JLCPCB. They are very professional in PCB making and the build time was short. I received my item within 7 working days.
After getting the PCB it was just a less than 2 minutes job to assemble all the components in a proper way.
Now I had to upload the code to the Arduino UNO.So I have attached the USB cable that comes with the Arduino UNO board and follows the steps mentioned below
· Open Arduino IDE on your PC
· Connect ARDUINO with PC via USB Cable
· Go to Tools > manage libraries > Search for AF Motor driver and download
· Go to Tools > Board > and select Arduino\Genuino UNO
· Go to Tools > Port > Select proper COM port
· Now Verify the code and then upload it
***Please don’t forget to remove/detach the HC-05 Bluetooth Module before uploading the code. Connect it after the code has been uploaded successfully.
Here in this step, I have attached the PCB board with the robot body / Chassis and connected the motor terminal with the output terminal of the L293D Motor Driver. I have also attached the 18650 Li-ion battery holder with the chassis and connected the output wires of the battery holder with the input power terminal of the L293D motor driver.
Here in this step, I have attached the 18650 Li-ion batteries with the battery holder and finally, the motor turns on.
And I have attached some 3d Printed Parts with the chassis to make the robot looks cool. This part is completely optional.
Now you will need the “AMR_Voice” app for controlling the Boat. I have given the Application link in the code you can directly download from there and install it to your Android device.
JLCPCB (Shenzhen JIALICHUANG Electronic Technology Development Co., Ltd.), is the largest PCB prototype enterprise in China and a high-tech manufacturer specializing
in quick PCB prototype and small-batch PCB production. With over 10 years of experience in PCB manufacturing, JLCPCB has more than 200, 000 customers at home and abroad,
with over 8, 000 online orders of PCB prototyping and small quantity PCB production per day. The annual production capacity is 200, 000 sq.m. for various of 1-layer,
2-layer or multi-layer PCBs. JLCPCB is a professional PCB manufacturer featured of large scale, well equipment, strict management, and superior quality.
Troubleshoot:1. The programmer is not responding: If you face this error then it may be because of the Bluetooth Module. Always Disconnect the RX and the TX pins before uploading the code to the Arduino.
2. The motor is not rotating in the right direction: If you face this issue then you don’t need to modify any code. You just have to Interchange the motor wires. In a simple way, I can say just connect the Motor to the Motor driver


Comments
Please log in or sign up to comment.