I recently received an Arduino Zero, arduino.cc’s latest offering. I’d been experimenting with nodebots, so I decided my first Arduino Zero project would be a nodebot.
Anna Gerber has an excellent tutorial for doing nodebots using Arduino at http://node-ardx.org/
Not only is it well written and suitable for beginners, it's also open source. I've derived this project from her first tutorial, and I recommend referencing it.
Before starting, make sure you have node.js and the node package manager (NPM) installed on your computer. Here is a great guide for installing both on a Mac.
Step 1: Clone the node-ardx github repository
Clone https://github.com/AnnaGerber/node-ardx into a new directory.
Run "npm install".
Next, make sure you have the latest version of the arduino IDE installed from arduino.cc. If you don’t have a version from after July 2015, I recommend downloading the hourly build. This will make sure that the Arduino Servo library is modernized to be used with the Arduino Zero’s SAMD architecture.
What is SAMD Architecture?
The Arduino Zero uses SAMD, while older Arduino boards use AVR (the Arduino Due is also built using SAM architecture, and the Teensy and digiX are arduino clones that use ARM processors). SAM stands for "Smart ARM-based microprocessors." The SAMD is a low-power, general purpose version of the SAM architecture.
You only notice the differences between AVR and ARM architectures when you're writing lower level code. If you tend to stick to the Arduino IDE, probably the only difference you will notice is that the Arduino Zero and other ARM boards have a narrower voltage range.
Step 2: Launch Firmata
Launch the Arduino IDE and go to “File”> “Examples”>”Firmata”
Select the "Standard Firmata" sketch.
What is Firmata?
Firmata is a library developed to make it easy to work with Arduino using various languages. The Firmata sketch basically turns the Arduino into a slave. It takes control of the various inputs and outputs and allows them to be controlled from other languages, such as Wiring, or of course, Node.js.
Step 3: Configure the Arduino IDE to work with the Zero
Now it’s time to plug the Arduino into the computer.
You’ll notice that the Arduino Zero has two micro USB ports.
According to the page, the programming port is the one you’ll normally want to use, although sketches can be sent either over the USB port or the programming port.
After plugging the board in, select the correct board and port in the IDE.
Under “Tools” > “Boards” you’ll see about 20 boards listed, but you won’t see the Zero at first. To add it, go to “Tools” > “Boards” > “Board Manager.”
This will bring up the Board Manager window.
Scroll down to “Arduino SAMD Boards.” Select the tiny blue text that says “more info.”
This will bring up an “Install” button.
Installing should only take a minute or so. You may need to restart the Arduino IDE after installing.
When you open the IDE, it should now have to boards, one called “Arduino Zero (Programming Port)” and one called “Arduino Zero (USB Port).”
Make sure your board is plugged in at the programming port (see diagram above) and select “Arduino Zero (Programming Port)” as the board.
Step 4: Upload Firmata and run the code
Now you’re ready to upload the "StandardFirmata" sketch to the Arduino.
Unfortunately, when you try to upload firmata, you'll receive this error:
“TOTAL_PINS was not declared in this scope”
Scrolling through the orange error message, you’ll see that every time “pins” or “inputs” is mentioned it throws an error.
The Problem:
Boards.h is the hardware abstraction on top of which Firmata is built.
It defines the pins that can be used for the functions "analogRead," "analogWrite", "digitalRead" and "digitalWrite." Firmata is built on top of the hardware abstraction functions of Arduino. While these functions offer simple integer pin numbers, Firmata needs more information than is provided by Arduino. Boards.h has to define the number of analog, digital, PWM pins, etc, that each board has.
The Solution:
You can find the Boards.h file by finding the Arduino application and right clicking (on a mac) to "show package contents."
Go to “Contents”>”Java”>”libraries.”
On windows, just go to your Arduino folder under "my documents" and open the libraries folder.
Within libraries you’ll see Firmata, and if your files are listed alphabetically, Boards.h will be the first one. Open it with your text-editor of choice.
You’ll see definitions for each board, from Arduino Uno to Teensy, to something called an Illuminato. You won’t see the Arduino Zero board listed.
We’ll be adding a new definition for the Zero just below the Illuminato.
Find the full Boards.h code in the gist here: https://gist.github.com/ykro/393c13ad84a29b2c6f65 (thanks to Adrian Catalan for writing this gist)
Step 5: Run the code!
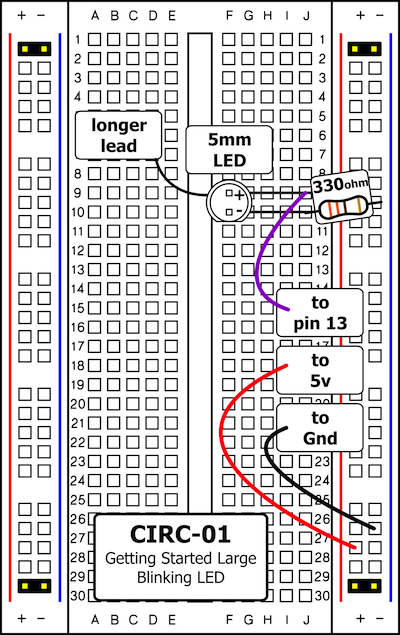
Now that support for the Arduino Zero has been added, go ahead and run “node code/CIRC01-code-led-a-strobe.js” from the terminal.
The terminal should respond with something like this:
You will see the light orange onboard LED marked “L” blinking (the yellow “ON” LED should already be on, and the orange “DEBUG” LED should be blinking as well.)
Plug an LED into pin 13.
Now you should see the LED blinking. You can interact with the LED from the terminal by typing “led.on();
Congrats! You've turned your Arduino Zero into a nodebot!
Next Steps:
Now that you've fixed the Boards.h file, you can use the Arduino Zero for any arduino tutorials that use Firmata.
I recommmend following al 14 tutorials found at http://node-ardx.org/.
The Johnny-five repository on github is also extremely helpful if you want to try writing your own nodebots code.


Comments
Please log in or sign up to comment.