This wearable project adds a GPS receiver, an OLED screen and a WiFi-enabled microcontroller to a Darth Vader mask to make a Star Wars-themed geocaching GPS device.
Geocaching is an outdoor treasure hunting game. There are caches hidden all over the world by people. The position of each cache is posted on a website like opencaching.us. The only tool you need to play is a GPS device to point you in the direction of a cache.
Overview
The augmented Darth Vader helmet first connects to the internet by using the Particle Photon WiFi capabilities.
It then finds its own location using the GPS.
Then it looks for the closest geocache that contain the word Jedi on opencaching.us
Finally, it shows the distance and direction from the current GPS location to the downloaded Jedi geocache location on the OLED display in the mask.
I used the SparkFun Micro OLED Breakout as it is a small but high resolution display with official software support for the Particle Photon.
I followed the Hookup guide and the library linked above and was able to get the OLED display working right away.
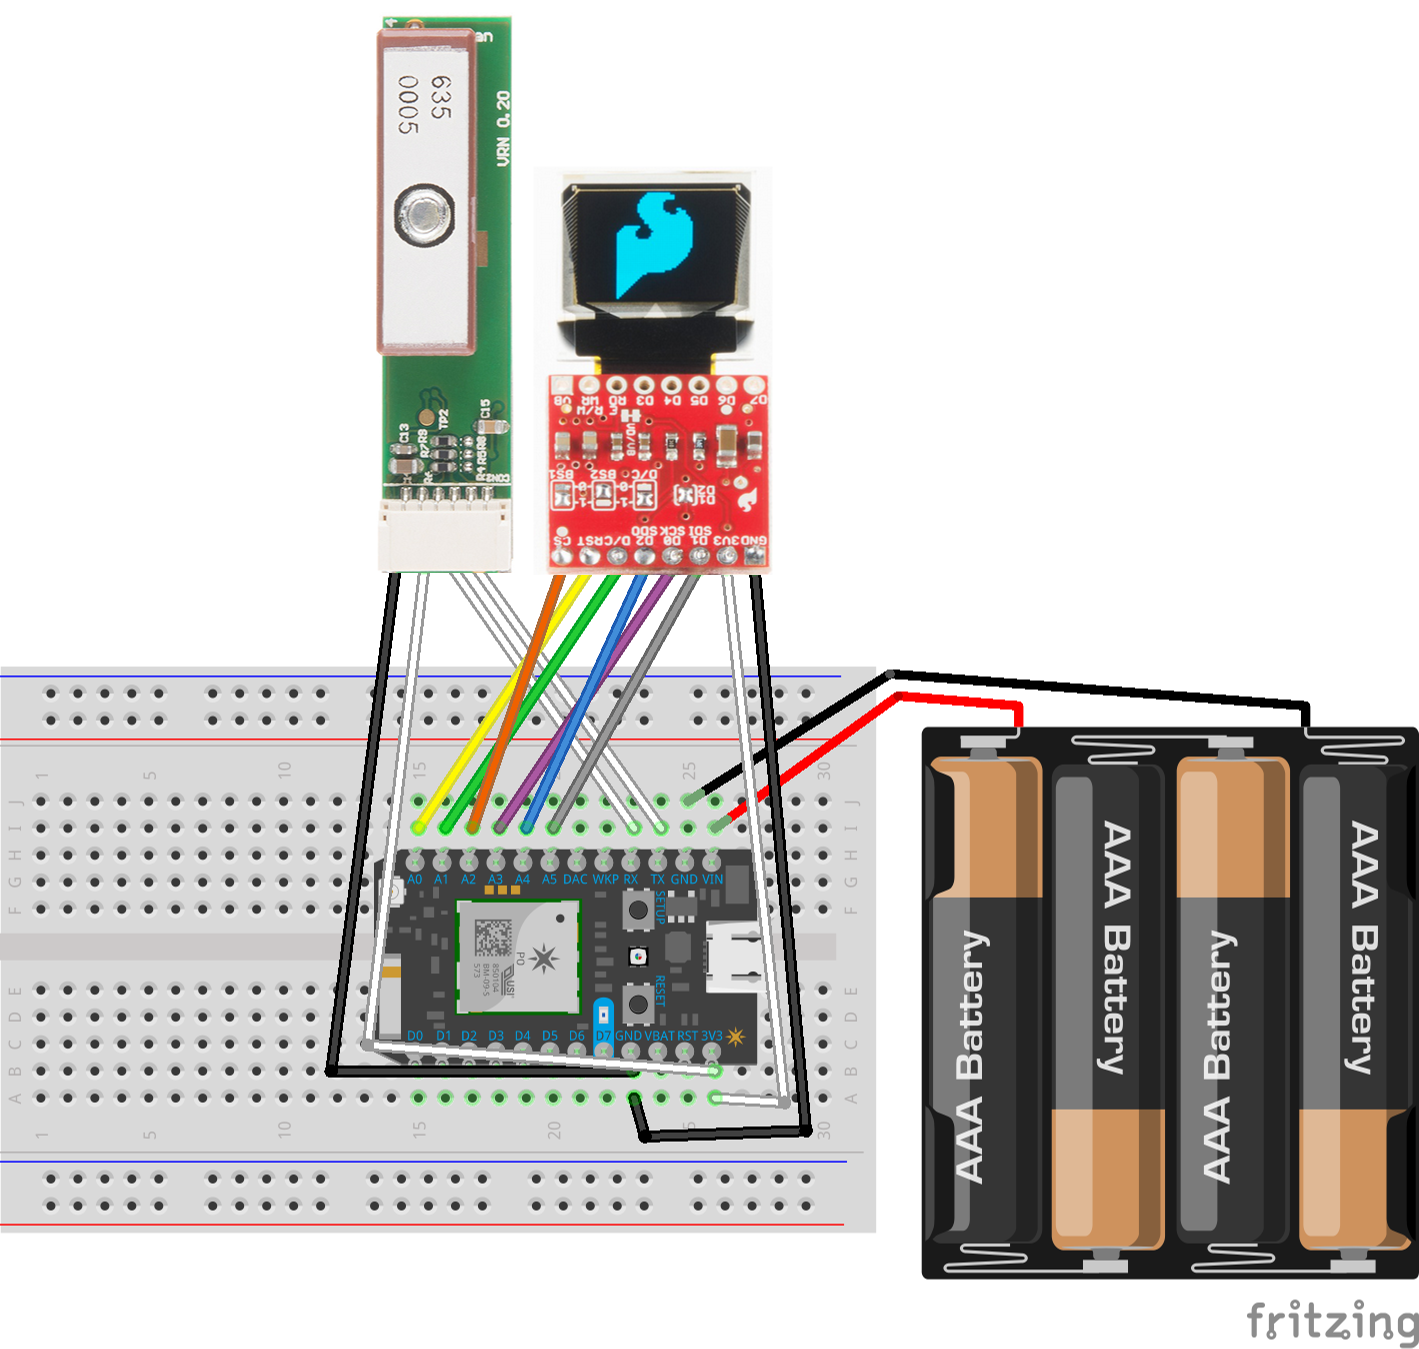
The connections (OLED → Photon) are SCK → A3, SDD → A4, SDI → A5, CS → A2, CRST → A0, D/C → A1, 3V3 → 3V3 and GND → GND.
#include "application.h"
#include "SparkFunMicroOLED.h"

const int OLED_PIN_RESET = A0;
const int OLED_PIN_DC = A1;
const int OLED_PIN_CS = A2;
MicroOLED screen(MODE_SPI, OLED_PIN_RESET, OLED_PIN_DC, OLED_PIN_CS);

void setup() {
  screen.begin();     // Initialize the OLED
  screen.clear(ALL);  // Clear the library's display buffer
  screen.display();   // Display what's in the buffer (splashscreen)
}
I used the tiny Sparkfun GP-735 GPS receiver. It communicates to a microcontroller using a 3.3V serial port using the NMEA protocol standard for pretty much all GPS units.
The excellent TinyGPS++ library has been ported to the Photon, so it's easy to convert the NMEA messages into GPS position on a Photon.
The connections (GPS → Photon) are RXA → TX, TXA → RX, VCC → 3V3, GND → GND.
The cable I ordered from Sparkfun had a 1 black wire and 5 white wires. Don't assume that the black wire is on pin 1 (ground). In my case the black wire was on pin 6, so check the pin order on your cables!
#include "application.h"
#include "TinyGPS++.h"

TinyGPSPlus gps;
void setup() {
  Serial.begin(9600);
}
void loop() {
  if(gps.location.isValid()) {
    Serial.println(gps.location.lat());
    Serial.println(gps.location.lng());
  }
}
I wired the display with a flat ribbon cable and the GPS with a JST 6-wire cable. To make the project portable, I powered it from 4 AAA batteries. I used the box from the Photon as a case since it fit the breadboard perfectly 😄
I used velcro to hold the display in the Darth Vader mask.
The code for the wearable is a state machine that goes through these actions:
- Initialize display
- Connect to network
- Wait for network connection
- Show connection success/failure
- Get current GPS location
- Wait for location
- Download nearest geocache location to the current location
- Wait for download to finish
- Announce tracking of geocache
- Track target and display distance (stay in this state until reset)
Tracking the target requires calculating the great-circle distance between two points: the current location and the geocache location. This is an interesting application of trigonometry. You can find more information on this page.
To film the video above, I added a Jedi hideout cache to the opencache.us website.
I then turned on the device in my driveway, waited for the the GPS coordinates of that cache to be downloaded and sent Darth Vader to track old Master Yoda in the swamp next to my house!


_3u05Tpwasz.png?auto=compress%2Cformat&w=40&h=40&fit=fillmax&bg=fff&dpr=2)


Comments
Please log in or sign up to comment.