Part 1 - Intro
In industry, there are so many devices that used to manufacture product they made. For example motors, variable frequency drive, heater, pump and many more. All these devices should work together without fault to make a good product. If there is a fault we should quickly know where it take place to prevent losses or damage on the devices.
So I want to build a monitoring system that take voltage, current and power data from sensors and analyze them. If there is something from the data that looks like not usual. The system will analyze it and predict where the fault is.
This fault prediction based on voltage, current and power data analytics. Many device fault will affect unusual power consumption. Like overload or lighten. The sensor placed at main power connection and in every load. The sensor at main connection will sense total load, while sensor in every load will only sense single load. This will make an easier analytics to predict where the fault take place.
All data from sensor will fetch by an android things and send all data to google cloud. In google cloud, the data will be shown and analyzed.
This is the data flow for this project :
Part 2 - Schematic
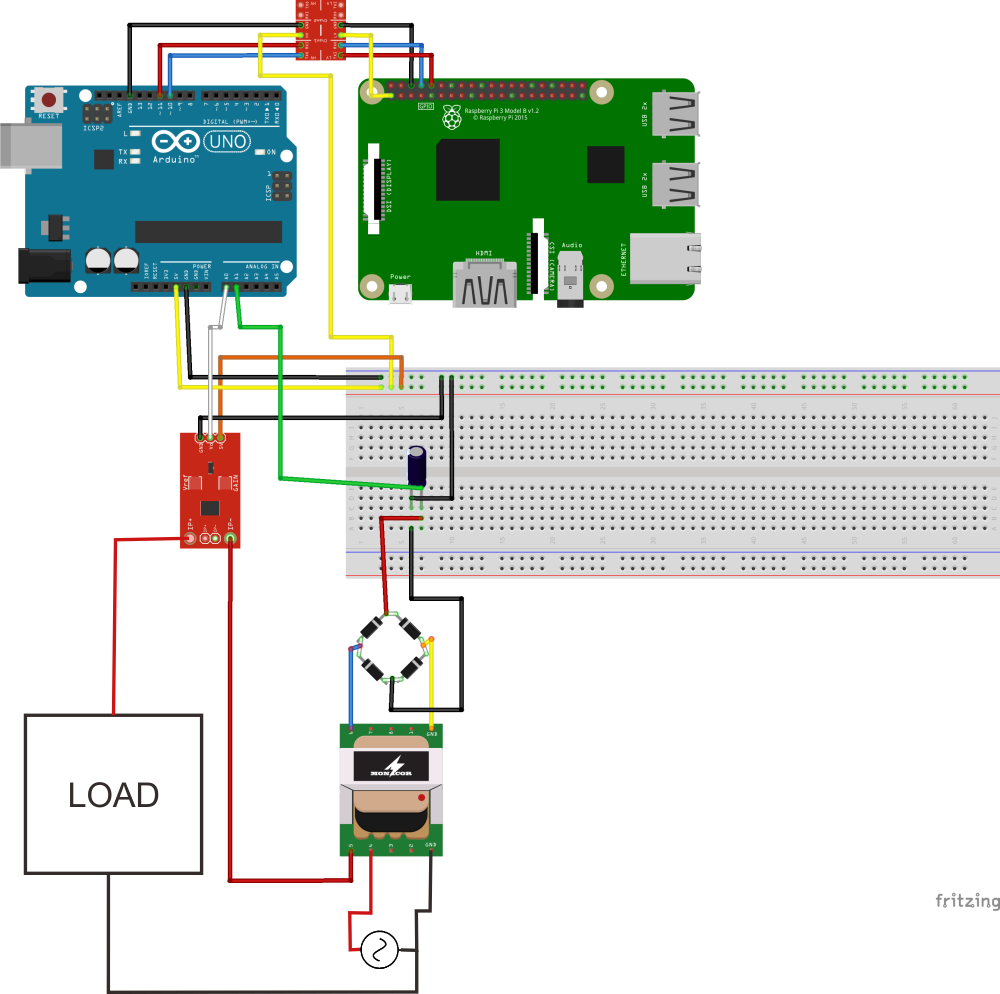
If you already have every component in hand, next we assembly every component.
In the shematic above, we have 2 sensors that is, current sensor and voltage sensor. Current sensor we use ACS712 and for voltage sensor we have to build our own using a transformer, 4 diodes and a capacitor. This sensor will convert 220V AC to low DC voltage (0-5).
Arduino and Raspberry pi communicate using UART. So we need to connect the arduino in serial port and raspberry in UART0. But since voltage level is different, we add a logic converter between them. This voltage level converter will drop 5V voltage from arduino to 3.3V and will rise 3.3V from raspberry pi to 5v.
Part 3 - Arduino Code
The arduino code will read the current and voltage sensor and then print the value with software serial. The software serial use pin 10 and 11 for tx and rx. For debugging, this code also print the sensor value to regular serial communication to your computer. So, if everything is works, it should print a value regarding the load you use.
#include <SoftwareSerial.h>
SoftwareSerial mySerial(10, 11); // RX, TX
int teganganACakhir = 0;
float rms = 0;
float daya = 0;
const int currentPin = A0;
const unsigned long sampleTime = 100000UL;                           // sampling for frequency 50Hz or 60Hz
const unsigned long numSamples = 250UL;                               // sampling divider
const unsigned long sampleInterval = sampleTime/numSamples;  // sampling Interval
const int adc_zero = 510;
void setup() {
 // Open serial communications and wait for port to open:
 Serial.begin(9600);
 while (!Serial) {
   ; // wait for serial port to connect. Needed for native USB port only
 }
 mySerial.begin(115200);
}
void loop() { // run over and over
 readCurrent(); //call read current function
 readVoltage(); //call read voltage function
 calculatePower(); //call calculate power function
 mySerial.print(rms);
 mySerial.print("-");
 mySerial.print(teganganACakhir);
 mySerial.print("-");
 mySerial.print(daya);

 Serial.print(rms);
 Serial.print("-");
 Serial.print(teganganACakhir);
 Serial.print("-");
 Serial.print(daya);
 delay(1000);
}
void readCurrent() {
      unsigned long currentAcc = 0; //variable currentAcc
      unsigned int count = 0; //variable count
      unsigned long prevMicros = micros() - sampleInterval ;
      while (count < numSamples)
      {
      if (micros() - prevMicros >= sampleInterval)
      {
      int adc_raw = analogRead(currentPin) - adc_zero; //reading adc value at A0 pin and substract by adc zero (ACS712 vie about 2,5V output at 0A).
      currentAcc += (unsigned long)(adc_raw * adc_raw);
      ++count;
      prevMicros += sampleInterval;
    }
  }
    rms = sqrt((float)currentAcc/(float)numSamples) * (27.027 / 1024.0); //calculate rms value
    rms = rms-0.1; //substract the noise
    if (rms<0.04) { //minimize noise
     rms=0;
    }
}
void readVoltage() {
 int jumlahadc=0;
 int i;
 for (i=0; i<30; i++) { //read 30 times for data smoothing
   int adctegangan = analogRead(A1);
   delay(2);
   jumlahadc = jumlahadc+adctegangan;
 }
 float tegangan = (jumlahadc/30);
 tegangan = tegangan*(5000/1023.0); //Convert adc value to voltage
 float teganganAC = (tegangan/1000)*59.9; //Converting to AC value (about 220V).
 teganganACakhir = int(teganganAC); //force to integer
}
void calculatePower() {
daya = rms*teganganACakhir; //power. current multiplied by voltage
}
Part 4 - Reading UART from Arduino
Here's the manifest file :
<?xml version="1.0" encoding="utf-8"?>
<!--
 Copyright 2016 The Android Open Source Project

 Licensed under the Apache License, Version 2.0 (the "License");
 you may not use this file except in compliance with the License.
 You may obtain a copy of the License at

     http://www.apache.org/licenses/LICENSE-2.0

 Unless required by applicable law or agreed to in writing, software
 distributed under the License is distributed on an "AS IS" BASIS,
 WITHOUT WARRANTIES OR CONDITIONS OF ANY KIND, either express or implied.
 See the License for the specific language governing permissions and
 limitations under the License.
-->

<manifest xmlns:android="http://schemas.android.com/apk/res/android"
 package="com.example.androidthings.loopback">

    <application
 android:allowBackup="true"
 android:label="@string/app_name">

        <uses-library android:name="com.google.android.things"/>

        <activity android:name=".LoopbackActivity">
            <intent-filter>
                <action android:name="android.intent.action.MAIN" />
                <category android:name="android.intent.category.LAUNCHER" />
            </intent-filter>

 <!-- Launch activity automatically on boot -->
 <intent-filter>
                <action android:name="android.intent.action.MAIN"/>
                <category android:name="android.intent.category.IOT_LAUNCHER"/>
                <category android:name="android.intent.category.DEFAULT"/>
            </intent-filter>
        </activity>
    </application>

</manifest>
Make two files in java, that is Board Defaults and UARTActivity
Board Default will give us definition for board we using:
/*
 * Copyright 2016, The Android Open Source Project
 *
 * Licensed under the Apache License, Version 2.0 (the "License");
 * you may not use this file except in compliance with the License.
 * You may obtain a copy of the License at
 *
 *      http://www.apache.org/licenses/LICENSE-2.0
 *
 * Unless required by applicable law or agreed to in writing, software
 * distributed under the License is distributed on an "AS IS" BASIS,
 * WITHOUT WARRANTIES OR CONDITIONS OF ANY KIND, either express or implied.
 * See the License for the specific language governing permissions and
 * limitations under the License.
 */

package com.example.androidthings.loopback;

import android.os.Build;
@SuppressWarnings("WeakerAccess")
public class BoardDefaults {
 private static final String DEVICE_EDISON = "edison";
    private static final String DEVICE_JOULE = "joule";
    private static final String DEVICE_RPI3 = "rpi3";
    private static final String DEVICE_IMX6UL_PICO = "imx6ul_pico";
    private static final String DEVICE_IMX6UL_VVDN = "imx6ul_iopb";
    private static final String DEVICE_IMX7D_PICO = "imx7d_pico";

 /**
     * Return the UART for loopback.
     */
 public static String getUartName() {
 switch (Build.DEVICE) {
 case DEVICE_EDISON:
 return "UART1";
            case DEVICE_JOULE:
 return "UART1";
            case DEVICE_RPI3:
 return "UART0";
            case DEVICE_IMX6UL_PICO:
 return "UART3";
            case DEVICE_IMX6UL_VVDN:
 return "UART2";
            case DEVICE_IMX7D_PICO:
 return "UART6";
            default:
 throw new IllegalStateException("Unknown Build.DEVICE " + Build.DEVICE);
 }
    }
}
and then UARTActivity :
/*
 * Copyright 2016 The Android Open Source Project
 *
 * Licensed under the Apache License, Version 2.0 (the "License");
 * you may not use this file except in compliance with the License.
 * You may obtain a copy of the License at
 *
 *     http://www.apache.org/licenses/LICENSE-2.0
 *
 * Unless required by applicable law or agreed to in writing, software
 * distributed under the License is distributed on an "AS IS" BASIS,
 * WITHOUT WARRANTIES OR CONDITIONS OF ANY KIND, either express or implied.
 * See the License for the specific language governing permissions and
 * limitations under the License.
 */

package com.example.androidthings.UARTActivity;

import android.app.Activity;
import android.os.Bundle;
import android.os.Handler;
import android.os.HandlerThread;
import android.util.Log;

import com.google.android.things.pio.PeripheralManagerService;
import com.google.android.things.pio.UartDevice;
import com.google.android.things.pio.UartDeviceCallback;

import java.io.IOException;

/**
 * Example activity that provides a UART loopback on the
 * specified device. All data received at the specified
 * baud rate will be transferred back out the same UART.
 */
public class LoopbackActivity extends Activity {
 private static final String TAG = "UARTActivity";

 // UART Configuration Parameters
 private static final int BAUD_RATE = 115200;
    private static final int DATA_BITS = 8;
    private static final int STOP_BITS = 1;

    private static final int CHUNK_SIZE = 512;

    private PeripheralManagerService mService = new PeripheralManagerService();

    private HandlerThread mInputThread;
    private Handler mInputHandler;

    private UartDevice mLoopbackDevice;

    private Runnable mTransferUartRunnable = new Runnable() {
 @Override
 public void run() {
            transferUartData();
 }
    };

 @Override
 protected void onCreate(Bundle savedInstanceState) {
 super.onCreate(savedInstanceState);
 Log.d(TAG, "Loopback Created");

 // Create a background looper thread for I/O
 mInputThread = new HandlerThread("InputThread");
 mInputThread.start();
 mInputHandler = new Handler(mInputThread.getLooper());

 // Attempt to access the UART device
 try {
            openUart(BoardDefaults.getUartName(), BAUD_RATE);
 // Read any initially buffered data
 mInputHandler.post(mTransferUartRunnable);
 Log.i(TAG,"Open success");
 } catch (IOException e) {
            Log.e(TAG, "Unable to open UART device", e);
 }
    }

@Override
 protected void onDestroy() {
 super.onDestroy();
 Log.d(TAG, "Loopback Destroyed");

 // Terminate the worker thread
 if (mInputThread != null) {
 mInputThread.quitSafely();
 }

// Attempt to close the UART device
 try {
            closeUart();
 } catch (IOException e) {
            Log.e(TAG, "Error closing UART device:", e);
 }
    }

/**
     * Callback invoked when UART receives new incoming data.
     */
 private UartDeviceCallback mCallback = new UartDeviceCallback() {
 @Override
 public boolean onUartDeviceDataAvailable(UartDevice uart) {
 // Queue up a data transfer
 transferUartData();
 //Continue listening for more interrupts
 return true;
 }

@Override
 public void onUartDeviceError(UartDevice uart, int error) {
            Log.w(TAG, uart + ": Error event " + error);
 }
    };

 /* Private Helper Methods */

 /**
     * Access and configure the requested UART device for 8N1.
     *
     * @param name Name of the UART peripheral device to open.
     * @param baudRate Data transfer rate. Should be a standard UART baud,
     *                 such as 9600, 19200, 38400, 57600, 115200, etc.
     *
     * @throws IOException if an error occurs opening the UART port.
     */
 private void openUart(String name, int baudRate) throws IOException {
 mLoopbackDevice = mService.openUartDevice(name);
 // Configure the UART
 mLoopbackDevice.setBaudrate(baudRate);
 mLoopbackDevice.setDataSize(DATA_BITS);
 mLoopbackDevice.setParity(UartDevice.PARITY_NONE);
 mLoopbackDevice.setStopBits(STOP_BITS);

 mLoopbackDevice.registerUartDeviceCallback(mCallback, mInputHandler);
 }

/**
     * Close the UART device connection, if it exists
     */
 private void closeUart() throws IOException {
 if (mLoopbackDevice != null) {
 mLoopbackDevice.unregisterUartDeviceCallback(mCallback);
            try {
 mLoopbackDevice.close();
 } finally {
 mLoopbackDevice = null;
 }
        }
    }

/**
     * Loop over the contents of the UART RX buffer, transferring each
     * one back to the TX buffer to create a loopback service.
     *
     * Potentially long-running operation. Call from a worker thread.
     */
 private void transferUartData() {
 if (mLoopbackDevice != null) {
 // Loop until there is no more data in the RX buffer.
 try {
 byte[] buffer = new byte[CHUNK_SIZE];
                int read;
                while ((read = mLoopbackDevice.read(buffer, buffer.length)) > 0) {
 mLoopbackDevice.write(buffer, read);
 String str = new String(buffer, "UTF-8");
 Log.i("Isi ", str);

 }
            } catch (IOException e) {
                Log.w(TAG, "Unable to transfer data over UART", e);
 }
        }
    }
}
If you do it right, now if we power the arduino and the raspberry it should print the sensor output to android monitor the value from arduino.
Part 5 - Setting up Google Cloud
Before we setting up the google cloud backend, make sure you have sign up for google cloud. You can have trial access for 30 days.
1 - Create the project
Open https://console.cloud.google.com, Create a new project. and give a name.
2. Credentials
Open https://console.cloud.google.com/apis/credentials
Create a Service account ID and Download credentials as JSON. Save it for later.
3. Setup Google Pub/Sub
Open https://console.cloud.google.com/cloudpubsub
Create a topic and name it.
4. Setup Google IoT Core
Open https://console.cloud.google.com/iot
Create a registry named ‘faultmonitoring’. Pick a region (anywhere).
Use MQTT and leave the CA blank.
5. Setup Google BigQuery
Open https://bigquery.cloud.google.com/welcome
Create a table with 4 column like below :
Part 5 - Complete Android Things Code
This code is still under construction


_ztBMuBhMHo.jpg?auto=compress%2Cformat&w=48&h=48&fit=fill&bg=ffffff)


Comments