

Hardware components | ||||||
_ztBMuBhMHo.jpg?auto=compress%2Cformat&w=48&h=48&fit=fill&bg=ffffff) |
| × | 1 | |||
 |
| × | 1 | |||
 |
| × | 1 | |||
 |
| × | 1 | |||
 |
| × | 1 | |||
Software apps and online services | ||||||
 |
| |||||
In this project, we will be logging data to database using Arduino Ethernet shield. We will store the data of the DHT22 temperature and humidity sensor in the database and we will then show this on the webpage.
For creating the database, we will use the Xampp server and we will then send the data from the Arduino using the Ethernet shield through the internet router.
This data will get stored in the database and we can access this data anytime we want. We will also create a webpage that will show this data.
For Custom Projects, hire me at https://www.freelancer.com/u/Muhammadaqibdutt
Required ComponentsThe components required for logging data to database using Arduino Ethernet shield are as follows
- Arduino Uno
- Arduino Ethernet Shield
- DHT22 Temperature and Humidity sensor
- Ethernet Cable
- Connecting Wires
- Breadboard
The skills you require logging data to database using Arduino Ethernet shield are as follows
- Arduino IDE
- HTML (Not Necessary)
- PHP (Not Necessary)
- MYSQL (Not Necessary)
1. The first step you need to do is install Xampp. Go to the below link and download it from there.
After installing it, run the Xampp as administrator by right clicking on it and selecting “run as administrator” as shown in below picture.
2. After opening it, Start the Apache and MySQL services.
Open your browser and type “localhost:80/phpmyadmin/”. It will ask for a username and password, the default username is “root” and leave the password as blank. After giving the username and password, it will open the phpmyadmin.
Then go to databases tab and create the new database. I have created the database with the name “ethernet” as shown below
Then go to SQL tab next to databases tab and paste the below code there. It will create a table where we will enter the data of the sensors from the Arduino.
CREATE TABLE ethernet.data(
    id INT NOT NULL AUTO_INCREMENT PRIMARY KEY,
    event TIMESTAMP NOT NULL DEFAULT CURRENT_TIMESTAMP,
    temperature VARCHAR(10) NOT NULL,
    humidity VARCHAR(10) NOT NULL,
    heat_index VARCHAR(10) NOT NULL
)Now we are going to create the php pages which will help in making connection between the Arduino and the Database.
1. First go to C:\xampp\htdocs and create a new folder named ‘ethernet’. Create a new text file in this folder and save the name as ‘connection.php’. Paste the below code there and save the file. This PHP file will make a connection between the Arduino and the database.
<?php
$username = "root";
$pass = "";
$host = "localhost";
$db_name = "ethernet";
$con = mysqli_connect ($host, $username, $pass);
$db = mysqli_select_db ( $con, $db_name );
?>
2. Then create a new text file and save the name as ‘data.php’. Paste the below code there and save it. This PHP file will log the data into the database from the Arduino.
<?php
include ('connection.php');
$sql_insert = "INSERT INTO data (temperature, humidity, heat_index) VALUES ('".$_GET["temperature"]."', '".$_GET["humidity"]."', '".$_GET["heat_index"]."')";
if(mysqli_query($con,$sql_insert))
{
echo "Done";
mysqli_close($con);
}
else
{
echo "error is ".mysqli_error($con );
}
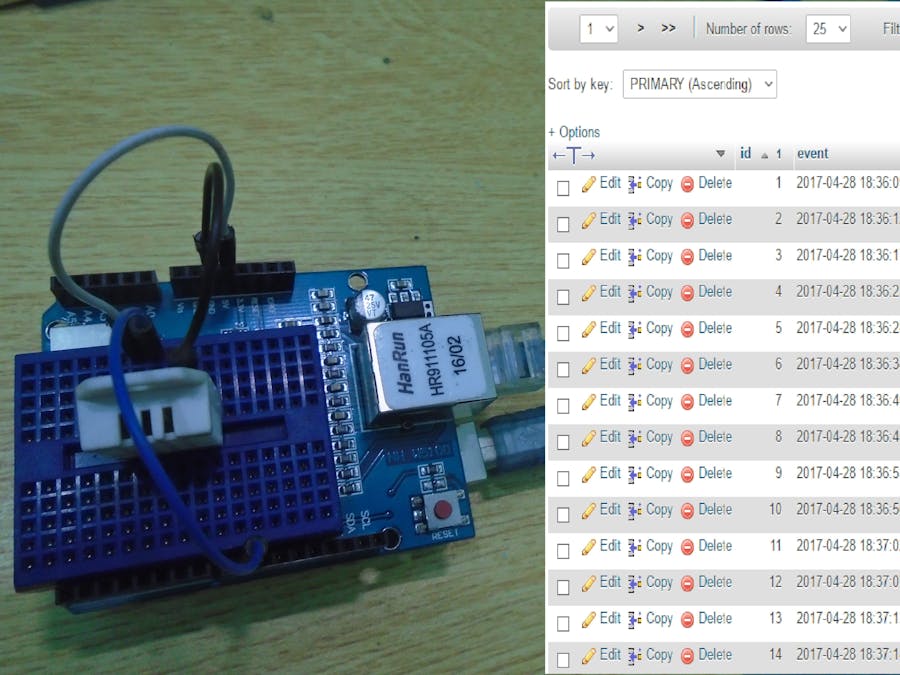
?>3.You can manually check that if the database is receiving the data from these pages or not or you can say that if the connection between the database and these pages is made or not. To check that, place the below line in your browser
http://localhost:80/ethernet/data.php?temperature=15&humidity=14&heat_index=13After entering the above line in your browser, if “Done” will be shown, then it means that the values are stored in the database. You can see these by going into the database.
At this point you have successfully made the connection between the database and the PHP pages.
Step 4 Sending Data from Arduino to DatabaseBefore going forward, you need to check that whether the ethernet shield is working properly or not. So to do this, connect the ethernet wire from the internet router to the ethernet shield.
Next, open up the Arduino IDE, go to Files->Examples->Ethernet->DHCPAdressPrinter. A new window will open up, upload the code and in the serial printer, it will show you the IP Address of the ethernet shield. Note this IP address as you will need it in the code.
Then open the command prompt (cmd) and type in “ipconfig” and it will show you the IPv4 address. Note it as we will also need it in the code.
Now, we are ready to send the data to the database from the Arduino.
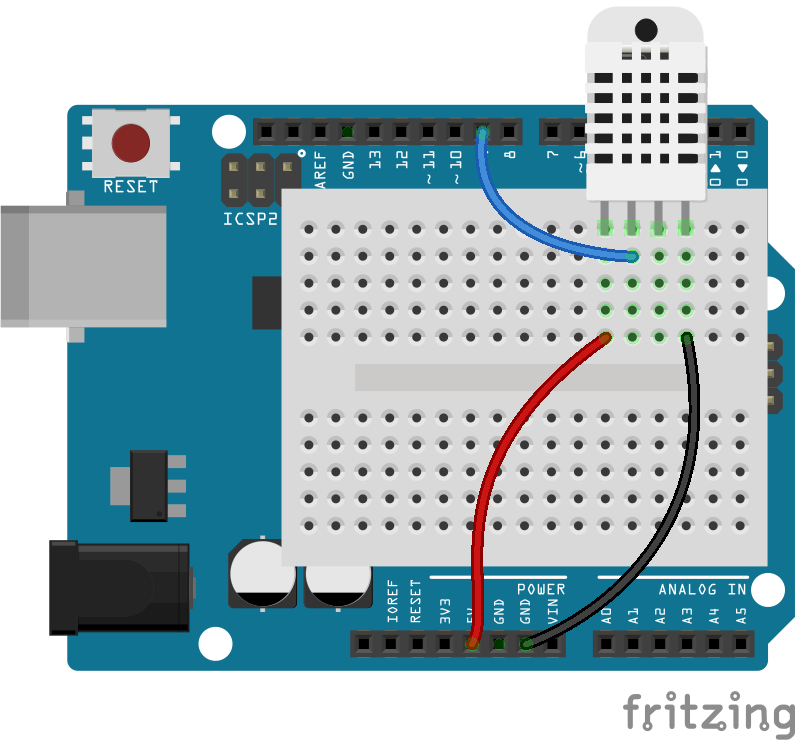
Make the connections of the DHT22 with the Arduino as shown in the figure below
To read more about interfacing DHT22 with Arduino, read this Tutorial | Temperature and Humidity Sensor DHT22 Interfacing with ArduinoYou need to make changes in the following two lines.
byte ip[] = {192, 168, 1, 18 };
byte serv[] = {192, 168, 1, 5} ;
You will need to enter the IP address of ethernet shield in the byte ip[]={}. This is the IP address that you get after uploading the dhcp address printer code in the Arduino IDE
You will need to enter the IPv4 address that you get from the cmd in the byte serv[]={}.
The remaining code is explained with the comments.
Arduino CodeDownload the DHT22 library from the below link. No need to download the Ethernet and SPI library because it comes with the Arduino IDE installation.
Now paste the below code in the Arduino IDE
#include <SPI.h>
#include <Ethernet.h>
#include "DHT.h"
#define DHTPIN 9
#define DHTTYPE DHT22
DHT dht(DHTPIN, DHTTYPE);
byte mac[] = { 0xDE, 0xAD, 0xBE, 0xEF, 0xFE, 0xED };
byte ip[] = {192, 168, 1, 18 }; //Enter the IP of ethernet shield
byte serv[] = {192, 168, 1, 5} ; //Enter the IPv4 address
EthernetClient cliente;
void setup() {
Serial.begin(9600); //setting the baud rate at 9600
Ethernet.begin(mac, ip);
dht.begin();
}
void loop() {
float hum = dht.readHumidity(); //Reading the humidity and storing in hum
float temp = dht.readTemperature(); //Reading the temperature as Celsius and storing in temp
float fah = dht.readTemperature(true); //reading the temperature in Fahrenheit
float heat_index = dht.computeHeatIndex(fah, hum); //Reading the heat index in Fahrenheit
float heat_indexC = dht.convertFtoC(heat_index); //Converting the heat index in Celsius
 if (cliente.connect(serv, 80)) { //Connecting at the IP address and port we saved before
Serial.println("connected");
cliente.print("GET /ethernet/data.php?"); //Connecting and Sending values to database
cliente.print("temperature=");
cliente.print(temp);
cliente.print("&humidity=");
cliente.print(hum);
cliente.print("&heat_index=");
cliente.println(heat_indexC);
//Printing the values on the serial monitor
Serial.print("Temperature= ");
Serial.println(temp);
Serial.print("Humidity= ");
Serial.println(hum);
Serial.print("Heat Index= ");
Serial.println(heat_indexC);
cliente.stop(); //Closing the connection
}
else {
// if you didn't get a connection to the server:
Serial.println("connection failed");
}
delay(5000);
}To display the data, you will need to create another PHP file that will read the data from the database and will show it on the webpage.
Create another PHP file with the name “display.php” and place it in the same folder where you have placed the other PHP files (C:\xampp\htdocs\ethernet\). Place the following code in the display.php and save the file.
<?php
$url=$_SERVER['REQUEST_URI'];
header("Refresh: 5; URL=$url"); // Refresh the webpage every 5 seconds
?>
<html>
<head>
<title>Arduino Ethernet Database</title>
<style type="text/css">
.table_titles {
padding-right: 20px;
padding-left: 20px;
color: #000;
}
.table_titles {
color: #FFF;
background-color: #0000FF;
}
table {
border: 2px solid #333;
}
body { font-family: "Trebuchet MS", Courier; }
</style>
</head>
<body>
<h1>Arduino Data Logging to Database</h1>
<table border="0" cellspacing="0" cellpadding="4">
<tr>
<td class="table_titles">ID</td>
<td class="table_titles">Date and Time</td>
<td class="table_titles">Temperature</td>
<td class="table_titles">Humidity</td>
<td class="table_titles">Heat_index</td>
</tr>
<?php
include('connection.php');
$result = mysqli_query($con,'SELECT * FROM data ORDER BY id DESC');
// Process every record
$oddrow = true;
while($row = mysqli_fetch_array($result))
{
if ($oddrow)
{
$css_class=' class="table_cells_odd"';
}
else
{
$css_class=' class="table_cells_even"';
}
$oddrow = !$oddrow;
echo "<tr>";
echo "<td '.$css_class.'>" . $row['id'] . "</td>";
echo "<td '.$css_class.'>" . $row['event'] . "</td>";
echo "<td '.$css_class.'>" . $row['temperature'] . "</td>";
echo "<td '.$css_class.'>" . $row['humidity'] . "</td>";
echo "<td '.$css_class.'>" . $row['heat_index'] . "</td>";
echo "</tr>";
}

// Close the connection
mysqli_close($con);
?>
</table>
</body>
</html>
Now type the following line in the browser, webpage with data will be shown like shown in below figure
http://localhost:80/ethernet/display.phpIf you have any questions, then feel free to ask us in the comment section.


Comments