We can make the lighting switches in our house smarter with this ESP8266 circuit, so if something goes wrong (e.g. if there is no WiFi or the server is down) it will continue to work as a normal switch.
You can find the original writing here: Smart Alternative Switch with ESP8266 for ioBroker via MQTT
Attention!
Parts of the following circuit work with Mains voltage. Mains voltage is not a toy, it can cause fatal electric shock or fire! Only at your own risk and only if you know what you are doing!
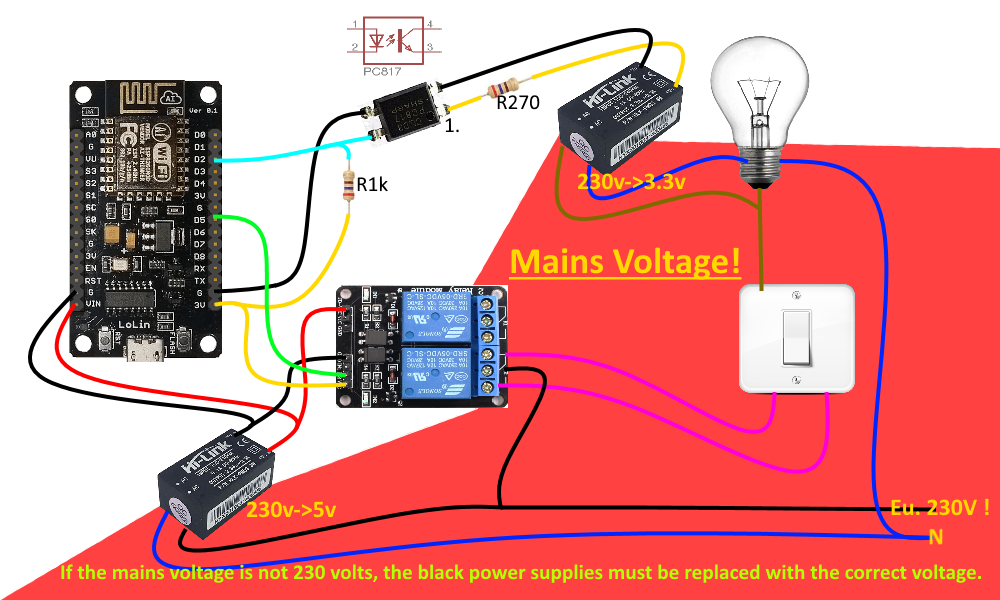
The area marked in red in the following figure is below Mains voltage!
Let's see the circuit. I tried to draw intelligibly, I hope it worked.
I use this circuit in the European Union, where the mains voltage is 230V! If you want to use it and the mains voltage in your area is not 230V, you could do so by replacing the power supplies shown in the illustration.
If the mains voltage is not 230 volts, the 2 black power supply modules in the figure must be replaced with the correct voltage.
In addition to the normal alternative switch, the relay module must be installed as if it were another alternative switch. This relay module has an optocoupler so that the ESP8266 microcontroller is completely optically isolated.
In the figure, the upper black cube is a switching power supply with 230 V to 3.3 V (If the mains voltage is not 230 volts, it must be replaced! ). Its 230 V input is connected to the lamp, its output is routed to the ESP8266 D2 pin via an optocoupler (pc817). This is used to monitor whether the lamp is lit or not. Input D2 must be switched to 3.3 V with a pull-up resistor.
The lower black cube is a 230 V to 5 V (If the mains voltage was not 230, this must also be replaced!) switch mode power supply that supplies power to the low voltage part of the circuit.
The ESP8266 microcontroller must be programmed for the circuit to work. Open the Arduino app and copy this sketch. Rewrite the required SSID and password pair for the WLAN connection and the IP address of the MQTT server. When you're done, upload the code to ESP8266.
/**************************************/
//  https://myhomethings.eu           //
//  Alternative switch - ESP8266      //
//  Board: NodeMCU 1.0 ESP-12E        //
/**************************************/

#include <ESP8266WiFi.h>
#include <PubSubClient.h>

const char* ssid = "SSID";
const char* password = "Password";
const char* mqtt_server = "192.168.x.xxx";

WiFiClient espClient;
PubSubClient client(espClient);

int relayPin = D5;
int lightControllPin = D2;
long previousMillis = 0;
int relayState = 1;
int switchState = 0;
int switchFlag = 0;


void setup_wifi()
{
  delay(100);
  WiFi.begin(ssid, password);

  while (WiFi.status() != WL_CONNECTED)
  {
    delay(500);
  }
  randomSeed(micros());
}

void reconnect()
{
  while (!client.connected())
  {
    String clientId = "ESP8266-AlternativeSwitch";

    if (client.connect(clientId.c_str()))
    {
      client.subscribe("Light_topic");
    }
    else
    {
      delay(6000);
    }
  }
}

void callback(char* topic, byte* payload, unsigned int length)
{
  payload[length] = '\0';
  String strTopic = String(topic);
  String strPayload = String((char * ) payload);

  if(strTopic == "Light_topic" && switchFlag == 0)
  {
    if(strPayload == "false")
    {
      if(digitalRead(lightControllPin) == LOW)
      {
        if(relayState == 1)
        {
          digitalWrite(relayPin, LOW);
          relayState = 0;
        }
        else
        {
          digitalWrite(relayPin, HIGH);
          relayState = 1;
        }
      }
    }

    if(strPayload == "true")
    {
      if(digitalRead(lightControllPin) == HIGH)
      {
        if(relayState == 1)
        {
          digitalWrite(relayPin, LOW);
          relayState = 0;
        }
        else
        {
          digitalWrite(relayPin, HIGH);
          relayState = 1;
        }
      }
    }
  }
}

void setup()
{
  setup_wifi();
  client.setServer(mqtt_server, 1883);
  client.setCallback(callback);

  pinMode(relayPin, OUTPUT);
  pinMode(lightControllPin, INPUT);
  digitalWrite(relayPin, HIGH);
}

void loop()
{
  unsigned long Millis = millis();
  if (Millis - previousMillis >= 1000)
  {
    previousMillis = Millis;
    switchFlag = 0;
  }

  if (!client.connected())
  {
    reconnect();
  }
  client.loop();

  if(digitalRead(lightControllPin) == LOW)
  {
    if(switchState == 0)
    {
      client.publish("Light_topic", "true");
      switchState = 1;
      switchFlag = 1;
    }
  }

  if(digitalRead(lightControllPin) == HIGH)
  {
    if(switchState == 1)
    {
      client.publish("Light_topic", "false");
      switchState = 0;
      switchFlag = 1;
    }
  }
}In line 41 we enter the unique ID of the device. It's worth changing this or we can create a less eloquent generated ID by changing it to the following code fragment.
String clientId = "ESP8266ClientID-";
clientId += String(random(0xffff), HEX);
In line 45 we subscribe to "Light_topic" on the MQTT server. This is a data point that contains the status of the lamp. The "callback" function monitors status changes.
client.subscribe("Light_topic");If the value of the variable "strTopic" in line 60 is "Light_topic" and the value of "switchFlag" is "0", there is a change on the MQTT server. The value of "switchFlag" is "1" when the lamp is switched on with the conventional switch. This is necessary in the condition because if we manually turn on the lamp, the value of the lamp on the MQTT server changes, and due to the subscription, the condition is met again and the relay is turned on again
if(strTopic == "Lampa_topic" && switchFlag == 0)Line 62: The value of "strPayload" is "false". This means that the lamp must be turned off according to the command received from the server.
if(strPayload == "false")Line 64: Check whether the lamp is lit or not. If it is not lit, the program does nothing. It would not be good to turn the lamp on despite the command.
if(digitalRead(lightControllPin) == LOW) // it is onA value of "LOW" means that the lamp is switched on because the D2 pin is pulled to 3.3 V by default, ie "HIGH". The pc817 optocoupler pulls it down to GND when the lamp is switched on.
If all the conditions have been met so far, the status of the relay must be checked and switched accordingly.
if(relayState == 1)
{
  digitalWrite(relayPin, LOW);
  relayState = 0;
}
 else
{
  digitalWrite(relayPin, HIGH);
  relayState = 1;
}
Line 124: The program checks whether the lamp is lit or not. If so, and in the following condition, the status of the switch is "0". So it was switched off, manual switching took place. This must be transmitted to the MQTT server with the "client.publish ()" function, set the "Light_topic" data point to "true".
if(digitalRead(lightControllPin) == LOW)
{
  if(switchState == 0)
  {
    client.publish("Lampa_topic", "true");
    switchState = 1;
    switchFlag = 1;
  }
}
That was the explanation of the code, I hope I was understandable.
After commissioning, the new device is displayed in the iobroker under MQTT as a new data point.
To read an article about ioBroker and the MQTT adapter, click here.
With the IoT adapter installed, you can connect to Google Home or Amazon Alexa and also control the lamp with voice commands.
More examples for ESP8266 - ESP32 - Arduino can be found here.
I hope you enjoyed this example and it will be useful to you.
Have a nice day!


Comments
Please log in or sign up to comment.