Alarm clocks have been around since the 1800’s and although the concept has remained simple, they are still as relevant today as they were when they were first conceived. Although many of us now choose to use a smartphone over a traditional alarm clock, phone batteries can be unreliable (especially if you forget to plug in the device overnight) so there is still something to be said for using a dedicated alarm device. One recent upgrade to the alarm clock is the integration of smart assistants. So what exactly is a smart alarm clock?
A smart alarm clock is a clock that can connect to your home network in order to give features not available on traditional alarm clocks. Smart alarm clocks can show you feeds from camera systems, talk to other smart devices in your home, and provide information like weather updates and reminders.
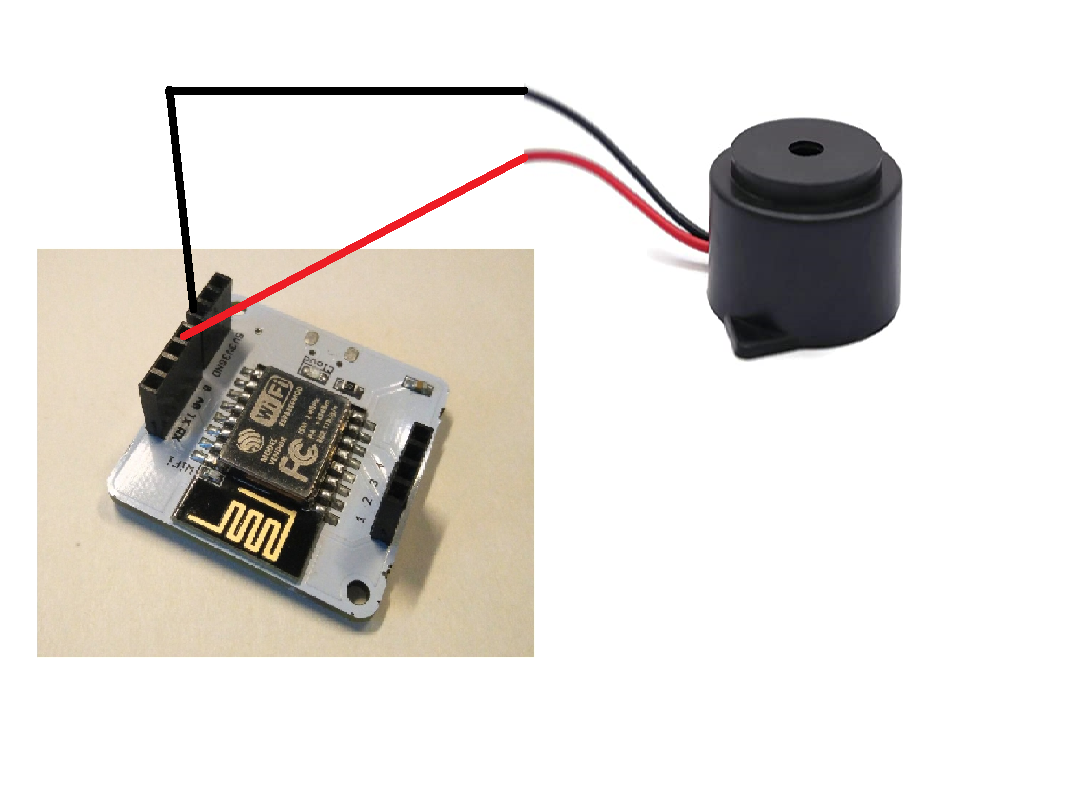
Alarm Circuit :- Identify the positive and negative pin of buzzer. For this remember that the longer pin of buzzer is the positive and shorter pin is negative.
- Connect the positive pin of the Buzzer to pin 0 (or any other GPIO pin i.e 1 2 3 or 4) of the Bolt WiFi Module using male to female wire.
- Connect the negative pin of buzzer to pin 'GND' with the help of male to female wire.
- Power on the Bolt device using a micro-USB cable.
- Create the account on www.integromat.com.
- Verify the account using your mail.
- Sign into your account.
- After verifying account sign in into it.
- Click on the icon "create new scenerio".
- Search in the search bar "boltiot" and select it.
- Click on Add button.
- Select My bolt in my connection,
- Enter the API key. you can find the API key on your bolt cloud dashboard.
- Select command Write digital output.
- In device name write your bolt WiFi module id which you can find on your bolt cloud dashboard in the form of "BOLTXXXXXXX".
- Select pin and write '0' in it because we taking output in pin 0 so that buzzer gets turned on.
- Write the state HIGH.
- Click on ok.
- We want that our buzzer beeps for several seconds before it gets turned off. So we requires to add a delay so that our buzzer rings for particular time.
- For this select tool icon and select sleep, write number of seconds for which we want ring our buzzer i.e. set delay time. I set my delay time as 60 seconds.
- Click on ok.
- Click on adding a new module and choose Bolt IoT again. Continue Step 2, But now, in this module, we are going to switch off the Buzzer by sending a LOW to the Buzzer.
- So far, we have set up the scenario to ring the buzzer. Now, we will give it some context in the form of the time to ring.
- Click on the little clock icon on the initial Bolt module. This is the scheduling option. Choose the time that you want the alarm to ring and click on OK.
- That's it, you have successfully set up your alarm scenario. Don't forget to save your scenario.


Comments