The Arduboy is a miniature credit card size game system with open source software, based on the Arduino hardware platform. I do not have an Arduboy but I feel nostalgic and love the retro gaming culture so I decided to make a handheld game console similar to Arduboy with extended screen size.
Hardware selectionIn the beginning I thought I should be starting using a breadboard with an OLED screen and buttons and later move the design to a protoboard but due to limited time I decided to use Seeedstudio Wio Terminal which has SAMD51 microcontroller, ILI9341 color TFT display, 5-way switch and 3 push buttons. It has everything I needed to get started for rapid prototyping. Although, Wio Terminal has a color display but I wanted to keep the retro B/W look and feel.
I have forked the Modmatic Github repository which is a fork of the well known MLXXXp/Arduboy2 Github repository. This repository has SAMD51 implementation but with different display controller. I implemented the ILI9341 display controller using Bodmer/TFT_eSPI library (which is by default installed with the Wio Terminal board installation). Also, I had to remap all buttons pins and speaker.
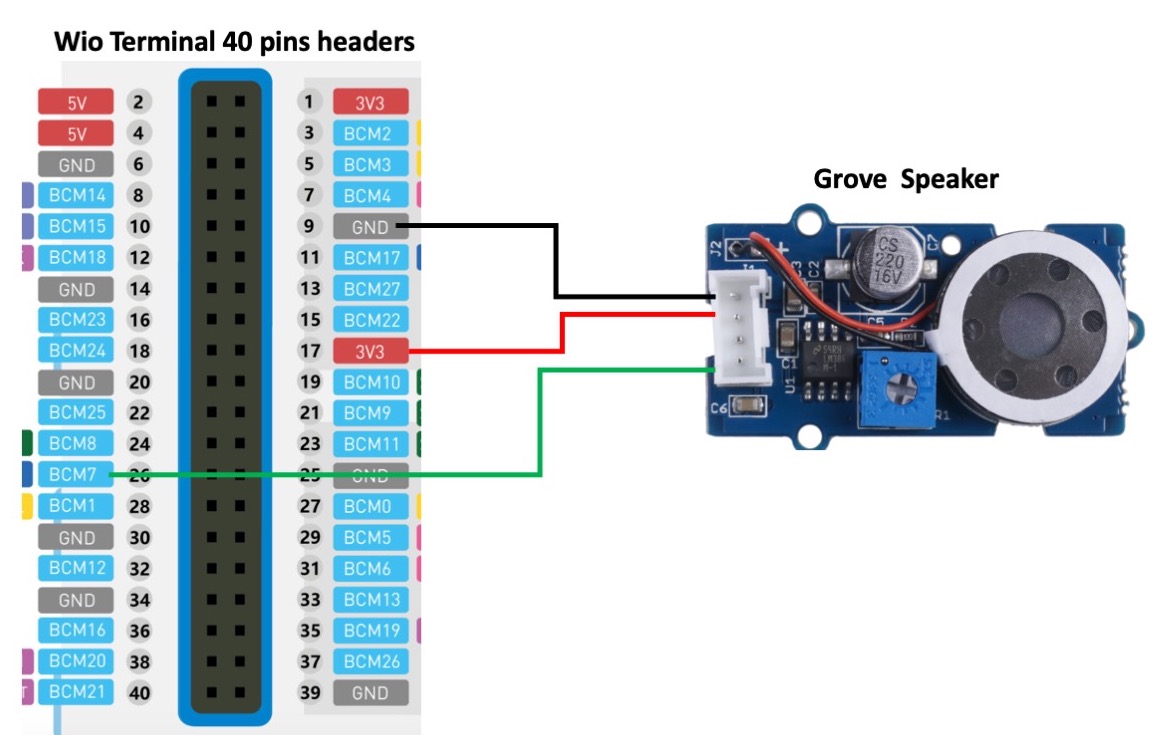
ModificationThe Wio terminal has an onboard buzzer but the library I am using supports the tones over SAMD51 DAC pin using interrupts which has better loudness. I have connected an external speaker with amplifier to the headers on the back of the Wio Terminal. This is optional and games can be played without it.
Grove Speaker    Wio Terminal
VCC              3.3V
GND              GND
SIG DAC1The original Arduboy uses 128x64 pixels display resolution which is quite good for sharp rendering of the 8-bit graphics and sprites. Since the Wio Terminal (ILI9341) has 320x240 pixels display resolution so it would be nice to use it as much as we can. Most of the games have been written for 128x64 resolution so by rescaling proportionally we can go up to 256x128 resolution on the Wio Terminal. The graphics scaling is implemented using the Nearest-neighbor with integer interpolation. Nearest-neighbor algorithm is the simplest and fastest implementation of image scaling technique. It takes array of reference pixels (image) as the base to construct a new scaled image. The constructed image can be smaller, larger, or equal in size depending on the scaling ratio. When enlarging an image, we are actually introducing empty spaces in the original base picture. From the image below, an image with dimension (w1 = 4, h1 = 4) is to be enlarged to (w2 = 8, h2 = 8). The black pixels represent empty spaces where interpolation is needed, and the complete image is the result of nearest neighbor interpolation.
The implementation is so small that I have included the code below.
void Arduboy2Core::scale(const uint8_t *image, uint16_t w1,
     uint16_t h1, uint8_t *scaledImage, uint16_t w2, uint16_t h2)
{
    uint16_t x_ratio = (uint16_t)((w1<<16)/w2) + 1;
    uint16_t y_ratio = (uint16_t)((h1<<16)/h2) + 1;
    uint16_t x2, y2;

    for (uint16_t i=0; i<h2; i++) {
        for (uint16_t j=0; j<w2; j++) {
            x2 = ((j * x_ratio) >> 16) ;
            y2 = ((i * y_ratio) >> 16) ;
            scaledImage[(i * w2) + j] = image[(y2 * w1) + x2] ;
        }
    }
}
We can compare the resolutions in the image below.
Please download the latest Arduino IDE and follow the instructions to install from here: https://www.arduino.cc/en/software. To install the Wio Terminal board library, open the Arduino IDE, click on File > Preferences, and copy below URL to Additional Boards Manager URLs: https://files.seeedstudio.com/arduino/package_seeeduino_boards_index.json
Click on Tools > Board > Board Manager and Search Wio Terminal and click on install.
You would need to select the board and port using the Tools > Board menu.
The Wio Terminal has no EEPROM so we need to install FlashStorage library which has APIs to emulate EEPROM using flash memory. Click on Tools > Manage Libraries... to open Library Manager and search FlashStorage (by Arduino) and click on install.
Now we need to install Arduboy libraries for Wio Terminal from the Github repositories listed below:
Click on Code > Download ZIP to download the library bundle.
To install the libraries click on Sketch > Include Library > Add.ZIP Library.
We can test the library using the HelloWorld sketch. Connect the Wio Terminal over USB to the computer and open the sketch by clicking on File > Examples > Arduboy2 > HelloWorld and click on Sketch > Upload to compile/upload the firmware.
Download the ZIP file from the Github repository https://github.com/Team-ARG-Museum/ID-42-Sirene. Unzip and open the file SRN_AB.ino in the Arduino IDE.
Click on Sketch > Upload and enjoy the game!
Similarly we can play many other games. Although most of the games should work out of the box but few games sketches require external libraries which can be installed using the Arduino IDE Library manager. Please check the error messages while compiling the sketch and install the missing libraries.
Playing Catacombs of the damned! 3D game DemoPlaying Road Trip DemoConclusionIt has been really a great experience and learning to port Arduboy on the Wio Terminal. I enjoyed playing games on it. In the near future I plan to develop a game for it. I would like to thank Kevin Bates and Seeedstudio for supporting the open source software and open hardware platform.


Comments
Please log in or sign up to comment.