


Hardware components | ||||||
 |
| × | 1 | |||
 |
| × | 1 | |||
| × | 1 | ||||
| × | 1 | ||||
| × | 1 | ||||
| × | 2 | ||||
| × | 1 | ||||
| × | 1 | ||||
| × | 1 | ||||
| × | 1 | ||||
Software apps and online services | ||||||
 |
| |||||
Hand tools and fabrication machines | ||||||
 |
| |||||
 |
| |||||
Robots can be incredibly entertaining, especially when they engage with humans, assist them, and serve as companions. This project focuses on creating a companion robot capable of following a person's face using a camera sensor equipped with advanced face detection capabilities. This do-it-yourself mobile robot can be constructed entirely from readily available, low-cost components and its chassis can be produced using a 3D printer, making it accessible for hobbyists and enthusiasts alike. The primary objective of this project is to spark the curiosity of young makers and inspire interest in the fields of Science, Technology, Engineering, and Mathematics (STEM), encouraging them to explore the exciting world of robotics and innovation.
If you’ve ever come across pre-assembled robots available for purchase, you might be tempted to buy one. However, there’s a unique sense of joy and accomplishment that comes from building your robot from the ground up. The process of designing, assembling, and fine-tuning each component and coding can be incredibly rewarding and will allow you to unleash your creativity in a way that store-bought models simply can’t offer. So, let's dive into this exciting project and start crafting your very own robot!
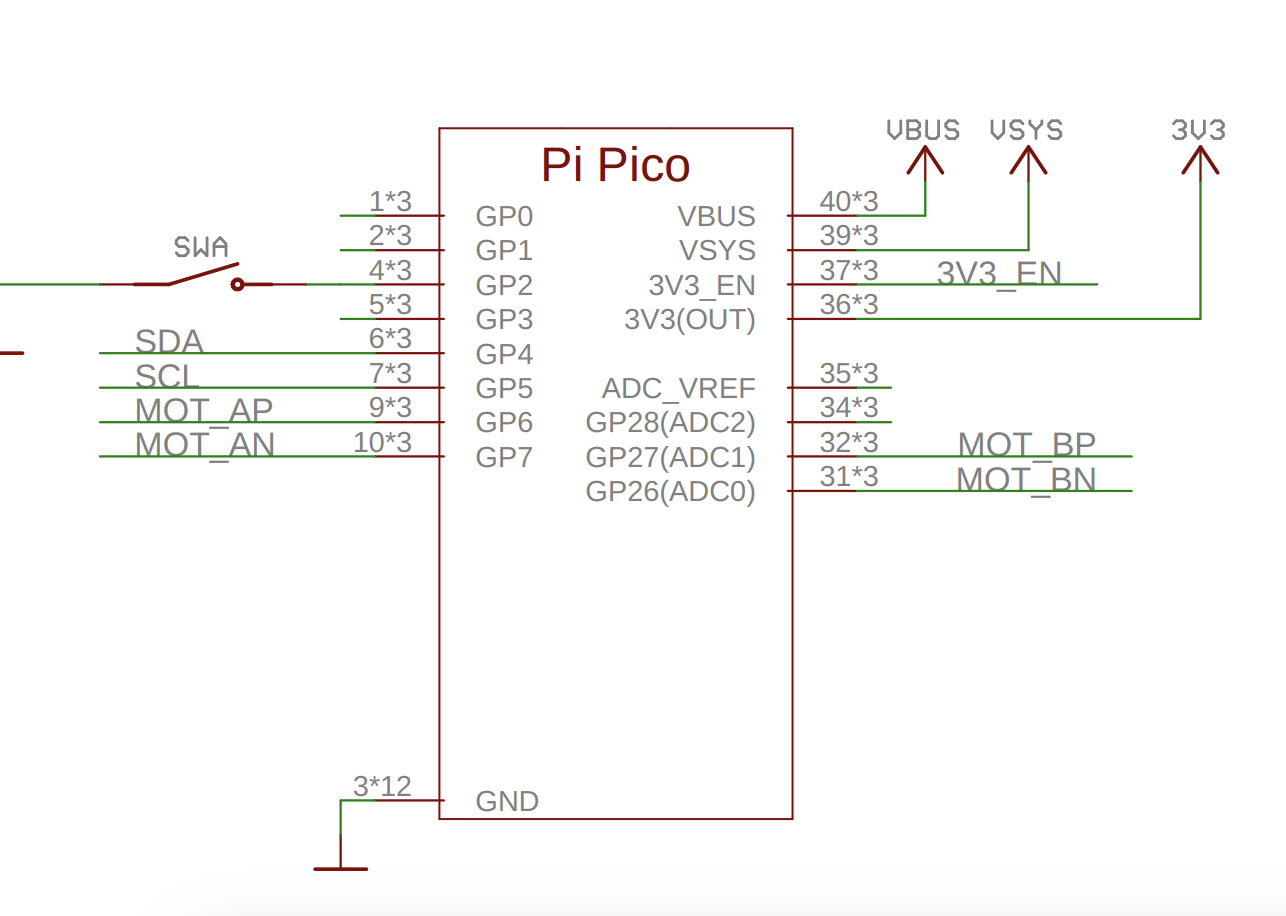
Hardware SelectionWe will use the Raspberry Pi Pico W as the main microcontroller for the robot.
To maintain a compact design, we chose the Pimoroni LiPo Shim and Motor Shim for Pico, which can be stacked on the headers of the Raspberry Pi Pico W.
To minimize the overall size of the robot chassis, we selected a pair of compact brushed DC motors equipped with durable metal gearboxes. These motors were strategically mounted perpendicular to the axle, allowing for a more efficient use of space within the chassis design. This orientation not only helps maintain a low profile but also optimizes torque delivery and enhances maneuverability, making them ideal for our robot's requirements.
We will be using the Useful Sensors' Person Sensor for face detection. This compact hardware module is designed to detect the faces of individuals in the vicinity. It provides information about the number of people present their locations relative to the device and even performs facial recognition. The board employs a standard Qwiic connector for the I2C interface. We will connect this sensor to the Raspberry Pi Pico using the onboard Qwiic connector of the Pimoroni Motor Shim.
Additionally, we would need motor connectors, wheels, a ball caster, and a Qwiic cable.
We used FreeCAD to design the robot's body and chassis and printed it using the tough white PLA filament. The body features a front-facing hole for mounting the person sensor.
The chassis has been designed to facilitate a secure snap-fit connection with the gear motors, ensuring a robust and stable assembly. This design not only simplifies the installation process but also enhances the overall structural integrity of the system, allowing for efficient operation and ease of maintenance.
The gear motors can be easily pushed into the designated slots in right orientation.
A ball caster is firmly attached using screws at the front to ensure stability during operation. Additionally, two wheels are precisely fitted onto the shafts of the motors, allowing for smooth and efficient movement. This configuration enables the ball caster to pivot easily while the wheels provide the necessary traction and control for navigation.
The person sensor connects to the Qwiic connector on the motor shim. The assembled robot is depicted as shown below.
All parts can be seamlessly integrated into the intricately designed 3D printed casing. To add a touch of character, we apply a sticker on the camera's face, giving it a personality.
Please follow the instructions here to download and install Arduino IDE. After installation, open the Arduino IDE and install the board package for the Arduino Nano 33 BLE Sense by going to Tools > Board > Boards Manager. Search the board package as shown below and install it.
After the board package installation is completed, choose the RaspberryPi Pico W from the Tools > Board > RaspberryPiRP2040 menu and select the serial port of the connected board from Tools > Port menu. We have adapted the Pimoroni motor driver code for Arduino, which can be found in the GitHub repo mentioned in the Code section. The Arduino sketch provided below controls the robot’s movements when it detects a person’s face.
#include <Wire.h>

#undef degrees
#undef radians

#include "src/pico_motor_shim.hpp"
#include "src/person_sensor.h"

#define LED_PIN LED_BUILTIN

using namespace motor;

const int32_t SAMPLE_DELAY_MS = 200;

// The scaling to apply to each motor's speed to match its real-world speed
constexpr float SPEED_SCALE = 5.4f;

// The speed to drive the wheels at, from 0.0 to SPEED_SCALE
constexpr float DRIVING_SPEED = SPEED_SCALE;

constexpr int TURN_THRESHOLD = 25;
constexpr int MIN_BOX_WIDTH = 40;
constexpr int MAX_BOX_WIDTH = 60;

Motor left(pico_motor_shim::MOTOR_1, NORMAL_DIR, SPEED_SCALE);
Motor right(pico_motor_shim::MOTOR_2, NORMAL_DIR, SPEED_SCALE);

void forward(float speed = DRIVING_SPEED) {
  left.speed(speed);
  right.speed(speed);
}

void backward(float speed = DRIVING_SPEED) {
  left.speed(-speed);
  right.speed(-speed);
}

void stop() {
  left.stop();
  right.stop();
}

void coast() {
  left.coast();
  right.coast();
}

void turn_left(float speed = DRIVING_SPEED) {
  left.speed(-speed);
  right.speed(speed);
}

void turn_right(float speed = DRIVING_SPEED) {
  left.speed(speed);
  right.speed(-speed);
}

void setup()
{
  pinMode(LED_PIN, OUTPUT);
  Wire.begin();
  Serial.begin(115200);

  while (!left.init() || !right.init()) {
    Serial.println("Cannot initialise the motors.");
    sleep_ms(1000);
  }
}

void loop()
{
  person_sensor_results_t results = {};

  if (!person_sensor_read(&results)) {
    Serial.println("No person sensor results found on the i2c bus");
    return;
  }

  if (results.num_faces > 0 ) {
    const person_sensor_face_t* face = &results.faces[0];
    int centroid_x = (face->box_left + face->box_right) / 2;
    int centroid_y = (face->box_top  + face->box_bottom) / 2;
    int box_width = face->box_right - face->box_left;
    int turn_direction = (centroid_x - 128);


    Serial.printf("%d,%d,%d,%d,%d,%d\n",
                  face->box_left,
                  face->box_top,
                  face->box_right,
                  face->box_bottom,
                  centroid_x,
                  centroid_y);

    Serial.printf("%d,%d,%d\n", face->box_confidence, box_width, turn_direction);

    if (face->box_confidence < 80) {
      return;
    }

    if (turn_direction < -TURN_THRESHOLD) {
      turn_right(0.35 * DRIVING_SPEED);
      sleep_ms(500);
      stop();
    } else if (turn_direction > TURN_THRESHOLD) {
      turn_left(0.35  * DRIVING_SPEED);
      sleep_ms(500);
      stop();
    } else if (box_width < MIN_BOX_WIDTH) {
      forward(0.35 * DRIVING_SPEED);
      sleep_ms(500);
      stop();
    } else if (box_width > MAX_BOX_WIDTH) {
      backward(0.35 * DRIVING_SPEED);
      sleep_ms(500);
      stop();
    }
  }

  if (results.num_faces == 0 ) {
    sleep_ms(SAMPLE_DELAY_MS);
  }
}We did not have the opportunity to create a demo for the robot with its body and battery fitted, but we do have an enjoyable test run video.
ConclusionThis project successfully integrates hardware and software, resulting in an interactive system. Using a 3D-printed chassis, motors, a camera module, and a microcontroller, we developed a robot that detects and follows human faces in real time. Overall, this project serves as a foundation for further exploration in the field of robotics and opens up possibilities for more advanced applications, such as autonomous navigation and complex object tracking. The knowledge and experience gained from this endeavor will undoubtedly contribute to future projects and innovations.


Comments
Please log in or sign up to comment.