In this project I have built a proof of concept of a machine learning application using Quickfeather development board and SensiML Toolkit. There are many ongoing research and analysis on smart grid technologies which is expected to result in effective climate change mitigation. Non-Intrusive Load Monitoring (NILM) is seen as a key technique for enabling innovative smart-grid services. In this project I am targeting household energy consumption analysis but it is equally applicable to industrial energy consumption. NILM technique breaks down the energy consumption into its components and provide information on present appliances and can be applied to perform diagnostics. Why do we need NILM? Because we do not want to add a sensor to each of the household appliances to monitor. NILM technique is well scalable and present positive solution without any electricity hazards and also being as a single point of control it is convenient to upgrade the application and connect with other online services to provide useful and timely information. Also it increases awareness on user energy usage patterns so that we can save energy to save earth.
Hardware and Software SetupWe are going to use QuickFeather development board.
The QuickFeather development board has many on-board sensors as shown above but for the current project we need a sensor which can give us information about electricity characteristics. For this purpose we are using M5Stack Atom Socket Kit which has HL8032 energy meter integrated circuit which provides the data over UART connection at 4800 bps.
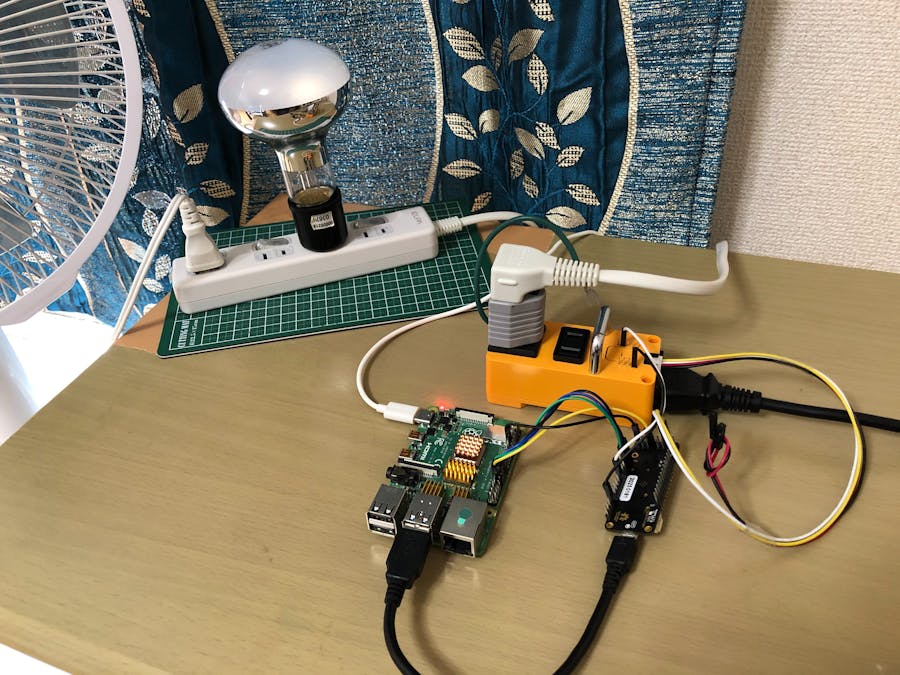
M5Stack Atom Socket Kit can be used safely up to 10A current. It has a 3 pin input power socket which is connected to the main power supply and it has pin connectors which can be used to get data from the HLW8032 IC. It also has an inbuilt relay which can be control using the grove connector to switch on/off the main power supply. There are two output sockets. (2-pin/3-pin) which is connected to a power strip for supplying power to at most 4 appliances. For this project I am using only two electric appliances; a fan (30W) and a lamp (90W). For the data collection we have used SensiML Data Capture Lab which is a Windows application and we need a Windows PC to install that. Since I have a Macbook so I am using a VirtualBox to install Windows VM and another VM for Linux for building the firmware using QORK-SDK. Please follow the instructions here https://github.com/QuickLogic-Corp/qorc-sdk to install the QORK-SDK. Also, we need to install SensiML Open Gateway application if we want to capture data in the Data Capture Lab using Wi-Fi connection. It is assumed that Raspberry Pi 4 is installed with the latest raspberry Pi OS.
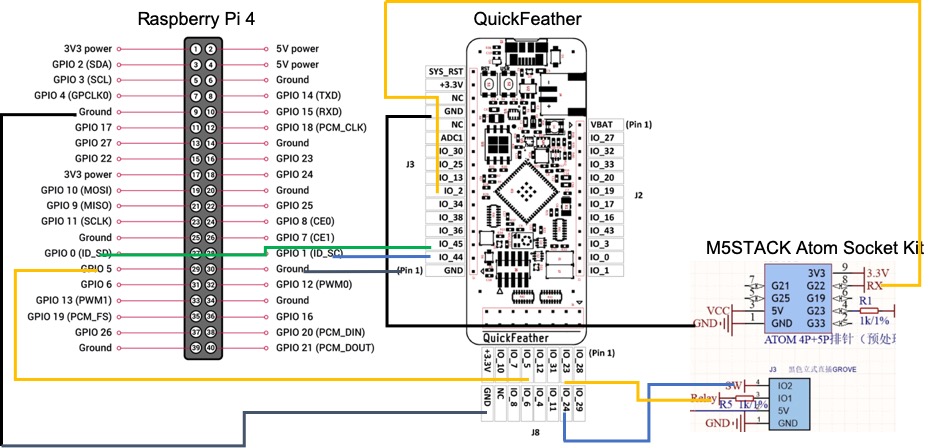
We need many UART connections to work with. We need one UART connection to connect QuickFeather to the M5Stack Atom Socket Kit. We need another UART to send data to Raspberry Pi 4. And we need one more UART to see the debug messages which is also connected to the Raspberry Pi 4. Since QuickFeather has only one hardware UART we need to use eFPGA to enable 2 more hardware UARTs. For this project we are using hybrid of two example applications from the QORK-SDK repository:
1. qf_apps/qf_fpgauart_app (loads the FPGA UART gateware, starts the FPGA clocks)
2. qf_apps/qf_ssi_ai_app (data collection using Simple Streaming Interface or recognition)
It was quite a bit work to merge two applications together at least for me. The final application can be found here: https://github.com/metanav/Challenge_Climate_Change
There is a relay and switch pin connection which in the Atom Socket Kit which is connected to the QuickFeather to control relay. We need to add below config in the src/pincfg_table.c to initialize pins.
{ // setup GPIO for External Button
  .ucPin = PAD_24,
  .ucFunc = PAD24_FUNC_SEL_GPIO_0,
  .ucMode = PAD_MODE_INPUT_EN,
  .ucPull = PAD_PULLUP,
  .ucDrv = PAD_DRV_STRENGTH_4MA,
  .ucSpeed = PAD_SLEW_RATE_SLOW,
  .ucSmtTrg = PAD_SMT_TRIG_DIS
},
{ // setup GPIO for Relay Switch
  .ucPin = PAD_23,
  .ucFunc = PAD23_FUNC_SEL_GPIO_7,
  .ucMode = PAD_MODE_OUTPUT_EN,
  .ucPull = PAD_NOPULL,
  .ucDrv = PAD_DRV_STRENGTH_4MA,
  .ucSpeed = PAD_SLEW_RATE_SLOW,
  .ucSmtTrg = PAD_SMT_TRIG_DIS
},
The schematics for connecting all devices can be found in the Schematics section. We can see the physical connection below.
The Atom Socket Kit (HLW8032) is using slow baud rate (4800) and even parity so we need to configure FPGA UART accordingly. Also, the another FPGA UART is configured at 115200 baud rate without parity. There is a "init_fpga_uart" function call in the main.c which takes care of it.
void init_fpga_uart()
{
  UartBaudRateType brate;
  UartHandler uartObj;
  memset( (void *)&(uartObj), 0, sizeof(uartObj) );
  uartObj.baud = BAUD_4800;
  uartObj.wl = WORDLEN_8B;
  uartObj.parity = PARITY_EVEN;
  uartObj.stop = STOPBITS_1;
  uartObj.mode = TX_RX_MODE;
  uartObj.hwCtrl = HW_FLOW_CTRL_DISABLE;
  uartObj.intrMode = UART_INTR_ENABLE;
  uartHandlerUpdate(UART_ID_FPGA, &uartObj);
  // wait
  for (volatile int i = 0; i != 4000000; i++) ;
  uart_init(UART_ID_FPGA, NULL, NULL, &uartObj);
  uint32_t device_id = *(uint32_t *)FPGA_PERIPH_BASE ;
  if (device_id == 0xABCD0002)
  {
      uartObj.baud = BAUD_115200;
      uartObj.wl = WORDLEN_8B;
      uartObj.parity = PARITY_NONE;
      uartObj.stop = STOPBITS_1;
      uartObj.mode = TX_RX_MODE;
      uartObj.hwCtrl = HW_FLOW_CTRL_DISABLE;
      uartObj.intrMode = UART_INTR_ENABLE;
      uartHandlerUpdate(UART_ID_FPGA_UART1,&uartObj);
      uart_init(UART_ID_FPGA_UART1, NULL, NULL, &uartObj);
   }
}
We will try to classify 4 classes below.
1. FAN
2. LAMP
3. LAMP and FAN
4. NO LOAD
We are using 4 electrical characteristics:
1. Voltage (Volt)
2. Current (Ampere)
3. True Power (Watt)
4. Apparent Power (Volt-Ampere)
In an AC circuit, true power (also known as real power or active power) is the actual power consumed by the equipment to do useful work. The combination of reactive power (the power which are merely absorbed and returned in load) and true power is called apparent power, and it is the product of a circuit’s voltage and current, without reference to phase angle. The voltage is almost constant for a given geographical region but the sensor values has a bit variation and we will see later if SensiML Toolkit's AutoML is going to use this feature or not. The electrical characteristics has very specific signature for individual appliances or combination of appliances. As we can see in the graph below which depicts two events when the lamp is switched off and fan is switched on in succession with few seconds delay.
It is assumed that QORK-SDK repository has been cloned in the home directory and all build toolchain has been setup.
Clone the repository:
$ cd ~/qork-sdk
$ source envsetup.sh
$ cd qf_apps
$ git clone https://github.com/metanav/Challenge_Climate_Change.git
$ cd challenge_climate_change
Make sure to change the firmware mode to data collection in the inc/app_config.h.
#define S3AI_FIRMWARE_IS_COLLECTION  1
#define S3AI_FIRMWARE_IS_RECOGNITION 0
We need TinyFPGA-Programmer-Application to flash the firmware. Please follow the instruction here to install: https://github.com/QuickLogic-Corp/TinyFPGA-Programmer-Application
$ cd GCC_Project
$ make
$ qfprog --port /dev/ttyACM0 --m4app output/bin/Challenge_Climate_Change.bin --mode m4
Device Plugins are a list of properties that describe how the Data Capture Lab (DCL) will collect data from the device. The Data Capture Lab allows us to import Device Plugins via SSF files. Below is the SSF file contents which is used to import into DCL.
{
  "name": "QuickFeather Simple Stream [Custom]",
  "uuid": "a612edcc-58fe-a534-15d7-1255447308ee",
  "collection_methods": [
   {
      "name": "live",
      "display_name": "Live Stream Capture",
      "storage_path": null,
      "is_default": true
   }],
  "device_connections": [
  {
    "display_name": "Serial Port",
    "value": 1,
    "is_default": true,
    "serial_port_configuration": {
      "com_port": null,
      "baud": 115200,
      "stop_bits": 1,
      "parity": 0,
      "handshake": 0,
      "max_live_sample_rate": 3301
    }
  },
  {
    "display_name": "Wi-Fi",
    "value": 2,
    "is_default": true,
    "wifi_configuration": {
      "use_external_broker": false,
      "external_broker_address": "",
      "broker_port": 1885,
      "device_ip_address": "192.168.3.6",
      "device_port": 5555,
      "max_live_sample_rate": 1000000
    }
  }],
  "capture_sources": [
  {
    "max_throughput": 0,
    "name": "Energy_Meter",
    "part": "HWL8032",
    "sample_rates": [
        6,
        7,
        8
    ],
    "is_default": true,
    "sensors": [
    {
      "column_count": 4,
      "is_default": true,
      "column_suffixes": [
        "VA",
        "mA",
        "W",
        "V"
      ],
      "type": "Energy_Meter_IC",
      "parameters": [],
      "sensor_id": 1529804975,
      "can_live_stream": true
    }]
  }],
  "is_little_endian": true
}The model that gets generated for the device is called a Knowledge Pack. A Knowledge Pack contains the device firmware code for inferencing.
There are standard steps to build a model for every machine leaning projects for edge devices.
1. Raw Data Capture
2. Data Labelling
3. Model preparation
4. Model training
5. Inferencing on the device
The SensiML Toolkit helps to automate most of the above-mentioned steps.
For each classes, the sensor data is captured for 4 minutes. Since the electricity load is a continuous event for a given duration, the captured data is annotated with single segment.
Data Collection DemoKnowledge Pack creation using SensiML Analytics Studio DemoFlash recognition firmwareIt is assumed that application repository was cloned as mentioned in the previous steps.
$ cd qork-sdk/qf_apps/challenge_climate_changeMake sure to change the firmware mode to recognition in the inc/app_config.h.
#define S3AI_FIRMWARE_IS_COLLECTION  0
#define S3AI_FIRMWARE_IS_RECOGNITION 1
Build and flash the firmware:
$ cd GCC_Project
$ make
$ qfprog --port /dev/ttyACM0 --m4app output/bin/Challenge_Climate_Change.bin --mode m4The inferencing rate as shown in the demo seems slow because the sample rate is 6 and we are using 4 seconds of samples (total 24 samples) for inferencing. Also, there is a message queue in the application which buffers data from the HLW8032 sensor so the knowledge pack takes a bit time to reach at current event changes.
Inferencing Demo using SensiML Open GatewayConclusionWe have demonstrated the application with the line powered QuickFeather. Since QuickFeather is only getting data from the sensor over UART so it can be powered using battery. Although we have used 4 classes using only 2 electrical appliances but the application is scalable and with capturing more data and training the model for many other appliances it can easily classify whole household appliances loads. Also, in future I would like to try hierarchal models to improve the model robustness for scaled version. The QuickFeather development board and SensiML Toolkit has great potential to build and deploy a machine learning pipeline for edge devices. I would like to see Data Capture Lab for MacOS and Linux in the near future.


Comments
Please log in or sign up to comment.