Programmable I/O (PIO) is a new piece of hardware developed for RP2040. It allows us to create new types of (or additional) hardware interfaces on RP2040-based device. The RP2040 have dedicated hardware PWM but in this small project we are going to use PIO to drive a servo motor.
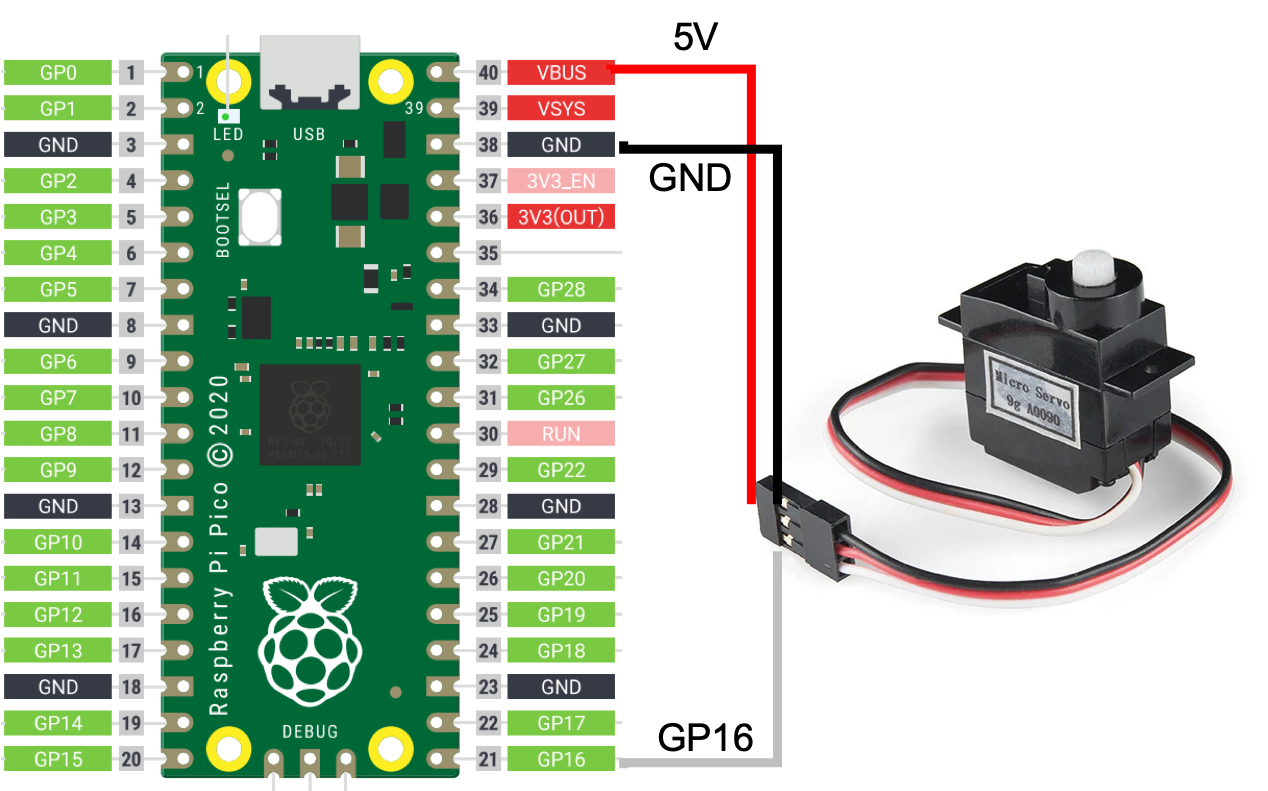
Hardware SetupPlease see the Schematics section for wirings diagram.
Development Environment SetupPlease follow instructions here to install the C/C++ SDK and toolchain.
Main Program#include "hardware/clocks.h"
#include "hardware/pio.h"
#include "pico/stdlib.h"
#include "pico_servo.pio.h"
#define MIN_DC 650
#define MAX_DC 2250
const uint SERVO_PIN = 16;
/* Write `period` to the input shift register */
void pio_pwm_set_period(PIO pio, uint sm, uint32_t period) {
pio_sm_set_enabled(pio, sm, false);
pio_sm_put_blocking(pio, sm, period);
pio_sm_exec(pio, sm, pio_encode_pull(false, false));
pio_sm_exec(pio, sm, pio_encode_out(pio_isr, 32));
pio_sm_set_enabled(pio, sm, true);
}
/* Write `level` to TX FIFO. State machine will copy this into X */
void pio_pwm_set_level(PIO pio, uint sm, uint32_t level) {
pio_sm_put_blocking(pio, sm, level);
}
int main() {
PIO pio = pio0;
int sm = 0;
uint offset = pio_add_program(pio, &pico_servo_pio_program);
float freq = 50.0f; /* servo except 50Hz */
uint clk_div = 64; /* make the clock slower */
pico_servo_pio_program_init(pio, sm, offset, clk_div, SERVO_PIN);
uint cycles = clock_get_hz(clk_sys) / (freq * clk_div);
uint32_t period = (cycles -3) / 3;
pio_pwm_set_period(pio, sm, period);
uint level;
int ms = (MAX_DC - MIN_DC) / 2;
bool clockwise = false;
while (true) {
level = (ms / 20000.f) * period;
pio_pwm_set_level(pio, sm, level);
if (ms <= MIN_DC || ms >= MAX_DC) {
clockwise = !clockwise;
}
if (clockwise) {
ms -= 100;
} else {
ms += 100;
}
sleep_ms(500);
}
}The program below generate PWM signals on a GPIO pin.
; Side-set pin 0 is used for PWM output
.program pico_servo_pio
.side_set 1 opt
  pull noblock  side 0 ; Pull from FIFO to OSR if available, else copy X to OSR.
  mov x, osr        ; Copy most-recently-pulled value back to scratch X
  mov y, isr        ; ISR contains PWM period. Y used as counter.
countloop:
  jmp x!=y noset  ; Set pin high if X == Y, keep the two paths length matched
  jmp skip  side 1
noset:
  nop  ; Single dummy cycle to keep the two paths the same length
skip:
  jmp y-- countloop ; Loop until Y hits 0, then pull a fresh PWM value from FIFO

% c-sdk {
  static inline void pico_servo_pio_program_init(PIO pio, uint sm, uint offse t, uint clk_div, uint pin) {
  pio_gpio_init(pio, pin);
  pio_sm_set_consecutive_pindirs(pio, sm, pin, 1, true);
  pio_sm_config c = pico_servo_pio_program_get_default_config(offset);
  sm_config_set_sideset_pins(&c, pin);
  sm_config_set_clkdiv(&c, clk_div);
  pio_sm_init(pio, sm, offset, &c);
}
%}
This program was tested with a micro servo (9g A0090). It should work with similar servos. All the standard servos should response with the values between 1000ms and 2000ms. In my case I was able to achieve min and max angles using the configuration below, please change it in the main.c to match with your servo.
#define MIN_DC 650
#define MAX_DC 2250$ export PICO_SDK_PATH=/path/to/pico/pico-sdk
$ git clone https://github.com/metanav/pico_servo_pio.git
$ cd pico_servo_pio
$ mkdir build && cd build
$ cmake ..
$ makeWe can upload the generated pico_pio_pwm.uf2 binary file to the Raspberry Pi Pico by following the steps below.
- Push and hold the BOOTSEL button and plug the Raspberry Pi Pico into the USB port of your computer. It will mount as a Mass Storage Device called RPI-RP2.
- Drag and drop the pico_pio_pwm.uf2 binary onto the RPI-RP2 volume.
After flashing the binary the Raspberry Pi Pico will reboot and the program will start running.


Comments
Please log in or sign up to comment.