


Hardware components | ||||||
 |
| × | 1 | |||
 |
| × | 1 | |||
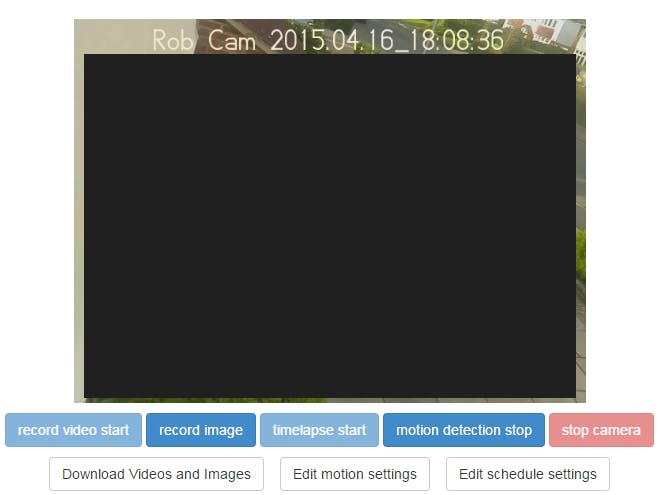
With the Raspberry Pi 3 B and the official Raspberry Pi camera, setting up a security system is surprisingly easy. A useful utility enables one to immediately get a web enabled system up and running. The project can be found at http://elinux.org/RPi-Cam-Web-Interface.
To get started you will need to have a Raspberry Pi running Raspbian. If you have a model before the 3 this will require a USB WiFi adapter.
Connect the Camera to PiYou will now need to connect the Raspberry Pi camera to the Raspberry Pi. You can find installation instructions at https://thepihut.com/blogs/raspberry-pi-tutorials/16021420-how-to-install-use-the-raspberry-pi-camera if you can't figure out how to connect it. The camera may be disabled by default, so you may need to go to the Raspberry Pi Configuration settings.
After enabling this, we will now need to open a terminal window. To ensure full compatibility you will want to make sure all packages and system software is updated. This can take quite a while depending upon how long it has been since you last updated. To do this you need to run the following commands in a terminal window.
sudo apt-get update
sudo apt-get dist-upgrade
If camera core software updates have been done then a sudo RPI-update may be used to benefit from these before they become available as standard.
GithubThe RPI Cam Web Interface project is stored in GitHub, so make sure you have Git installed. You will find out if you don't when running the below commands if you aren't certain about its install status. The install script will prompt you to select various settings, if you aren't sure what to select it is safe to go with the defaults.
git clone https://github.com/silvanmelchior/RPi_Cam_Web_Interface.git
cd RPi_Cam_Web_Interface
chmod u+x *.sh
./install.sh
Now, you can now go to http://localhost/html, unless you have modified the port or subfolder. If everything worked out, you should now see a live feed of your webcam data.
If you want to make this webcam data accessible outside your local network, you will need to use a tool such as https://ngrok.com/ to create a secure tunnel outside of your local network. In my tests, the stream latency was less than a second using ngrok, so it should work for almost all situations.
If using ngrok, be aware that anyone could theoretically visit, https://your_ngrok_url.ngrok.io/html and see a live feed of your camera data, so just be aware of the privacy concerns regarding the default config (there are authentication options in the install script if you want). To start ngrok, you need only download it and then run "./ngrok http 80".
If you have any questions or run into any difficulties, leave a comment below.


Comments
Please log in or sign up to comment.